Rocketfish RF-QS2 Quick Setup Guide (English) - Page 1
Rocketfish RF-QS2 Manual
 |
View all Rocketfish RF-QS2 manuals
Add to My Manuals
Save this manual to your list of manuals |
Page 1 highlights
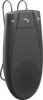
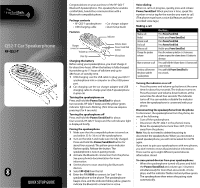
QS2-T Car Speakerphone RF-QS2-T QUICK SETUP GUIDE Congratulations on your purchase of the RF-QS2-T Bluetooth Speakerphone. This speakerphone enables comfortable, hands-free communication with a Bluetooth-compatible phone. Package contents • RF-QS2-T speakerphone • Car charger adapter • USB charging cable • Quick Setup Guide Features Indicator Charger connector Volume up Visor clip Volume down Power/Send/End button Microphone Charging the battery Before using your speakerphone, you must charge it for about two hours. When the battery is fully charged, it provides up to 11 hours of talk time and up to 480 hours of standby time. 1 USB charging: use the USB cable to plug your QS2-T speakerphone into a computer or other USB power port. 2 Car charging: use the car charger adapter and USB charging cable to charge your QS2-T speakerphone in your car. Turning the speakerphone on Press and hold the Power/Send/End for about two seconds. RF-QS2-T beeps and the yellow-green indicator light starts blinking. (First time use requires pressing it for 4 seconds.) Turning the speakerphone off Press and hold the Power/Send/End for about four seconds, RF-QS2-T beeps and the red indicator light is displayed briefly. Pairing the speakerphone 1 Make sure that the compatible phone is turned on and within 33 ft. (10 m) of the speakerphone. 2 Turn on the QS2-T and make sure it's fully charged. Press and hold the Power/Send/End button for about four seconds. The yellow-green indicator flashes rapidly. Release the button. The speakerphone is now in pairing mode. 3 Activate the Bluetooth connection from the phone. See your phone's documentation for more information. 4 Set the phone to start searching for Bluetooth devices. 5 Select RF-QS2 from the list. 6 Enter the PIN 0000 to connect (or "pair") the speakerphone to the phone. The speakerphone beeps once, and the indicator blinks yellow-green to indicate the Bluetooth connection is active. Voice dialing When no call is in progress, quickly press and release Power/Send/End. When you hear a tone, speak the number or voice tag for the number you want to call. (The phone must have a voice dial feature and have recorded voice tags.) Making a call To... Make a call Redial Answer a call End a call Refuse a call Change the speaker volume Mute or unmute a call Switch a call between the phone and the speakerphone Do this... Press Power/Send/End. Double-press Power/Send/End. Press Power/Send/End. Press Power/Send/End. Double-press Power/Send/End. Press the volume up button (+) to increase volume or press the volume down (-) button to decrease. Press and hold the Volume down (-) button until a tone is heard. Press and hold Power/Send/End for two seconds. Turning the indicator on or off • Press the power and volume up buttons at the same time for about four seconds. The indicator turns on. Press the power and volume down buttons at the same time for about four seconds. The indicator turns off. You can enable or disable the indicator when the speakerphone is connected with your phone. Disconnecting the speakerphone from the phone To disconnect the speakerphone from the phone, do one of the following: • Turn off the speakerphone. • Disconnect the RF-QS2-T in the phone's menu. • Move the speakerphone more than 33 ft. (10 m) away from the phone. Note: You do not need to delete the pairing to disconnect the speakerphone. When you reconnect a paired speakerphone, you will not be asked for its PIN again. If you want to pair your speakerphone with new phones, you don't need to erase all paired device information. There can be up to eight different paired devices information stored. To erase paired devices from your speakerphone: • When the speakerphone turned off, press and hold the Power/Send/End and volume up (+) buttons simultaneously for more than six seconds. A tone plays, and the indicator flashes red and yellow-green. The speakerphone then enters the pairing state automatically.
-
 1
1 -
 2
2
 |
 |