Ryobi AG700 English Manual - Page 14
Warning, Danger, Grinding
 |
View all Ryobi AG700 manuals
Add to My Manuals
Save this manual to your list of manuals |
Page 14 highlights
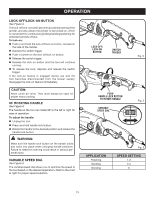
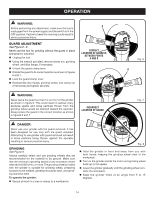
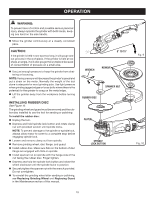
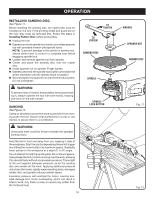
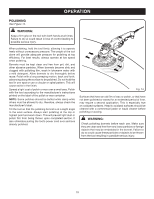
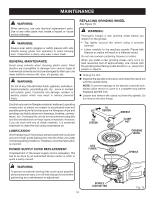
OPERATION WARNING: Before performing any adjustment, make sure the tool is unplugged from the power supply and the switch is in the OFF position. Failure to heed this warning could result in serious personal injury. GUARD ADJUSTMENT See Figure 6 - 8. Never use the tool for grinding without the guard in place and properly adjusted. Unplug the tool. Using the wrench provided, remove clamp nut, grinding wheel, and disc flange, if necessary. Unlock the guard clamp lever. Rotate the guard to its correct position as shown in figures 6 and 7. Lock the guard clamp lever. Reassemble disc flange, grinding wheel, and clamp nut (if removed) and tighten securely. A Correct location of guard is BETWEEN POINTS A AND B Fig. 6 B WARNING: Never place the guard so that it is on front of the grinder as shown in figure 8. This could result in serious injury because sparks and loose particles thrown from the grinding wheel would be directed toward the operator. Always place the guard in the correct location as shown in figures 6 and 7. Incorrect location of guard Fig. 7 DANGER: Never use your grinder with the guard removed. It has been designed for use only with the guard installed. Attempting to use grinder with guard removed will result in loose particles being thrown against the operator resulting in serious personal injury. GRINDing See Figure 9. Always carefully select and use grinding wheels that are recommended for the material to be ground. Make sure that the minimum operating speed of any accessory wheel selected is 6,800 r/min. or more. The grinding wheel provided with the grinder is suitable for grinding welds, preparing surfaces to be welded, grinding structural steel, and grinding stainless steel. To operate the grinder: Secure all work in a vise or clamp to a workbench. Fig. 8 Hold the grinder in front and away from you with both hands, keeping the grinding wheel clear of the workpiece. Turn on the grinder and let the motor and grinding wheel build up to full speed. Lower the grinder gradually until the grinding wheel contacts the workpiece. Keep the grinder tilted at an angle from 5 to 15 degrees. 14
-
 1
1 -
2
-
3
-
4
-
5
-
6
-
7
-
8
-
 9
9 -
 10
10 -
 11
11 -
 12
12 -
 13
13 -
 14
14 -
 15
15 -
 16
16 -
 17
17 -
 18
18 -
 19
19 -
20
-
21
-
22
 |
 |
