Ryobi AG700 English Manual - Page 20
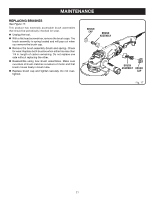
Warning, Danger, Replacing Guard
 |
View all Ryobi AG700 manuals
Add to My Manuals
Save this manual to your list of manuals |
Page 20 highlights
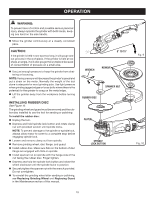
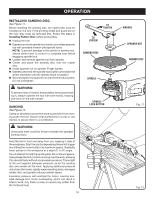
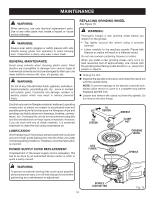
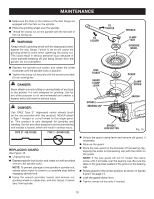
MAINTENANCE Make sure the flats on the bottom of the disc flange are engaged with the flats on the spindle. Place the grinding wheel over the spindle. Thread the clamp nut on the spindle with the flat side of the nut facing up. WARNING: Always install a grinding wheel with the depressed center against the disc flange. Failure to do so will cause the grinding wheel to crack when tightening the clamp nut. This could result in serious personal injury because of loose particles breaking off and being thrown from the grinder. Do not overtighten. Depress the spindle lock button and rotate the wheel clockwise until the spindle locks in position. Tighten the clamp nut securely with the wrench provided. Do not overtighten. DANGER: Never attach a wood cutting or carving blade of any type to this grinder. It is only designed for grinding. Use for any other purpose is not recommended and creates a hazard, which will result in serious injury. DANGER: Use ONLY Type 27 depressed center wheels (such as the one provided with this product). Never attach a Type 1 straight or cut-off wheel to this angle grinder. This product is only designed for grinding and sanding. Use for any other purpose is not recommended and creates a hazard, which will result in serious injury. Type 27 − OK to use Type 1 − do not use REPLACING GUARD See Figure 16. Unplug the tool. Depress spindle lock button and rotate nut with provided wrench until spindle locks. NOTE: To prevent damage to the spindle or spindle lock, always allow motor to come to a complete stop before engaging spindle lock. Using the wrench provided, loosen and remove nut, grinding wheel or rubber disc, and disc flange, if necessary, from spindle. to tighten to loosen Wrench Clamp nut Grinding Wheel Disc Flange GUARD CLAMP LEVER Spindle BEARING CAP Guard Clamp Screw arrow Spindle Lock Button Fig. 16 Unlock the guard clamp lever and remove old guard, if necessary. Remove the guard. Place the new guard on the shoulder of the bearing cap, aligning the arrow on the bearing cap with the notch on the guard. NOTE: If the new guard will not fit, loosen the clamp screw until it will slide over the bearing cap. Be sure the tabs on the guard are seated in the groove in the bearing cap. Rotate guard to the correct position as shown in figures 6 and 7 on page 14. Lock the guard clamp lever. Tighten clamp nut securely if needed. 20
-
 1
1 -
2
-
3
-
4
-
5
-
6
-
7
-
8
-
9
-
10
-
11
-
12
-
13
-
14
-
 15
15 -
 16
16 -
 17
17 -
 18
18 -
 19
19 -
 20
20 -
 21
21 -
 22
22
 |
 |
