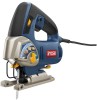
Ryobi JS480L Operation Manual - Page 9
Operation - blades
 |
View all Ryobi JS480L manuals
Add to My Manuals
Save this manual to your list of manuals |
Page 9 highlights
OPERATION WARNING: Do not allow familiarity with this product to make you careless. Remember that a careless fraction of a second is sufficient to inflict serious injury. WARNING: Always wear eye protection with side shields marked to comply with ANSI Z87.1. Failure to do so could result in objects being thrown into your eyes and other possible serious injuries. WARNING: Do not use any attachments or accessories not recommended by the manufacturer of this tool. The use of attachments or accessories not recommended can result in serious personal injury. APPLICATIONS You may use this product for the purposes listed below: Cutting all types of wood products (lumber, plywood, paneling, composition board and hard board) Cutting thin sheet metal (metal cutting blade not included) Cutting plastics and laminates STARTING / STOPPING THE SAW See Figure 3, page 13. To turn the saw ON, depress the switch trigger. Release the switch trigger to turn the saw OFF. LOCK-ON BUTTON See Figure 3, page 13. The saw is equipped with a lock-on feature which is convenient when continuous cutting for extended periods of time is required. To lock-on: Depress the switch trigger. Push in and hold the lock-on button located on the side of the handle. Release switch trigger. Release lock-on button. To release: Depress the switch trigger to release. If you have the lock-on feature engaged during use and the saw becomes disconnected from power supply, disengage the lock-on feature immediately. WARNING: Before connecting the saw to power supply source, always check to be sure it is not in lock-on position (depress and release switch trigger). Failure to do so could result in accidental starting of the saw resulting in possible serious injury. Also, do not lock the trigger on jobs where the saw may need to be stopped suddenly. VARIABLE SPEED CONTROL SELECTOR See Figure 4, page 13. The saw has a variable speed control selector designed to allow operator control and adjustment of speed and power limits. The speed and power of the saw can be increased or decreased by rotating the variable speed control selector in the direction of the arrows shown in figure 4. NOTE: Hold the saw in normal operating position and turn the variable speed control selector to the positive ( + ) symbol to increase speed and power. Turn to the negative ( − ) symbol to decrease speed and power. If you desire to lock the switch on at a given speed, depress the switch trigger, push in and hold the lock-on button, and release the switch trigger. Next, adjust the variable speed control selector until the desired speed is reached. Avoid running the saw at low speeds for extended periods of time. Running at low speeds under constant usage may cause your saw to become overheated. If this occurs, cool your saw by running it without a load and at full speed. The following guidelines may be used in determining correct speed for various applications: SLOW speed is ideal when minimum speed and power is required, for example, starting cuts. MEDIUM speed is suitable for cutting hard metals, plastics, and laminates. MAX speed produces best results when maximum power is required, for example, cutting wood. Soft metals such as aluminum, brass, and copper may also require high speeds. WARNING: Do not insert saw blade into air vents. They could come in contact with electrically live internal parts, and cause electrical shock resulting in serious injury. LED LIGHT See Figure 5, page 13. The LED light illuminates when the switch trigger is depressed to give you a clear view of the cut line on your work surface. 9 - English
-
 1
1 -
2
-
3
-
 4
4 -
 5
5 -
 6
6 -
 7
7 -
 8
8 -
 9
9 -
 10
10 -
 11
11 -
 12
12 -
 13
13 -
 14
14 -
15
-
16
-
17
-
18
-
19
-
20
-
21
-
22
-
23
-
24
-
25
-
26
-
27
-
28
-
29
-
30
-
31
-
32
-
33
-
34
-
35
-
36
-
37
-
38
-
39
-
40
 |
 |
