Ryobi P137 Operation Manual - Page 4
Operation
 |
View all Ryobi P137 manuals
Add to My Manuals
Save this manual to your list of manuals |
Page 4 highlights
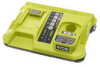
OPERATION WARNING: Do not allow familiarity with products to make you careless. Remember that a careless fraction of a second is sufficient to inflict serious injury. WARNING: Always wear eye protection with side shields marked to comply with ANSI Z87.1. Failure to do so could result in objects being thrown into your eyes resulting in possible serious injury. APPLICATIONS You may use this product for the following purpose: Charging RYOBI™ 18V and 40V Lithium-ion battery packs CAUTION: If at any point during the charging process none of the LEDs are lit, remove the battery pack from the charger to avoid damaging the product. DO NOT insert another battery. Return the charger and battery to your nearest authorized service center for service or replacement. NOTICE: Charge in a well-ventilated area. Do not block charger vents. Keep them clear to allow proper ventilation. KEY HOLE HANGER See Figure 1, page 6. Use the keyhole mounting feature to mount the charger. When mounted vertically, screws should be installed so that the center distance is 5 in. When mounted horizontally, screws should be installed so that the center distance is 6 in. CHARGING See Figures 1 - 6, pages 7 - 8. Battery packs are shipped in a low charge condition. Therefore, you should charge them before first use. If the charger does not charge your battery pack under normal circumstances, return both the battery pack and charger to your nearest repair center for electrical check. Charge time is dependent upon the type of battery pack. Make sure the power supply is normal household voltage, 120 volts, AC only, 60 Hz. Connect the charger to a power supply. Attach a 40V and/or an 18V battery pack to the charger. • For 40V battery packs, align the raised ribs on the battery pack with the grooves in the 40V battery port then slide the battery pack onto the battery port. • For 18V battery packs, insert the battery pack into the 18V battery port. Make sure the latches on each side of the battery pack snap in place and that battery pack is secured. Press down on the battery pack to be sure contacts on the battery pack engage properly with contacts in the charger. Do not place the charger in an area of extreme heat or cold. It will work best at normal room temperature. Battery packs may become slightly warm to the touch while charging. This is normal and does not indicate a problem. After charging is complete, the green LED will remain on. If a fully charged battery pack is not removed, the green LED will begin fading on and off continuously. This indicates the battery is fully charged and the charger is in standby mode. Charger will periodically wake from standby mode to ensure the battery pack remains in a fully charged state. To remove a battery pack from the charger, depress latch or latches and pull the battery pack away from the battery port. CHARGING A HOT BATTERY PACK When using a tool continuously, the battery pack may become hot. A hot battery pack may be placed directly onto the charger port but charging will not begin until the battery temperature cools to within acceptable temperature range. When a hot battery pack is placed on the charger, the red LED will begin flashing and the green LED will be off. When the battery pack cools, the charger will automatically begin charging. CHARGING A COLD BATTERY PACK A cold battery pack may be placed directly onto the charger port but charging will not begin until the battery temperature warms to within acceptable temperature range. When a cold battery pack is placed on the charger, the red LED will begin flashing and the green LED will be off. When the battery pack warms, the charger will automatically begin charging. 4 - English
-
 1
1 -
 2
2 -
 3
3 -
 4
4 -
 5
5 -
 6
6 -
 7
7 -
 8
8 -
 9
9 -
 10
10 -
11
-
12
-
13
-
14
-
15
-
16
-
17
-
18
-
19
-
20
 |
 |
