Ryobi P212 English Manual - Page 10
Assembly, Operation - hammer drill
 |
View all Ryobi P212 manuals
Add to My Manuals
Save this manual to your list of manuals |
Page 10 highlights
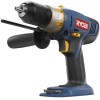
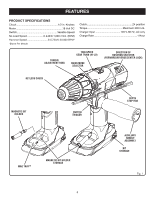
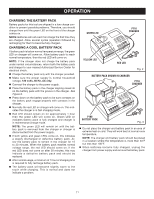
ASSEMBLY UNPACKING This product has been shipped completely assembled. Carefully remove the tool and any accessories from the box. Make sure that all items listed in the packing list are included. Inspect the tool carefully to make sure no breakage or damage occurred during shipping. Do not discard the packing material until you have carefully inspected and satisfactorily operated the tool. If any parts are damaged or missing, please call 1-800-525-2579 for assistance. PACKING LIST Hammer Drill with Auxiliary Handle Assembly Magnetic Bit Holder Bits (2) Lanyard (Not included in combo) Operator's Manual Warranty Registration Card WARNING: If any parts are damaged or missing do not operate this tool until the damaged or missing parts are replaced. Failure to do so could result in possible serious personal injury. WARNING: Do not attempt to modify this tool or create accessories not recommended for use with this tool. Any such alteration or modification is misuse and could result in a hazardous condition leading to possible serious personal injury. WARNING: To prevent accidental starting that could cause serious personal injury, always remove the battery pack from the tool when assembling parts. OPERATION WARNING: Do not allow familiarity with tools to make you careless. Remember that a careless fraction of a second is sufficient to inflict serious injury. WARNING: Always wear safety goggles or safety glasses with side shields when operating tools. Failure to do so could result in objects being thrown into your eyes, resulting in possible serious injury. WARNING: Do not use any attachments or accessories not recommended by the manufacturer of this tool. The use of attachments or accessories not recommended can result in serious personal injury. APPLICATIONS You may use this tool for the following purposes: Drilling in wood Drilling in ceramics, plastics, fiberglass, and laminates Drilling in metals Mixing paint Hammer drilling in concrete, brick, or other masonry CAUTION: If at any point during the charging process none of the LEDs are lit, remove the battery pack from the charger to avoid damaging the product. DO NOT insert another battery. Return the charger and battery to your nearest service center for service or replacement. LED FUNCTIONS OF CHARGER LED WILL BE ON TO INDICATE STATUS OF CHARGER AND BATTERY PACK: Red LED on = Fast charging mode. Green LED on = Fully charged and in trickle charge mode. Green LED on = When battery pack is inserted into charger, indicates hot battery pack or that battery pack is out of or below normal temperature range. Yellow and Green LEDs on = Deeply discharged or defective battery pack. No LED on = Defective charger or battery pack. 10
-
 1
1 -
2
-
3
-
4
-
 5
5 -
 6
6 -
 7
7 -
 8
8 -
 9
9 -
 10
10 -
 11
11 -
 12
12 -
 13
13 -
 14
14 -
 15
15 -
16
-
17
-
18
-
19
-
20
-
21
-
22
 |
 |