Ryobi P3105 Operation Manual - Page 6
Operation, Maintenance
 |
View all Ryobi P3105 manuals
Add to My Manuals
Save this manual to your list of manuals |
Page 6 highlights
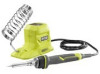
OPERATION NOTE: The LED indicator flashes quickly until it reaches the maximum operating temperature. Once the maximum temperature is reached, the indicator will glow solid. Press the on/off switch to turn the soldering iron off. NOTE: The LED indicator will flash a slower pattern for 10 minutes while the tip cools. Do not touch the tip while the LED indicator is solid or flashing. AUTOMATIC SHUT-OFF After 10 minutes of operation, the unit will automatically power down and the LED will flash slowly. This preserves the tip and prevents powering an unattended tool. To restore power, press the on/off switch to turn the unit back on. OPERATING THE SOLDERING IRON See Figure 3, page 7. Always hold the soldering iron pen as shown. Apply solder with the tip of the pen. Apply soldering wire only to the tip of the tool at the point where it touches the workpiece. After soldering, return the pen to the pen holder. Press firmly to make sure it is secure. Press the on/off switch to turn the soldering iron off. NOTE: The LED indicator will flash a slower pattern for 10 minutes while the tip cools. Do not touch the tip while the LED indicator is solid or flashing. Clean the soldering tip as described in the Maintenance section of this manual. WARNING: Always place the pen back into the holder so that the tip does not come in contact with anything while it is heating or when not in use. Following this rule will reduce the risk of damage to items, burns, fire, or serious personal injury. Always allow 30 minutes for the soldering iron to cool before storing the tool. MAINTENANCE WARNING: When servicing, use only identical replacement parts. Use of any other parts could create a hazard or cause product damage. GENERAL MAINTENANCE Avoid using solvents when cleaning plastic parts. Most plastics are susceptible to damage from various types of commercial solvents and may be damaged by their use. Use clean cloths to remove dirt, dust, oil, grease, etc. While the tip is hot, wipe the tip against a damp sponge or a metallic wool pad to remove debris. Keeping a clean tip is important to extend the life of the tip and will improve solder melting and flow during use. REPLACING SOLDERING TIPS See Figure 4, page 7. WARNING: Always allow the soldering tip to cool for a minimum of 30 minutes before removing the tip. Touching a hot soldering tip can result in serious personal injury. Remove the battery pack from the tool. Loosen the nut by turning counterclockwise and remove from tip. Remove the sleeve by sliding off the pen. Pull to remove the tip and insert a replacement tip. Push the new tip onto the ceramic heating element. Hold the body of the pen and slide the sleeve over the new tip. Reinstall the nut. STORAGE Always remove the battery pack and allow the soldering iron to cool completely before storing. WARNING: Always remove the battery pack before storage to ensure the product is off. Allow a minimum of 30 minutes of cool-down time before storage. Storing a soldering iron with a hot tip can cause serious burns and/or ignite combustible objects. NOTE: ILLUSTRATIONS START ON PAGE 7 FOLLOWING FRENCH AND SPANISH LANGUAGE SECTIONS 6 - English
-
 1
1 -
 2
2 -
 3
3 -
 4
4 -
 5
5 -
 6
6 -
 7
7 -
 8
8 -
 9
9 -
 10
10 -
 11
11 -
 12
12 -
13
-
14
-
15
-
16
-
17
-
18
-
19
-
20
 |
 |
