Ryobi P360 User Manual - Page 9
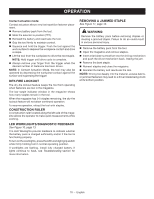
Removing Staples From The Tool, Setting The Air Pressure, Adjusting Depth Of Drive, Driving Staples
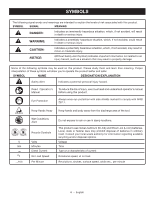
 |
View all Ryobi P360 manuals
Add to My Manuals
Save this manual to your list of manuals |
Page 9 highlights
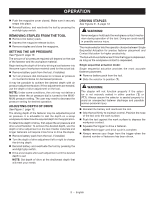
OPERATION Push the magazine cover closed. Make sure it securely snaps into place. Reinstall battery, and reactivate the tool by pressing the worklight grip switch. REMOVING STAPLES FROM THE TOOL Remove the battery pack. Depress the magazine release button. Remove staples and close the magazine. SETTING THE AIR PRESSURE See Figure 6, page 13. The amount of air pressure required will depend on the size of the fastener and the workpiece material. Begin testing the depth of drive by driving a test fastener into the same type of workpiece material used for the actual job. Remove battery pack from the tool, if installed. Turn air pressure dial clockwise to increase air pressure or counterclockwise for decreased pressure. It may be possible to achieve the desired depth with air pressure adjustments alone. If finer adjustments are needed, use the depth of drive adjustment on the tool. NOTE: Under some conditions, the unit may not deliver a fastener when the air pressure dial is turned to the MAXIMUM pressure setting. The user may need to decrease the pressure setting for desired operation. ADJUSTING DEPTH OF DRIVE See Figure 7, page 13. The driving depth of the fastener may be adjusted beyond air pressure. It is advisable to test the depth on a scrap workpiece to determine the required depth for the application. To determine depth of drive, first adjust the air pressure and drive a test fastener. To achieve the desired depth, use the depth of drive adjustment on the tool. Harder materials and longer fasteners will require more force to drive the staple. Remove battery pack from the tool, if installed. Turn the depth of drive adjustment left or right to change the driving depth. Reinstall battery and reactivate the tool by pressing the worklight grip switch. Drive a test staple after each adjustment until the desired depth is set. NOTE: Set depth of drive at the shallowest depth that will meet your needs. DRIVING STAPLES See Figures 8 - 9, page 13. WARNING: Never wedge or hold back the workpiece contact mechanism during operation of the tool. Doing so could result in possible serious injury. The mode selector lets the operator choose between Single Sequential Actuation for precise fastener placement and Contact Actuation for higher productivity. The tool will drive a fastener each time the trigger is depressed, as long as the workpiece contact is depressed. Single sequential actuation mode: Single sequential actuation provides the most accurate fastener placement. Remove battery pack from the tool. Slide the selector to position ( ). WARNING: The stapler will not function properly if the selector is not securely seated in either position ( ) or ( ). Always assure the selector is seated properly to avoid an unexpected fastener discharge and possible serious personal injury. Reinstall the battery and reactivate the tool. Grip the tool firmly to maintain control. Position the nose of the tool onto the work surface. Push the tool against the work surface to depress the workpiece contact. Squeeze the trigger to drive a fastener. NOTE: Hold trigger until drive cycle is complete. Always remove your finger from the trigger when the desired number of fasteners has been driven. 9 - English
-
 1
1 -
2
-
3
-
 4
4 -
 5
5 -
 6
6 -
 7
7 -
 8
8 -
 9
9 -
 10
10 -
 11
11 -
 12
12 -
 13
13 -
 14
14 -
15
-
16
-
17
-
18
-
19
-
20
-
21
-
22
-
23
-
24
-
25
-
26
-
27
-
28
-
29
-
30
-
31
-
32
-
33
-
34
-
35
-
36
 |
 |