Ryobi RY48130 Operation Manual 1 - Page 4
Unpacking
 |
View all Ryobi RY48130 manuals
Add to My Manuals
Save this manual to your list of manuals |
Page 4 highlights
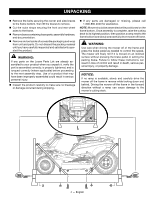
UNPACKING n Remove the bolts securing the corner and side braces to the frame bottom, then lift the braces to remove. n Cut the nylon straps securing the front and rear wheel axles to the frame. n Remove boxes containing loose parts, assembly hardware, and documentation. n Remove and set aside all accessible packaging and wrap from unit and parts. Do not discard the packing material until you have carefully inspected and satisfactorily operated the product. WARNING: If any parts on the Loose Parts List are already assembled to your product when you unpack it, verify the part is a ssembled correctly, is properly tightened, and is torqued correctly (where applicable) before proceeding to the next assembly step. Use of a product that may have been improperly assembled could result in serious personal injury. n Inspect the product carefully to make sure no breakage or damage occurred during shipping. n If any parts are damaged or missing, please call 1-800-860-4050 for assistance. NOTE: Mower should be assembled while positioned on the frame bottom. Once assembly is complete, raise the cutting deck to its highest position, then position a ramp next to the frame bottom and slowly and carefully drive mower off frame. WARNING: Use care when driving the mower off of the frame and press the brake pedal as needed to control the speed. The mower will freely roll if it is moved on an inclined surface without pressing the brake pedal or setting the parking brake. Failure to follow these instructions can result in loss of control and result in death, serious personal injury, or property damage. NOTICE: If no ramp is available, slowly and carefully drive the mower off the frame in reverse while looking down and behind. Driving the mower off the frame in the forward direction without a ramp can cause damage to the mower's cutting deck. 4 - English
-
 1
1 -
 2
2 -
 3
3 -
 4
4 -
 5
5 -
 6
6 -
 7
7 -
 8
8 -
 9
9 -
 10
10 -
11
-
12
-
13
-
14
-
15
-
16
-
17
-
18
-
19
-
20
-
21
-
22
-
23
-
24
-
25
-
26
-
27
-
28
 |
 |
