Ryobi RY48130 Operation Manual 1 - Page 6
Assembly
 |
View all Ryobi RY48130 manuals
Add to My Manuals
Save this manual to your list of manuals |
Page 6 highlights
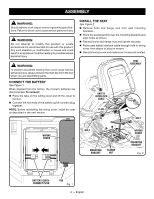
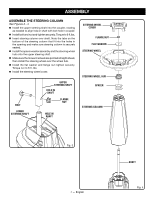
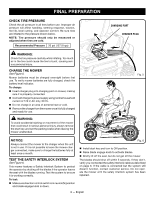
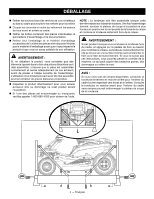
ASSEMBLY WARNING: Strictly adhere to all torque wrench tightening specifications. Failure to do so could cause serious personal injury. WARNING: Do not attempt to modify this product or create accessories not recommended for use with this product. Any such alteration or modification is misuse and could result in a hazardous condition leading to possible serious personal injury. WARNING: To prevent accidental starting that could cause serious personal injury, always remove the start key from the tool when you are assembling parts. CONNECT THE BATTERY See Figure 1. When shipped from the factory, the mower's batteries are disconnected. To connect: Press the tabs on the wiring cover and lift the cover to remove. Connect the two ends of the battery quick-connect plug together. NOTE: Before reinstalling the wiring cover, install the seat as described in the next section. INSTALL THE SEAT See Figure 2. Remove bolts and flange nuts from seat mounting brackets. Place the seat assembly over the mounting brackets and align holes as shown. Reinstall bolts and flange nuts and tighten securely. Route seat safety interlock cable through hole in wiring cover, then attach to plug on mower. Reinstall wiring cover and make sure it is securely seated. SEAT ASSEMBLY SAFETY INTERLOCK CABLE PLUG BOLT WIRING COVER BOLT MOUNTING BRACKET FLANGE NUT WIRING COVER MOUNTING BRACKET Fig. 2 BATTERY QUICKCONNECT PLUG TAB Fig. 1 6 - English
-
 1
1 -
 2
2 -
 3
3 -
 4
4 -
 5
5 -
 6
6 -
 7
7 -
 8
8 -
 9
9 -
 10
10 -
 11
11 -
 12
12 -
13
-
14
-
15
-
16
-
17
-
18
-
19
-
20
-
21
-
22
-
23
-
24
-
25
-
26
-
27
-
28
 |
 |
