Samsung 460CX Quick Start Guide - Page 14
Wall Bracket
 |
UPC - 729507805528
View all Samsung 460CX manuals
Add to My Manuals
Save this manual to your list of manuals |
-
 1
1 -
2
-
3
-
4
-
5
-
6
-
7
-
8
-
 9
9 -
 10
10 -
 11
11 -
 12
12 -
 13
13 -
 14
14 -
 15
15 -
 16
16 -
 17
17 -
 18
18 -
 19
19 -
20
-
21
-
22
-
23
-
24
-
25
-
26
-
27
-
28
-
29
-
30
-
31
-
32
-
33
-
34
-
35
-
36
 |
 |

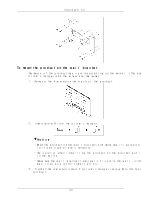
1.
Insert and tighten the Captive Screw in the direction of the ar
When done, mount the wall bracket on the wall.
There are two hinges(left and right). Use the correct one.
A -
Captive Screw
B -
Wall Bracket
C -
Hinge (Left)
D -
Hinge (Right)
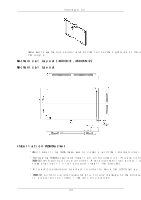
2.
Before
drilling into the wall, check if the length between the tw
the back of the product is correct.
If the length is too short or long, loosen all or some of the 4scre
bracket to adjust the length.
A -
Length between the two locking holes
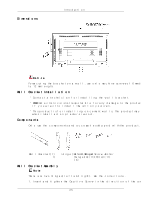
3.
Check
the installation diagram and mark the drill points on the wal
bit to drill holes deeper than 35 mm. Fix each anchor in the corre
Match each of the brackets and hinge holes to the corresponding anc
insert and tighten the 11 screws A.
Introduction
21