Samsung BL1050 User Manual - Page 2
Getting to Know your camera, Instructions - manual
 |
View all Samsung BL1050 manuals
Add to My Manuals
Save this manual to your list of manuals |
Page 2 highlights
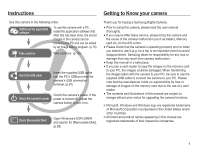
Instructions Use this camera in the following order. Setting up the application software To use this camera with a PC, install the application software first. After this has been done, the stored images in the camera can be moved to the PC and can be edited by an image editing program. (p.79) Take a picture Take a picture. (p.16) Insert the USB cable Insert the supplied USB cable into the PC's USB port and the camera's USB connection terminal. (p.81) Check the camera's power. If the Check the camera's power power is turned off, preset the camera button to turn it on. Check [Removable Disk] Open Windows's EXPLORER and search for [Removable Disk]. (p.82) Getting to Know your camera Thank you for buying a Samsung Digital Camera. å Prior to using this camera, please read the user manual thoroughly. å If you require After Sales service, please bring the camera and the cause of the camera malfunction (such as battery, Memory card etc.) to the A/S centre. å Please check that the camera is operating properly prior to when you intend to use it (e.g. for a trip or an important event) to avoid disappointment. Samsung takes no responsibility for any loss or damage that may result from camera malfunction. å Keep this manual in a safe place. å If you use a card reader to copy the images on the memory card to your PC, the images could be damaged. When transferring the images taken with the camera to your PC, be sure to use the supplied USB cable to connect the camera to your PC. Please note that the manufacturer holds no responsibility for loss or damage of images on the memory card due to the use of a card reader. å The contents and illustrations of this manual are subject to change without prior notice for upgrading the camera functions. Ä Microsoft, Windows and Windows logo are registered trademarks of Microsoft Corporation incorporated in the United States and/or other countries. Ä All brand and product names appearing in this manual are registered trademarks of their respective companies. 1
-
 1
1 -
 2
2 -
 3
3 -
 4
4 -
 5
5 -
 6
6 -
 7
7 -
 8
8 -
9
-
10
-
11
-
12
-
13
-
14
-
15
-
16
-
17
-
18
-
19
-
20
-
21
-
22
-
23
-
24
-
25
-
26
-
27
-
28
-
29
-
30
-
31
-
32
-
33
-
34
-
35
-
36
-
37
-
38
-
39
-
40
-
41
-
42
-
43
-
44
-
45
-
46
-
47
-
48
-
49
-
50
-
51
-
52
-
53
-
54
-
55
-
56
-
57
-
58
-
59
-
60
-
61
-
62
-
63
-
64
-
65
-
66
-
67
-
68
-
69
-
70
-
71
-
72
-
73
-
74
-
75
-
76
-
77
-
78
-
79
-
80
-
81
-
82
-
83
-
84
-
85
-
86
-
87
-
88
-
89
-
90
-
91
-
92
-
93
-
94
 |
 |
