Samsung CLP 610ND SyncThru 5.0 Job Accounting Plug-in Guide (ENGLISH) - Page 12
Getting started, Installing the SyncThru™ Admin 5 Job Accounting Plug-in, Uninstalling - user manual
 |
UPC - 635753720587
View all Samsung CLP 610ND manuals
Add to My Manuals
Save this manual to your list of manuals |
Page 12 highlights
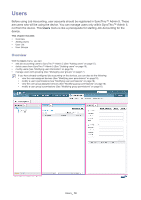
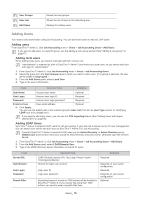
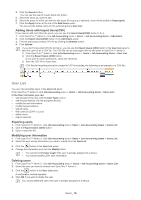
Getting started 2. This chapter gives you instructions for installing the SyncThru™ Admin 5 Job Accounting Plug-in. This chapter includes: • Installing the SyncThru™ Admin 5 Job Accounting Plug-in • Uninstalling the SyncThru™ Admin 5 Job Accounting Plug-in • Upgrading SyncThru™ Admin 5 Job Accounting Plug-in • Configuring Job Accounting from Devices Installing the SyncThru™ Admin 5 Job Accounting Plug-in When you install SyncThru™ Admin 5 Job Accounting Plug-in, you need to check the recommended minimum requirements for your system (See the Getting started chapter of SyncThru™ Admin 5 Admin Guide). • You can install additional plug-ins without stopping and restarting the server. • You can download plug-in files at http://solution.samsungprinter.com. 1. Install SyncThru™ Admin 5 (See the Getting started chapter of SyncThru™ Admin 5 Admin Guide). 2. Open SyncThru™ Admin 5 with a web browser. 3. From SyncThru™ Admin 5, click Settings menu > Settings > SyncThru Management > SyncThru Update. 4. Click the button in the SyncThru Update panel. 5. Upload the Job Accounting Plug-in file you have downloaded. The page is reloaded and Job Accounting is now available as a menu option. Uninstalling the SyncThru™ Admin 5 Job Accounting Plug-in If you want to uninstall SyncThru™ Admin 5 Job Accounting, follow the steps below: 1. Open SyncThru™ Admin 5 with a web browser. 2. From SyncThru™ Admin 5, click Settings menu > Settings > SyncThru Management > SyncThru Update. 3. Select the Plug-in you want to uninstall. 4. Click the button in the SyncThru Update panel. 5. The page is reloaded and Job Accounting has been removed as a menu option. Upgrading SyncThru™ Admin 5 Job Accounting Plug-in Samsung provides new features and enhancements for SyncThru™ Admin 5 Job Accounting Plug-in periodically. If you want to upgrade your SyncThru™ Admin 5 Job Accounting Plug-in, follow the steps below: 1. Open SyncThru™ Admin 5 with your web browser. 2. From SyncThru™ Admin 5, click Settings menu > Settings > SyncThru Management > SyncThru Update. 3. Click the button in the SyncThru Update panel. 4. Upload the Job Accounting Plug-in file you have downloaded. You can download plug-in files at http://solution.samsungprinter.com. Configuring Job Accounting from Devices You can also configure Job Accounting from devices. Adding Users to SyncThru™ Admin 5 First of all, you need to add user information to SyncThru™ Admin 5. There are two types of users: local users and LDAP (Domain) users. You can add users manually or from the LDAP server. You can use grouping for easy management of users. 1. From SyncThru™ Admin 5, click Job Accounting menu > Users > Job Accounting Users. 2. (See "Adding users" on page15). Please make sure that the job accounting users are different from SyncThru™ Admin 5 accounts. Getting started_ 12
-
 1
1 -
2
-
3
-
4
-
5
-
6
-
 7
7 -
 8
8 -
 9
9 -
 10
10 -
 11
11 -
 12
12 -
 13
13 -
 14
14 -
 15
15 -
 16
16 -
 17
17 -
18
-
19
-
20
-
21
-
22
-
23
-
24
-
25
-
26
-
27
-
28
-
29
-
30
-
31
-
32
-
33
-
34
-
35
-
36
-
37
-
38
-
39
-
40
-
41
-
42
-
43
-
44
-
45
-
46
-
47
-
48
-
49
-
50
-
51
-
52
-
53
-
54
-
55
-
56
-
57
-
58
-
59
-
60
-
61
-
62
-
63
-
64
-
65
 |
 |
