Samsung DV5451AEW/XAA User Manual (user Manual) (ver.1.0) (English) - Page 19
Final Installation Checklist - dryer model
 |
View all Samsung DV5451AEW/XAA manuals
Add to My Manuals
Save this manual to your list of manuals |
Page 19 highlights
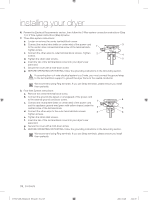
01 Contents U.S. MODELS: IMPORTANT - All U.S. models are designed for a 3-WIRE SYSTEM CONNECTION. The dryer frame is grounded to the neutral conductor at the terminal block. A 4-WIRE SYSTEM CONNECTION is required for new or remodeled construction, mobile homes, or if local codes do not permit grounding through neutral. If you use the 4-wire system, you cannot ground the dryer frame to the neutral conductor at the terminal block. Refer to the following instructions for 3- and 4-WIRE SYSTEM CONNECTIONS: Remove the terminal block cover plate. Insert the power cord with a UL-listed strain relief through the hole provided in the cabinet near the terminal block. A strain relief must be used. Do not loosen the nuts already installed on the terminal block. Be sure they are tight. Use a 3/8" (1cm) deep well socket. 9. Connect the Water Inlet Hose. For instructions, go to Connecting the Inlet Hose on page 10. To ensure that the dryer provides optimal drying performance, it must be level. To level the dryer, follow the lettered steps below: a. Using a level, check if the dryer is level side to side and then front to back. b. If the dryer is not level, adjust the leveling feet on the bottom of the dryer until the washer is level side to side and back to front. Turning the feet clockwise retracts the feet. Turning the feet clockwise loosens and extends them. Level To set the dryer to the same height as the washer, fully retract the leveling feet by turning them counterclockwise, then loosen the feet by turning them clockwise. Once the dryer is the same height as the washer, follow the directions above to level the dryer. Leveling feet Retract fully Then loosen Adjust the leveling feet only as much as necessary to level the dryer. Extending the leveling feet more than necessary can cause the dryer to vibrate. 11. Make sure all gas connections (on gas models), exhaust, and electrical connections are complete. Plug in your dryer, and then check its operation by using the checklist on the next page. 12. For GAS MODELS ONLY- DV5471AG*, DV5451AG*: The burner may not ignite initially due to air in the gas line. Allowing your dryer to operate on a heat setting will purge the line. If the gas does not ignite within 5 minutes, turn your dryer off and wait 5 minutes. Be sure the gas supply to your dryer has been turned on. To confirm gas ignition, check the exhaust for heat. FINAL INSTALLATION CHECKLIST † The dryer is plugged into an electrical outlet and grounded properly. † The exhaust ductwork is hooked up and the joints are taped. † You have used rigid or stiff-walled flexible metal duct material, not plastic flexible duct. † The dryer is level and is sitting firmly on the floor. † For gas models: The gas is turned on and there are no gas leaks. † Start your dryer to confirm that it runs, heats, and shuts off. Contents _19 DV5471AE-03022A-01_EN.indd Sec2:19 2011-03-28 3:44:40
-
 1
1 -
2
-
3
-
4
-
5
-
6
-
7
-
8
-
9
-
10
-
11
-
12
-
13
-
 14
14 -
 15
15 -
 16
16 -
 17
17 -
 18
18 -
 19
19 -
 20
20 -
 21
21 -
 22
22 -
 23
23 -
 24
24 -
25
-
26
-
27
-
28
-
29
-
30
-
31
-
32
-
33
-
34
-
35
-
36
-
37
-
38
-
39
-
40
-
41
-
42
-
43
-
44
-
45
-
46
-
47
-
48
-
49
-
50
-
51
-
52
-
53
-
54
-
55
-
56
-
57
-
58
-
59
-
60
-
61
-
62
-
63
-
64
-
65
-
66
-
67
-
68
-
69
-
70
-
71
-
72
-
73
-
74
-
75
-
76
-
77
-
78
-
79
-
80
 |
 |
