Samsung DVD-C350 User Manual (user Manual) (ver.2.0) (English) - Page 5
Basic functions, Playing a Disc
 |
UPC - 036725608252
View all Samsung DVD-C350 manuals
Add to My Manuals
Save this manual to your list of manuals |
Page 5 highlights
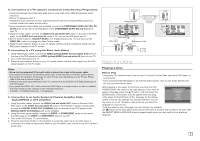
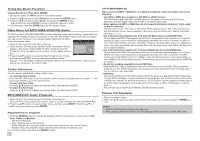
A. Connections to a TV using the Component Jacks (Interlace/Progressive) - Connecting through the Component jacks lets you view video at the 480p (Progressive Scan) resolution. - What is "Progressive Scan"? Progressive scan has twice as many scanning lines per frame as interlaced (480i) output and provides better and clearer picture quality. 1.Using Component video cables (not included), connect the COMPONENT VIDEO OUT (PR, PB and Y) jacks on the rear of the DVD player to the COMPONENT IN (PR, PB and Y) jacks of your TV. 2. Using the audio cables, connect the AUDIO (red and white) OUT Jacks on the rear of the DVD player to the AUDIO (red and white) IN Jacks of TV. Turn on the DVD player and TV. 3. Set the Video Output to I-SCAN/P-SCAN in the Display Setup menu. You can also use the VIDEO SEL. button to change the Video Output mode. 4. Press the input selector button on your TV remote control until the Component signal from the DVD player appears on the TV screen. B. Connecting to a TV using the Video Jack (Video) 1. Using Video/Audio cables, connect the VIDEO (yellow)/AUDIO (red and white) OUT jacks on the rear of the DVD player to the VIDEO (yellow)/AUDIO (red and white) IN jacks of your TV. 2. Turn on the DVD player and TV. 3. Press the input selector button on your TV remote control until the Video signal from the DVD player appears on the TV screen. Notes - Noise may be generated if the audio cable is placed too close to the power cable. - If you want to connect to an Amplifier, please refer to the Amplifier connection section below. - The number and position of the jacks on your TV may vary depending on your TV set. Please refer to the user's manual of your TV. - If there is one audio input terminal on the TV, connect it to the [AUDIO OUT] [left] (white) jack of the DVD player. - If you press the VIDEO SEL. button when the DVD Player is in stop mode or no disc is inserted, the Video Output mode changes in the following sequence : (I-SCAN ➝ P-SCAN) (Interlaced ➝ Progressive). C. Connection to an Audio System (2 Channel Amplifier, Dolby Digital,MPEG2 or DTS Amplifier) 1. Using the audio cables, connect the AUDIO (red and white) OUT Jacks on the rear of the DVD player to the AUDIO (red and white) IN Jacks of the Amplifier. If using a coaxial cable, connect the DIGITAL AUDIO OUT (COAXIAL) jacks on the rear of the DVD player to the DIGITAL AUDIO IN (COAXIAL) Jack of the Amplifier. 2. Using the video signal cable(s), connect the VIDEO or COMPONENT Jacks on the rear of the DVD player to the VIDEO or COMPONENT Jacks of your TV. 3. Turn on the DVD player, TV, and Amplifier. 4. Press the input select button of the Amplifier to select the audio input your DVD player is connected to in order to hear sound. Refer to your Amplifier's user manual to set the Amplifier's audio input. WHITE C Coaxial Cable BLUE GREEN 2-Channel stereo ampilfier, Dolby Digital or DTS amplifier RED RED YELLOW B Video Cable Audio Cable A Component Cable YELLOW RED WHITE BLUE RREEDD GREEN RED WHITE WHITE RED Basic functions Playing a Disc Before Play - Using your TV's remote control, turn on your TV and set it to the Video Input your DVD player is connected to. - If you connected the DVD player to an external Audio System, turn on your Audio System and set it to the correct Audio Input. After plugging in the player, the first time you press the DVD POWER button, the screen to the right appears: If you want to select a language, press the π/† button, and then press the ENTER button. (This screen will only appear when you plug in the player for the first time.) If the language for the startup screen is not set, the settings may change whenever you turn Select Menu Language English Français Deutsch Español Italiano Nederlands the power on or off. Therefore, make sure that you select the language you want to use. Once you select a menu language, you can change it by pressing the ( ) button on the front panel of the unit for more than 5 seconds with no disc in the unit. Then the SELECT MENU LANGUAGE window appears again where you can reset to your preferred language. 5
-
 1
1 -
 2
2 -
 3
3 -
 4
4 -
 5
5 -
 6
6 -
 7
7 -
 8
8 -
 9
9 -
 10
10 -
 11
11 -
12
-
13
-
14
-
15
-
16
 |
 |
