Samsung DVD-C350 User Manual (user Manual) (ver.1.0) (English, French) - Page 4
Descriptions, Tour of the Remote Control - dvd
 |
UPC - 036725608252
View all Samsung DVD-C350 manuals
Add to My Manuals
Save this manual to your list of manuals |
Page 4 highlights
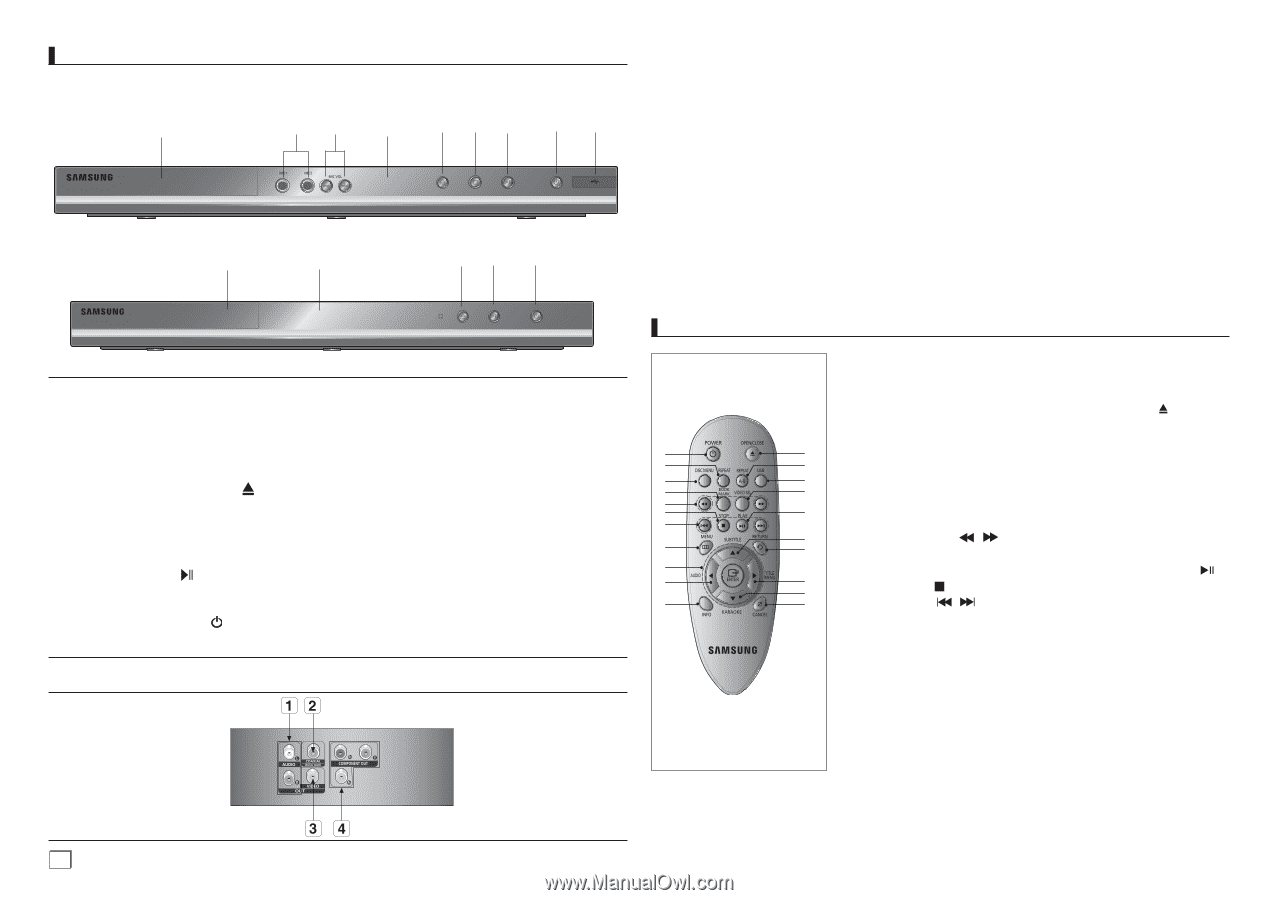
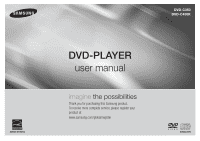
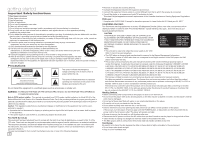
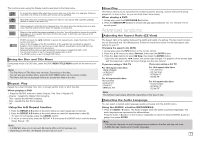
Descriptions Front Panel Controls DVD-C450K 1 ▼ 89 2 ▼ ▼▼ ▼ ▼ 3 45 ▼ ▼ ▼ 67 ▼ ▼ DVD-C350 1 2 35 6 1. AUDIO OUT JACKS Use audio cables to connect to the Audio input jacks of your television or audio/video receiver 2. DIGITAL AUDIO JACK Use a coaxial digital cable to connect to an A/V Amplifier that contains a Dolby Digital, MPEG2 or DTS decoder. 3. VIDEO OUT JACK Use a video cable to connect to the Video input jack on your television. 4. COMPONENT VIDEO OUT JACKS - Use these jacks if you have a TV with Component Video in jacks. These jacks provide PR, PB and Y video. - If P-SCAN is set to "ON" in Video Output of the Setup Menu, progressive scan mode will work. - If I-SCAN is set to "ON" in Video Output of the Setup Menu, interlaced scan mode will work. ▼ 1. DISC TRAY Place the disc here. 2. DISPLAY Operation indicators are displayed here. 3. OPEN/CLOSE/STOP ( ) Press to open and close the disc tray 4. STOP (■) (Only DVD-C450K) Stop disc play. 5. PLAY/PAUSE ( ) Play or pause the disc / Stops Disc Play 6. POWER ON/OFF ( ) Rear Panel ▼ ▼ ▼ ▼ Turn On/Off the DVD Player 7. USB HOST (Only DVD-C450K) Connect digital still camera, MP3 player, memory stick, Card reader, or another removable storage devices. 8. MIC (Only DVD-C450K) Connect Microphone for karaoke functions. 9. MICROPHONE VOLUME (Only DVD-C450K) Use to adjust microphone volume level. Use the button by pressing it. Turn it to the left or right to control the volume. Tour of the Remote Control DVD-C450K 1 2 3 4 5 6 7 8 9 10 11 1. DVD POWER Button Turns the power on or off. 2. REPEAT Button Allows you to repeat play a title, chapter, track, or disc. 12 3. DISC MENU Button 13 Brings up the Disc menu. 14 15 4. BOOKMARK Quickly find bookmark sec- 16 tions of a DVD. 17 5. SEARCH Buttons ( / ) 18 Allow you to search forward/ back ward through a disc. 19 6. STOP Button ( ) 20 21 7. SKIP Buttons ( / ) Use to skip the title, chapter or track 8. MENU Button Brings up the DVD player's menu. 9. ENTER Buttons This button functions as a toggle switch. 10. AUDIO Button (√) Use this button to access various audio functions on a disc. 11. INFO Button Displays the current disc mode. 12. OPEN/CLOSE ( ) Button To open and close the disc tray. 13. REPEAT A-B Button Allows you to repeat A-B disc. 14. USB Button 15. VIDEO SEL. Button Selects video output for mats. 16. PLAY/PAUSE Button ( ) Begin/Pause disc play. 17. SUBTITLE Button (π) 18. RETURN Button Returns to a previous menu. 19. TITLE MENU Button (®) Brings up the Title menu. 20. KARAOKE Button († ) Use to begin Karaoke func tions. 21. CANCEL Button Use to remove menus or status displays from the screen. 4
-
 1
1 -
 2
2 -
 3
3 -
 4
4 -
 5
5 -
 6
6 -
 7
7 -
 8
8 -
 9
9 -
 10
10 -
11
-
12
-
13
-
14
-
15
-
16
-
17
-
18
-
19
-
20
-
21
-
22
-
23
-
24
-
25
-
26
-
27
-
28
-
29
-
30
-
31
-
32
 |
 |