Samsung DVD-C350 User Manual (user Manual) (ver.1.0) (English, French) - Page 5
Connections - a
 |
UPC - 036725608252
View all Samsung DVD-C350 manuals
Add to My Manuals
Save this manual to your list of manuals |
Page 5 highlights
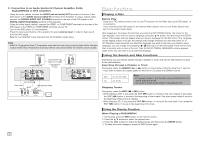
DVD-C350 1 2 3 4 5 6 7 8 9 10 1. DVD POWER Button Turns the power on or off. 2. REPEAT Button Allows you to repeat play a title, chapter, track, or disc. 3. DISC MENU Button 11 Brings up the Disc menu. 12 4. BOOKMARK 13 Quickly find bookmark sec 14 15 tions of a DVD. 16 5. STOP Button ( ) 6. SKIP Buttons ( / ) 17 18 Use to skip the title, chapter or track 19 7. MENU Button Brings up the DVD player's 20 menu. 8. ENTER Buttons This button functions as a toggle switch. 9. AUDIO Button (√) Use this button to access various audio functions on a disc. 10. INFO Button Displays the current disc mode. 11. OPEN/CLOSE ( ) Button To open and close the disc tray. 12. REPEAT A-B Button Allows you to repeat A-B disc. 13. ZOOM Button Enlarges the DVD Picture. 14. VIDEO SEL. Button Selects video output for mats. 15. SEARCH Buttons ( / ) Allow you to search for ward/back ward through a disc. 16. PLAY/PAUSE Button ( ) Begin/Pause disc play. 17. SUBTITLE Button (π) 18. RETURN Button Returns to a previous menu. 19. TITLE MENU Button (®) Brings up the Title menu. 20. CANCEL Button Use to remove menus or status displays from the screen. Install Batteries in the Remote control 1. Open the battery cover on the back of the remote control. 2. Insert two AAA batteries. Make sure that the polarities (+ and -) are aligned correctly. 3. Replace the battery cover. Connections Choosing a Connection The following explains how to make connections commonly used to connect the DVD player with a TV and other components. A diagram showing these connections is on the next page. Before Connecting the DVD Player - Always turn off the DVD player, TV, and other components before you connect or disconnect any cables. - Refer to the user's manual of the additional components you are connecting for more informa- tion on those particular components. A. Connections to a TV Interlace / Progressive - Connecting through the Component jacks lets you view video at the 480p (Progressive Scan) resolution. - What is "Progressive Scan"? Progressive scan has twice as many scanning lines per frame as interlaced (480i) output and provides better and clearer picture quality. 1.Using Component video cables (not included), connect the COMPONENT VIDEO OUT (PR, PB and Y) jacks on the rear of the DVD player to the COMPONENT IN (PR, PB and Y) jacks of your TV. 2. Using the audio cables, connect the AUDIO (red and white) OUT terminals on the rear of the DVD player to the AUDIO (red and white) IN terminals of TV. Turn on the DVD player and TV. 3. Set the Video Output to I-SCAN/P-SCAN in the Display Setup menu. You can use the VIDEO SEL. button to change the Video Output mode. 4. Press the input selector on your TV remote control until the Component signal from the DVD player appears on the TV screen. B. Connecting to a TV (VIDEO) - Using video/audio cables, connect the VIDEO (yellow)/AUDIO (red and white) OUT terminals on the rear of the DVD player to the VIDEO (yellow)/AUDIO (red and white) IN terminals of TV. - Turn on the DVD player and TV. - Press the input selector on your TV remote control until the Video signal from the DVD player appears on the TV screen. Note - Noise may be generated if the audio cable is placed too close to the power cable. - If you want to connect to an Amplifier, please refer to the Amplifier connection section below. - The number and position of terminals can vary depending on your TV set. Please refer to the user's manual of the TV. - If there is one audio input terminal on the TV, connect it to the [AUDIO OUT][left] (white) terminal of the DVD player. - If you press the VIDEO SEL. button when DVD Player is in stop mode or no disc is inserted, the Video Output mode changes in the following sequence: (I-SCAN ➝ P-SCAN ). 5
-
 1
1 -
 2
2 -
 3
3 -
 4
4 -
 5
5 -
 6
6 -
 7
7 -
 8
8 -
 9
9 -
 10
10 -
 11
11 -
12
-
13
-
14
-
15
-
16
-
17
-
18
-
19
-
20
-
21
-
22
-
23
-
24
-
25
-
26
-
27
-
28
-
29
-
30
-
31
-
32
 |
 |
