Samsung DVE50M7450W/A3 User Manual - Page 27
Exhaust ducting guide, Switching the door position, Ducting, Cleaning
 |
View all Samsung DVE50M7450W/A3 manuals
Add to My Manuals
Save this manual to your list of manuals |
Page 27 highlights
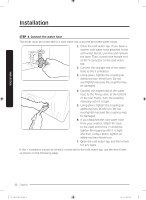
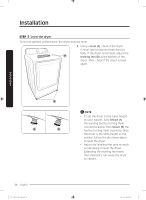
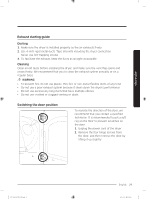
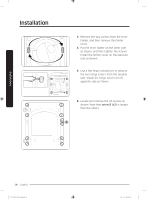
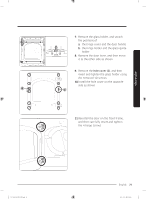
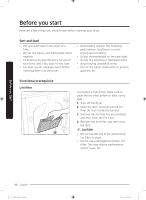
Installation Exhaust ducting guide Ducting 1. Make sure the dryer is installed properly so the air exhausts freely. 2. Use 4-inch rigid metal ducts. Tape all joints including the dryer connection. Never use lint-trapping screws. 3. To facilitate the exhaust, keep the ducts as straight as possible. Cleaning Clean all old ducts before installing the dryer, and make sure the vent flap opens and closes freely. We recommend that you to clean the exhaust system annually or on a regular basis. WARNING • To prevent fire, do not use plastic, thin-foil, or non-metal flexible ducts of any kind. • Do not use a poor exhaust system because it slows down the dryer's performance. • Do not use excessively long ducts that have multiple elbows. • Do not use crushed or clogged venting or ducts. Switching the door position To reverse the direction of the door, we recommend that you contact a qualified technician. It is recommended to put a soft rug on the floor to prevent scratches on the door. 1. Unplug the power cord of the dryer. 2. Remove the four hinge screws from the door, and then remove the door by lifting it up slightly. DV7450M-03170Z-00_EN.indd 27 English 27 2017-01-25 11:24:22
-
 1
1 -
2
-
3
-
4
-
5
-
6
-
7
-
8
-
9
-
10
-
11
-
12
-
13
-
14
-
15
-
16
-
17
-
18
-
19
-
20
-
21
-
 22
22 -
 23
23 -
 24
24 -
 25
25 -
 26
26 -
 27
27 -
 28
28 -
 29
29 -
 30
30 -
 31
31 -
 32
32 -
33
-
34
-
35
-
36
-
37
-
38
-
39
-
40
-
41
-
42
-
43
-
44
-
45
-
46
-
47
-
48
-
49
-
50
-
51
-
52
-
53
-
54
-
55
-
56
-
57
-
58
-
59
-
60
-
61
-
62
-
63
-
64
-
65
-
66
-
67
-
68
-
69
-
70
-
71
-
72
-
73
-
74
-
75
-
76
-
77
-
78
-
79
-
80
-
81
-
82
-
83
-
84
-
85
-
86
-
87
-
88
-
89
-
90
-
91
-
92
-
93
-
94
-
95
-
96
-
97
-
98
-
99
-
100
-
101
-
102
-
103
-
104
-
105
-
106
-
107
-
108
-
109
-
110
-
111
-
112
-
113
-
114
-
115
-
116
-
117
-
118
-
119
-
120
-
121
-
122
-
123
-
124
-
125
-
126
-
127
-
128
-
129
-
130
-
131
-
132
-
133
-
134
-
135
-
136
-
137
-
138
-
139
-
140
-
141
-
142
-
143
-
144
-
145
-
146
-
147
-
148
-
149
-
150
-
151
-
152
-
153
-
154
-
155
-
156
-
157
-
158
-
159
-
160
-
161
-
162
-
163
-
164
-
165
-
166
-
167
-
168
 |
 |
