Samsung E316 User Manual - Page 44
Dialing a Number from the Phone Book, Select a Photo - specification
 |
View all Samsung E316 manuals
Add to My Manuals
Save this manual to your list of manuals |
Page 44 highlights
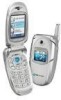
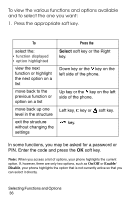
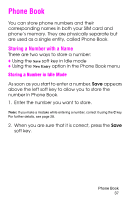
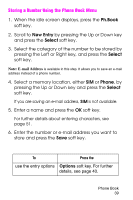
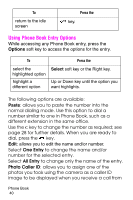
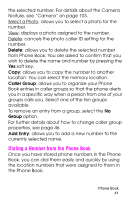
the selected number. For details about the Camera feature, see "Camera" on page 103. Select a Photo: allows you to select a photo for the number. View: displays a photo assigned to the number. Delete: cancels the photo caller ID setting for the number. Delete: allows you to delete the selected number from Phone Book. You are asked to confirm that you wish to delete the name and number by pressing the Yes soft key. Copy: allows you to copy the number to another location. You can select the memory location. Caller Group: allows you to organize your Phone Book entries in caller groups so that the phone alerts you in a specific way when a person from one of your groups calls you. Select one of the ten groups available. To remove an entry from a group, select the No Group option. For further details about how to change caller group properties, see page 46. Add Entry: allows you to add a new number to the currently selected name. Dialing a Number from the Phone Book Once you have stored phone numbers in the Phone Book, you can dial them easily and quickly by using the location numbers that were assigned to them in the Phone Book. Phone Book 41
-
 1
1 -
2
-
3
-
4
-
5
-
6
-
7
-
8
-
9
-
10
-
11
-
12
-
13
-
14
-
15
-
16
-
17
-
18
-
19
-
20
-
21
-
22
-
23
-
24
-
25
-
26
-
27
-
28
-
29
-
30
-
31
-
32
-
33
-
34
-
35
-
36
-
37
-
38
-
 39
39 -
 40
40 -
 41
41 -
 42
42 -
 43
43 -
 44
44 -
 45
45 -
 46
46 -
 47
47 -
 48
48 -
 49
49 -
50
-
51
-
52
-
53
-
54
-
55
-
56
-
57
-
58
-
59
-
60
-
61
-
62
-
63
-
64
-
65
-
66
-
67
-
68
-
69
-
70
-
71
-
72
-
73
-
74
-
75
-
76
-
77
-
78
-
79
-
80
-
81
-
82
-
83
-
84
-
85
-
86
-
87
-
88
-
89
-
90
-
91
-
92
-
93
-
94
-
95
-
96
-
97
-
98
-
99
-
100
-
101
-
102
-
103
-
104
-
105
-
106
-
107
-
108
-
109
-
110
-
111
-
112
-
113
-
114
-
115
-
116
-
117
-
118
-
119
-
120
-
121
-
122
-
123
-
124
-
125
-
126
-
127
-
128
-
129
-
130
-
131
-
132
-
133
-
134
-
135
-
136
-
137
-
138
-
139
-
140
-
141
-
142
-
143
-
144
-
145
-
146
-
147
-
148
-
149
-
150
-
151
-
152
-
153
-
154
-
155
-
156
-
157
-
158
-
159
-
160
-
161
-
162
-
163
-
164
-
165
-
166
-
167
-
168
-
169
-
170
-
171
-
172
-
173
-
174
-
175
-
176
-
177
-
178
-
179
-
180
-
181
-
182
-
183
-
184
-
185
-
186
-
187
-
188
-
189
-
190
-
191
-
192
-
193
-
194
-
195
-
196
-
197
-
198
-
199
-
200
-
201
-
202
-
203
-
204
-
205
-
206
-
207
-
208
-
209
-
210
-
211
-
212
-
213
-
214
-
215
-
216
-
217
-
218
-
219
 |
 |
