Samsung Galaxy Tab S2 NOOK User Manual - Page 13
Setting Up Your NOOK, Read the End User License Agreement EULA
 |
View all Samsung Galaxy Tab S2 NOOK manuals
Add to My Manuals
Save this manual to your list of manuals |
Page 13 highlights
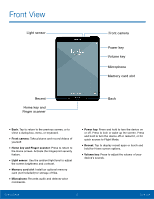
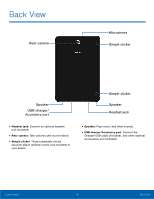
Setting Up Your NOOK The set-up process for your Samsung Galaxy S2 NOOK® guides you through setting up four types of accounts: • A Google/Gmail account for accessing Google Play and the Google App Store. • A Samsung account for buying and using Samsung apps. • A NOOK account with up to 6 NOOK profiles for accessing the NOOK Store® and NOOK content such as NOOK Books®, the NOOK Newsstand®, and NOOK apps. Each NOOK profile requires a Google account on your tablet. Note: You have to connect to a Wi-Fi network to set up your NOOK. When you first turn on your NOOK, it displays a Samsung Galaxy welcome screen. 1. Tap Start. Your NOOK displays a list of the Wi-Fi networks it detects in your area. 2. Tap the name of the Wi-Fi network to which you want to connect. If the network displays a lock symbol, you are prompted to enter a password to connect to the network. If you do not know the password, ask the network administrator. Once you have entered the password in the password dialog box, tap Connect. 3. Once your NOOK connects to the network, tap Next. 4. Set the date, time, and time zone for your NOOK. Tap any of these items to call up a dialog box for making changes. 5. Tap Next. 6. Read the End User License Agreement (EULA) for Software. If you agree to the EULA, tap the checkbox I understand and agree to the terms and conditions above. (If you do not agree to the EULA, you cannot use your NOOK.) 7. The EULA screen also offers you a chance to share diagnostic data with Samsung. Tap Yes or No to indicate your decision. 8. Tap Next. Your NOOK prompts you to sign in to your Google account or to create a Google account if you do not have one. You need a Google account to access Google Play and other Google apps on your device. 9. If you want to make use of Google apps, either create a Google account or sign in to your existing Google account. (If you have previously set up two-factor authentication for your Google account, you are prompted to launch a Web browser and enter a verification code to finish logging in.) Your Google account then displays fields for personalizing your tablet. 10. Enter your first name and last name. Tap Done. 11. Your NOOK prompts you to set up a Samsung account for accessing Samsung Galaxy apps. You can sign in, create a new account, or sign in with your Google ID. Tap the button with your choice. To skip setting up or signing in with a Samsung account, tap Skip. 12. Next your device displays a full-screen welcome page for NOOK. (Until you have set up a NOOK account, your NOOK displays this same welcome page whenever you launch any NOOK app such as the NOOK Library.) Getting Started 7 Setting Up Your NOOK
-
 1
1 -
2
-
3
-
4
-
5
-
6
-
7
-
 8
8 -
 9
9 -
 10
10 -
 11
11 -
 12
12 -
 13
13 -
 14
14 -
 15
15 -
 16
16 -
 17
17 -
 18
18 -
19
-
20
-
21
-
22
-
23
-
24
-
25
-
26
-
27
-
28
-
29
-
30
-
31
-
32
-
33
-
34
-
35
-
36
-
37
-
38
-
39
-
40
-
41
-
42
-
43
-
44
-
45
-
46
-
47
-
48
-
49
-
50
-
51
-
52
-
53
-
54
-
55
-
56
-
57
-
58
-
59
-
60
-
61
-
62
-
63
-
64
-
65
-
66
-
67
-
68
-
69
-
70
-
71
-
72
-
73
-
74
-
75
-
76
-
77
-
78
-
79
-
80
-
81
-
82
-
83
-
84
-
85
-
86
-
87
-
88
-
89
-
90
-
91
-
92
-
93
-
94
-
95
-
96
-
97
-
98
-
99
-
100
-
101
-
102
-
103
-
104
-
105
-
106
-
107
-
108
-
109
-
110
-
111
-
112
-
113
-
114
-
115
-
116
-
117
-
118
-
119
-
120
-
121
-
122
-
123
-
124
-
125
-
126
 |
 |
