Samsung HLP4663W User Manual (ENGLISH) - Page 7
Remote Control - 46
 |
UPC - 036725243729
View all Samsung HLP4663W manuals
Add to My Manuals
Save this manual to your list of manuals |
Page 7 highlights
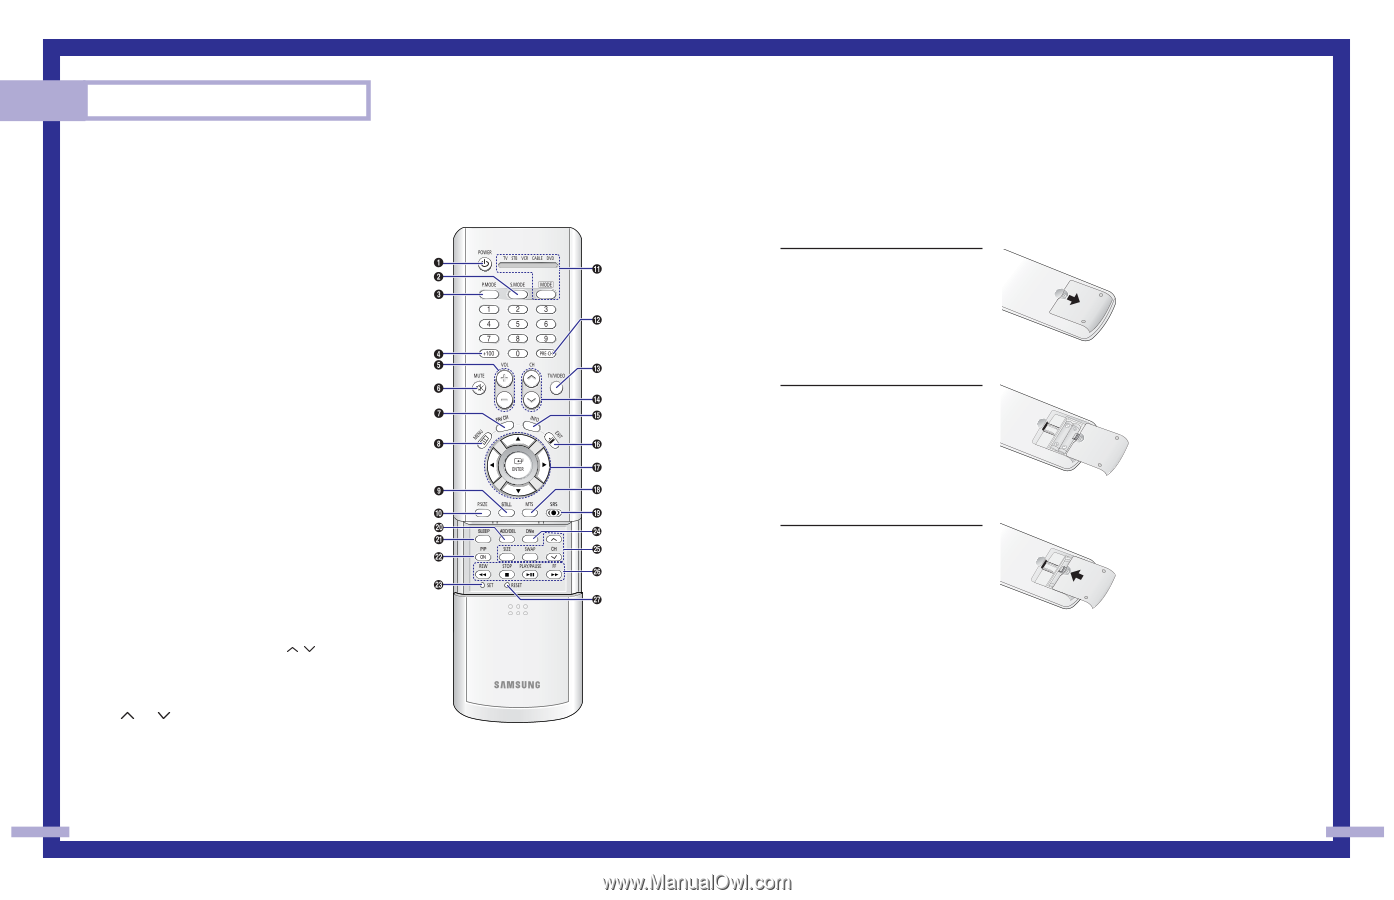
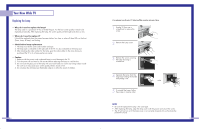
Your New Wide TV Remote Control You can use the remote control up to about 23 feet from the TV. When using the remote control, always point it directly at the TV. You can also use your remote control to operate your Set-Top box, VCR, Cable box or DVD player. See pages 46~47 for details. 1. POWER Turns the TV on and off. 2. S.MODE Adjust the TV sound by selecting one of the preset factory settings (or select your personal, customized sound settings.) 3. P.MODE Adjust the TV picture by selecting one of the preset factory settings (or select your personal, customized picture settings.) 4. +100 Press to select cable channels over 100 on TV. 5. VOL +, VOL - Press to increase or decrease the volume. 6. MUTE Press to mute the TV sound. 7. FAV.CH (Favorite Channel) Press to switch between your favorite channels. 8. MENU Displays the main on-screen menu. 9. STILL Press to stop the action during a particular scene. Press again to resume normal video. 10. P.SIZE Press to change the picture size. 11. MODE Selects a target device to be controlled by the Samsung remote control (i.e., TV, STB, VCR, CABLE, or DVD). 12. PRE-CH Tunes to the previous channel. 13. TV/VIDEO Press to display all of the available video sources (i.e., TV, Set-Top box, VCR, DVD, DTV, PC). 14. CH , CH Press to change channels. 15. INFO Press to display information on the TV screen. 16. EXIT Press to exit the menu. 17 ENTER Press to select highlight up, down, left, or right. While using the on-screen menus, press the ENTER to activate (or change) a particular item. 18. MTS (Multichannel Television Stereo) Press to choose Stereo, Mono or SAP (Secondary Audio Program). 19. SRS Activates TruSurround. 20. ADD/DEL Press to add or erase channels in the TV's memory. Use the ADD/DEL button to memorize and erase the fine tuning after fine tuning channels. 21. SLEEP Press to select a preset time interval for automatic shutoff. 22. PIP (Picture In Picture) Activates PIP. 23. SET Used during set up of this remote control, so that it will work compatibly with other devices (Set-Top box, VCR, Cable box, DVD, etc.) 24. DNIe (Digital Natural Image engine) Activates DNIe. 25. PIP Controls SIZE; Press to select the size of PIP window. SWAP; Press to exchange the video signal that is currently displayed on the main screen with the signal in the PIP window. CH / ; Press to display the available channels in sequence. (These buttons change channels in the PIP window only.) 26. VCR/DVD Controls Controls VCR or DVD functions: Rewind, Stop, Play/Pause, Fast Forward. 27. RESET If your remote control is not functioning properly, take out the batteries and press the reset button for about 2~3 seconds. Re-insert the batteries and try using the remote control again. 12 Installing Batteries in the Remote Control With normal use, the batteries in the remote control should last about a year. If you notice a performance degradation while using the remote, the batteries may need to be replaced. Make sure you replace both batteries and do not mix old and new batteries in the remote control. If you won't be using the remote control for a long time, remove the batteries and store them in a cool dry place. 1 Slide the back cover all the way out to open the battery compartment of the remote control. 2 Install two AAA size batteries. Make sure to match the "+" and "-" ends of the batteries with the diagram inside the compartment. 3 Slide the cover back into place. 13
-
 1
1 -
 2
2 -
 3
3 -
 4
4 -
 5
5 -
 6
6 -
 7
7 -
 8
8 -
 9
9 -
 10
10 -
 11
11 -
 12
12 -
13
-
14
-
15
-
16
-
17
-
18
-
19
-
20
-
21
-
22
-
23
-
24
-
25
-
26
-
27
-
28
-
29
-
30
-
31
-
32
-
33
-
34
-
35
-
36
-
37
-
38
-
39
-
40
-
41
-
42
-
43
-
44
-
45
-
46
 |
 |