Samsung HMX-H300BN User Manual (user Manual) (ver.1.0) (English) - Page 46
Recording With Ease For Beginners(smart Auto), Smart Auto, Recording Start/stop, Photo
 |
UPC - 036725303836
View all Samsung HMX-H300BN manuals
Add to My Manuals
Save this manual to your list of manuals |
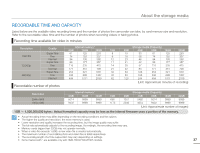
Page 46 highlights
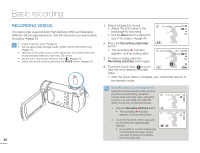
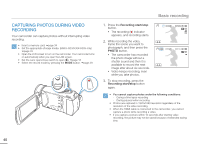
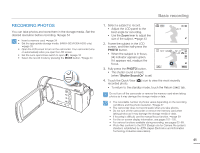
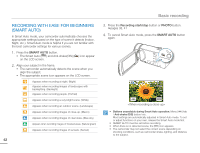
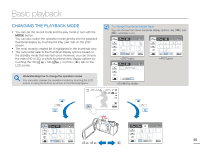
Basic recording RECORDING WITH EASE FOR BEGINNERS (SMART AUTO) In Smart Auto mode, your camcorder automatically chooses the appropriate settings based on the type of scene it detects (Indoor, Night, etc.). Smart Auto mode is helpful if you are not familiar with the best camcorder settings for various scenes. 1. Press the SMART AUTO button. • The Smart Auto ( ) and Anti-shake(OIS) ( on the LCD screen. ) icon appear 2. Align your subject in the frame. • The camcorder automatically detects the scene when you align the subject. • The appropriate scene icon appears on the LCD screen. Appears when recording at night. (Night) Appears when recording images of landscapes with backlighting. (Backlight) Appears when recording people. (Portrait) Appears when recording a very bright scene. (White) Appears when recording an outdoor scene. (Landscape) Appears when recording images of close-up. (Macro) Appears when recording images of clear skies. (Blue sky) Appears when recording images of forested areas. (Natural green) Appears when recording images of sunsets. (Sunset) 42 3. Press the Recording start/stop button or PHOTO button. pages 38, 41 4. To cancel Smart Auto mode, press the SMART AUTO button again. STBY 00:00:00 [307Min] 9999 OFF SUPER • Buttons unavailable during Smart Auto operation: Menu ( ) tab / Anti-shake (OIS) button/ etc. Most settings are automatically adjusted in Smart Auto mode. To set or adjust functions on your own, release the Smart Auto mode first. • SMART AUTO must be set before recording. • When there is no detected scene, the ( ) icon appears. • The camcorder may not select the correct scene depending on shooting conditions, such as camcorder shake, lighting, and distance to the subject.
-
 1
1 -
2
-
3
-
4
-
5
-
6
-
7
-
8
-
9
-
10
-
11
-
12
-
13
-
14
-
15
-
16
-
17
-
18
-
19
-
20
-
21
-
22
-
23
-
24
-
25
-
26
-
27
-
28
-
29
-
30
-
31
-
32
-
33
-
34
-
35
-
36
-
37
-
38
-
39
-
40
-
 41
41 -
 42
42 -
 43
43 -
 44
44 -
 45
45 -
 46
46 -
 47
47 -
 48
48 -
 49
49 -
 50
50 -
 51
51 -
52
-
53
-
54
-
55
-
56
-
57
-
58
-
59
-
60
-
61
-
62
-
63
-
64
-
65
-
66
-
67
-
68
-
69
-
70
-
71
-
72
-
73
-
74
-
75
-
76
-
77
-
78
-
79
-
80
-
81
-
82
-
83
-
84
-
85
-
86
-
87
-
88
-
89
-
90
-
91
-
92
-
93
-
94
-
95
-
96
-
97
-
98
-
99
-
100
-
101
-
102
-
103
-
104
-
105
-
106
-
107
-
108
-
109
-
110
-
111
-
112
-
113
-
114
-
115
-
116
-
117
-
118
-
119
-
120
-
121
 |
 |
