Samsung HMX-QF30BN User Manual Ver.1.0 (English) - Page 89
Connecting to a TV, Connecting to a high definition TV with HDMI
 |
View all Samsung HMX-QF30BN manuals
Add to My Manuals
Save this manual to your list of manuals |
Page 89 highlights
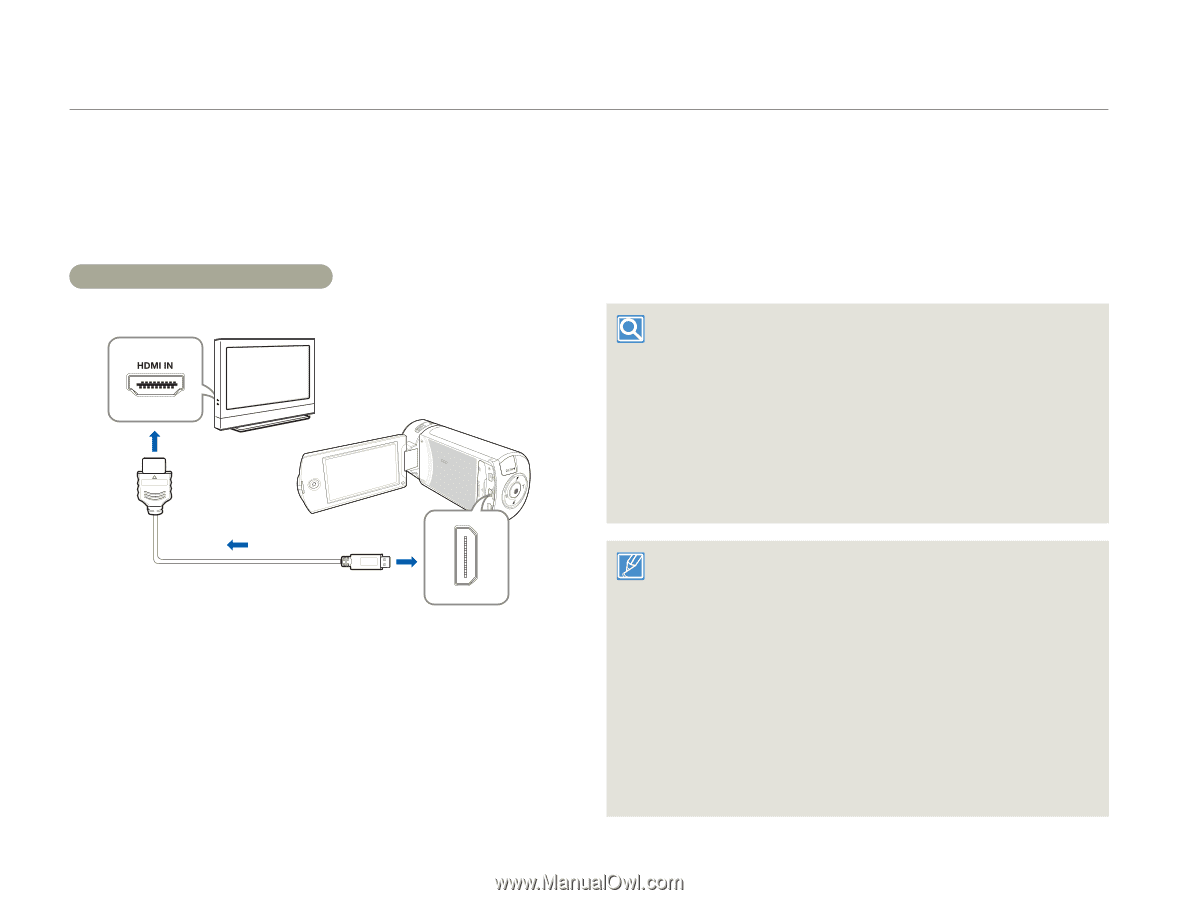
Connecting to a TV Connecting to a high definition TV with HDMI You can view High Definition (HD) quality videos recorded in HD resolution on an HDTV using an HDMI connection. This camcorder supports HDMI output to deliver high-definition video transfer. Using a micro HDMI cable 4 Set the TV's input or source selector to the HDMI input you've attached the camcorder to. • Refer to the TV's instruction manual to see how to select the TV's input or source. 5 Select the playback mode on your camcorder, and then start to play back videos or photos. pages 56~62 HDTV Camcorder Signal flow Micro HDMI Cable 1 Turn on the camcorder. • If you do not turn on the camcorder first, the camcorder may fail to recognize the connected TV. • Use the AC power adaptor to power the camcorder when you attach it to a TV. 2 Select HDMI TV Out. page 103 3 Connect the camcorder to the TV with a micro HDMI cable. Understanding the HDMI HDMI (High Definition Multimedia Interface) is a compact audio/video interface for transmitting uncompressed digital data. What is Anynet+ function? The Anynet+ function lets you control all devices that support the Anynet+ function with the same remote. You can use the Anynet+ function on the camcorder if the camcorder is connected with an HDMI cable to an Anynet+ supported TV. For more information, refer to the Anynet+ supported TV's user manual. • This camcorder is provided with the TV Connect Guide menu function. If you try to connect the camcorder to a TV and don't have your user's manual, you can use the TV Connect Guide menu function to view connection instructions on the camcorder's screen. page 104 • You can use only a D to A type micro HDMI cable with this camcorder. • The HDMI jack on the camcorder is for output only. • If an Anynet+ supported TV is connected to the camcorder by an HDMI cable, turning on the camcorder may turn the TV's power on. (an Anynet+ function) If you don't want this to occur, set Anynet+ (HDMI-CEC) to Off. page 104 • When the camcorder is connected to a TV with a micro HDMI cable, the wireless functions do not work. Using with other devices 85
-
 1
1 -
2
-
3
-
4
-
5
-
6
-
7
-
8
-
9
-
10
-
11
-
12
-
13
-
14
-
15
-
16
-
17
-
18
-
19
-
20
-
21
-
22
-
23
-
24
-
25
-
26
-
27
-
28
-
29
-
30
-
31
-
32
-
33
-
34
-
35
-
36
-
37
-
38
-
39
-
40
-
41
-
42
-
43
-
44
-
45
-
46
-
47
-
48
-
49
-
50
-
51
-
52
-
53
-
54
-
55
-
56
-
57
-
58
-
59
-
60
-
61
-
62
-
63
-
64
-
65
-
66
-
67
-
68
-
69
-
70
-
71
-
72
-
73
-
74
-
75
-
76
-
77
-
78
-
79
-
80
-
81
-
82
-
83
-
 84
84 -
 85
85 -
 86
86 -
 87
87 -
 88
88 -
 89
89 -
 90
90 -
 91
91 -
 92
92 -
 93
93 -
 94
94 -
95
-
96
-
97
-
98
-
99
-
100
-
101
-
102
-
103
-
104
-
105
-
106
-
107
-
108
-
109
-
110
-
111
-
112
-
113
-
114
-
115
-
116
-
117
-
118
-
119
-
120
-
121
-
122
-
123
-
124
-
125
-
126
-
127
-
128
-
129
-
130
-
131
-
132
-
133
 |
 |