Samsung HT-TWZ412 User Manual (user Manual) (ver.1.0) (English) - Page 21
Speaker Components, How to Install the Speaker on the Stand HT-TWZ412 only, HT-TWZ412, CONNECTIONS
 |
View all Samsung HT-TWZ412 manuals
Add to My Manuals
Save this manual to your list of manuals |
Page 21 highlights
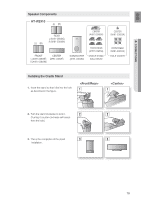
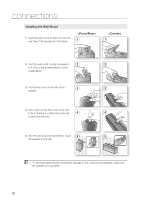
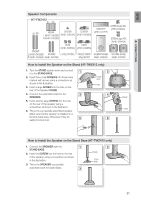
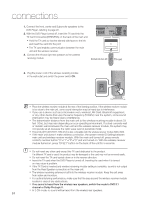
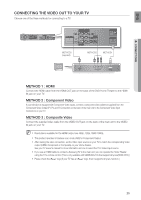
ENG ● CONNECTIONS Speaker Components HT-TWZ412 (L) (R) (L) (R) REAR CENTER L (AH81-04028D) (AH81-03853A) R (AH81-04028C) REAR (AH81-03852A) FRONT L (AH81-04028B) STAND HOLE COVER R (AH81-04028A) (AH81-04028E) CENTER (AH81-04028G) REAR (AH81-03465A) CRADLE STAND/ WALL MOUNT CENTER (AH81-04171F) SUBWOOFER (AH81-03856F) SCREW (Small): 6EA (AH81-03944A) SCREW (Large): 4EA (AH81-03943A) STAND BASE (AH81-04028F) How to Install the Speaker on the Stand (HT-TWZ412 only) 1. Turn the STAND upside-down and connect 1 it to the STAND BASE. 2. Insert three small SCREWS into three holes marked with arrows using a screwdriver as shown in the illustration. 3. Insert a large SCREW into the hole on the rear of the Speaker STAND. 4. Connect the assembled stand to the 3 SPEAKER. 5. Insert another large SCREW into the hole on the rear of the speaker using a screwdriver as shown in the illustration. 6. This is the successfully assembled speaker. Make sure that the speaker is installed on a flat and stable area. Otherwise it may be easily knocked over. 5 2 STAND BASE STAND 4 6 SPEAKER STAND How to Install the Speaker on the Stand Base (HT-TWZ412 only) 1. Connect the SPEAKER with the 1 STAND BASE. 2. Insert the SCREW into the hole on the rear of the speaker using a screwdriver as shown in the illustration. 3. This is the SPEAKER successfully assembled with the Stand Base. 3 2 SPEAKER STAND BASE 21
-
 1
1 -
2
-
3
-
4
-
5
-
6
-
7
-
8
-
9
-
10
-
11
-
12
-
13
-
14
-
15
-
 16
16 -
 17
17 -
 18
18 -
 19
19 -
 20
20 -
 21
21 -
 22
22 -
 23
23 -
 24
24 -
 25
25 -
 26
26 -
27
-
28
-
29
-
30
-
31
-
32
-
33
-
34
-
35
-
36
-
37
-
38
-
39
-
40
-
41
-
42
-
43
-
44
-
45
-
46
-
47
-
48
-
49
-
50
-
51
-
52
-
53
-
54
-
55
-
56
-
57
-
58
-
59
-
60
-
61
-
62
-
63
-
64
-
65
-
66
-
67
-
68
-
69
-
70
-
71
-
72
-
73
-
74
-
75
 |
 |
