Samsung HT X50 Quick Guide (easy Manual) (ver.1.0) (English) - Page 10
Connecting Audio from External Components, OPTICAL : Connecting an External Digital Component - home theater system
 |
UPC - 036725616608
View all Samsung HT X50 manuals
Add to My Manuals
Save this manual to your list of manuals |
Page 10 highlights
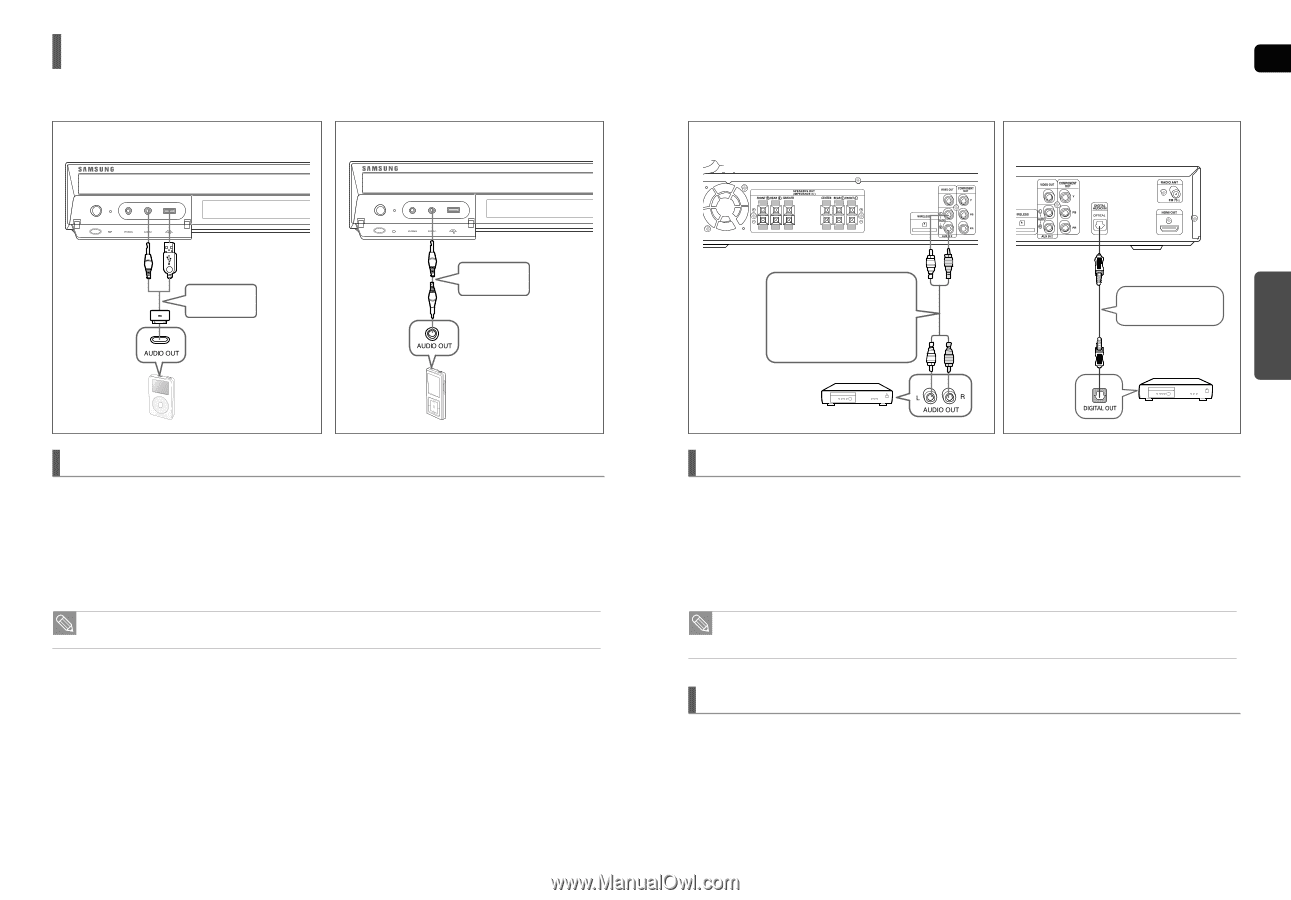
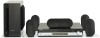
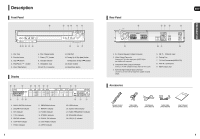
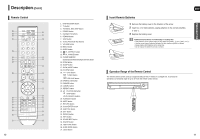
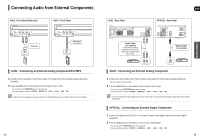
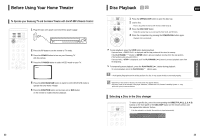
Connecting Audio from External Components AUX1 : Front Panel (iPod only) AUX1 : Front Panel AUX2 : Rear Panel OPTICAL : Rear Panel ENG CONNECTIONS Audio Cable Audio Cable (not supplied) AUX1 : Connecting an External Analog Component/iPod MP3 You can listen to the audio from an External Analog Component/iPod MP3 player through the main unit. 1 Connect AUX IN 1 (Audio) on the Home Theater to the Audio Out of the external analog component/ iPod MP3. 2 Press the AUX button on the remote control to select input. s You can also use the FUNCTION button on the main unit. The mode switches as follows : DVD/CD ➝ DIGITAL IN ➝ AUX 1 ➝ AUX 2 ➝ USB ➝ FM. • When the unit is powered on and you connect an iPod MP3 player, the unit will charge your iPod's battery. 18 Audio Cable (not supplied) If the external analog component has only one Audio Out, connect either left or right. Optical Cable (not supplied) AUX2 : Connecting an External Analog Component Analog signal components such as a VCR. 1 Connect AUX IN 2 (Audio) on the Home Theater to the Audio Out of the external analog component. s Be sure to match connector colors. 2 Press the AUX button on the remote control to select input. s You can also use the FUNCTION button on the main unit. The mode switches as follows : DVD/CD ➝ DIGITAL IN ➝ AUX 1 ➝ AUX 2 ➝ USB ➝ FM. • You can connect the Video Output jack of your VCR to the TV, and connect the Audio Output jacks of the VCR to this product. OPTICAL : Connecting an External Digital Component Digital signal components such as a Set-Top Box. 1 Connect the Digital Input (OPTICAL) on the Home Theater to the Digital Output of the external digital component. 2 Press the AUX button on the remote control to select . s You can also use the FUNCTION button on the main unit. The mode switches as follows : DVD/CD ➝ DIGITAL IN ➝ AUX 1 ➝ AUX 2 ➝ USB ➝ FM. 19
-
 1
1 -
2
-
3
-
4
-
 5
5 -
 6
6 -
 7
7 -
 8
8 -
 9
9 -
 10
10 -
 11
11 -
 12
12 -
 13
13 -
 14
14 -
 15
15 -
16
-
17
-
18
-
19
-
20
-
21
-
22
-
23
-
24
-
25
-
26
-
27
-
28
-
29
-
30
-
31
-
32
-
33
 |
 |