Samsung HW-T450/ZA User Manual - Page 8
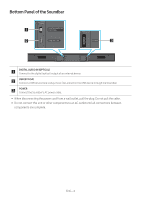
Checking the Components, Inserting Batteries before using the Remote Control (AA batteries X 2
 |
View all Samsung HW-T450/ZA manuals
Add to My Manuals
Save this manual to your list of manuals |
Page 8 highlights
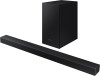
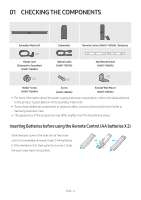
01 CHECKING THE COMPONENTS PAIR SOUND MODE VOL WOOFER SOUNDBAR Soundbar Main Unit Subwoofer Remote Control (AH81-11678A) / Batteries x 2 Power Cord (Subwoofer, Soundbar) (AH81-11680A) x 2 Optical Cable (AH81-11681A) x 2 Wall Mount Guide (AH81-11685A) x 2 Holder-Screw (AH81-11684A) Screw (AH81-11683A) Bracket-Wall Mount (AH81-11682A) •• For more information about the power supply and power consumption, refer to the label attached to the product. (Label: Bottom of the Soundbar Main Unit) •• To purchase additional components or optional cables, contact a Samsung Service Center or Samsung Customer Care. •• The appearance of the accessories may differ slightly from the illustrations above. Inserting Batteries before using the Remote Control (AA batteries X 2) Slide the back cover in the direction of the arrow until it is completely removed. Insert 2 AA batteries (1.5V) oriented so that their polarity is correct. Slide the back cover back into position. ENG - 2
-
 1
1 -
2
-
 3
3 -
 4
4 -
 5
5 -
 6
6 -
 7
7 -
 8
8 -
 9
9 -
 10
10 -
 11
11 -
 12
12 -
 13
13 -
14
-
15
-
16
-
17
-
18
-
19
-
20
-
21
-
22
-
23
-
24
-
25
-
26
-
27
-
28
-
29
-
30
-
31
-
32
-
33
-
34
-
35
-
36
-
37
-
38
 |
 |
