Samsung LN32B360 User Manual
Samsung LN32B360 - 32" LCD TV Manual
 |
UPC - 036725229860
View all Samsung LN32B360 manuals
Add to My Manuals
Save this manual to your list of manuals |
Samsung LN32B360 manual content summary:
- Samsung LN32B360 | User Manual - Page 1
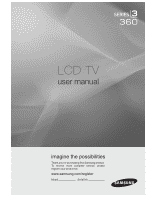
LCD TV user manual imagine the possibilities Thank you for purchasing this Samsung product. To receive more complete service, please register your product at www.samsung.com/register Model Serial No. - Samsung LN32B360 | User Manual - Page 2
Warranty supplied with Samsung Electronics (SAMSUNG) products, and the requirements, conditions, exclusions and limitations contained herein, SAMSUNG will additionally provide Warranty Repair Service in the United States on SAMSUNG products purchased in Canada, and in Canada on SAMSUNG products - Samsung LN32B360 | User Manual - Page 3
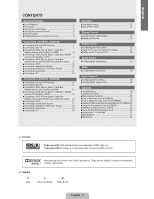
the Input Menu 34 Ŷ Con¿guring the Support Menu 34 Appendix Ŷ Troubleshooting 36 Ŷ Installing the Stand 37 Ŷ Disconnecting the Stand 37 Ŷ How to Adjust the Stand (LN19B360 38 Ŷ How to Adjust the Angle of the TV (LN19B360 38 Ŷ Installing VESA Compliant Mounting Devices (LN19B360)39 Ŷ Using the - Samsung LN32B360 | User Manual - Page 4
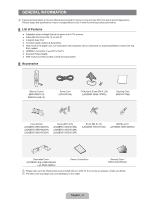
LN32B360: 6002-001294) Screw (M4 X L14) (LN32B530: 6003-001334) Wall Mount kit (LN19B360: BN96-04960A) Decoration Cover (LN19B360: Right- BN63-04242A Left- BN63-04254A) Owner's Instructions Warranty Card / Safety Guide Manual N Please make sure the following items are included with your LCD TV - Samsung LN32B360 | User Manual - Page 5
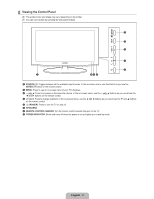
as you would use the ź and Ÿ buttons on the remote control. 5 P (POWER): Press to turn the TV on and off. 6 SPEAKERS 7 REMOTE CONTROL SENSOR: Aim the remote control towards this spot on the TV. 8 POWER INDICATOR: Blinks and turns off when the power is on and lights up in stand-by mode. English - 3 - Samsung LN32B360 | User Manual - Page 6
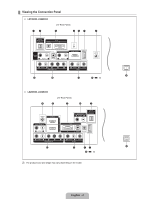
¦ Viewing the Connection Panel „ LN19B360, LN22B360 [TV Rear Panel] 12 3 45 7 8 9 # @ ! 0 „ LN26B360, LN32B360 [TV Rear Panel] 8 6 3 # 2 @ ! 17 9 0 N The product color and shape may vary depending on the model. English - 4 - Samsung LN32B360 | User Manual - Page 7
cable connection, you must use the HDMI IN 1 jack. N You can also use the ports to connect to a PC. 7 SERVICE - Connector for software upgrades. 8 ANT IN - Connects to an antenna or cable TV system. 9 POWER INPUT - Connects the supplied power cord. 0 KENSINGTON LOCK - The Kensington Lock (optional - Samsung LN32B360 | User Manual - Page 8
the Channel list menus etc. a MTS: Press to choose stereo, mono or Separate Audio 9 0 P.SIZE: Picture size selection. Program (SAP broadcast). 0 ! TV: Selects the TV mode directly. ) a ¦ Installing Batteries in the Remote Control 1. Lift the cover at the back of the remote control upward as - Samsung LN32B360 | User Manual - Page 9
your antenna has a set of leads that look not supplied). Use a screwdriver to tighten the screws. 2. Plug the adaptor into the ANT IN terminal on the back of the TV. UHF VHF ANT IN ¦ Connecting Cable TV To connect to a cable TV system, follow the instructions below. Cable without a Cable Box - Samsung LN32B360 | User Manual - Page 10
Output connector on the external device. DVD / Blu-ray player / Cable Box / Satellite receiver (Set-Top Box) TV Rear Panel 1 HDMI Cable (Not supplied) 1. Connect an HDMI Cable between the HDMI (DVI) IN jack on the TV and the HDMI jack on the DVD / Blu-ray Player or Cable Box / Satellite receiver - Samsung LN32B360 | User Manual - Page 11
Panel DVD / Blu-ray player / Cable Box / Satellite receiver (Set-Top Box) 2 Audio Cable (Not supplied) 1 DVI to HDMI Cable (Not supplied) 1. Connect a DVI to HDMI Cable or DVI-HDMI Adapter between the HDMI (DVI) IN jack on the TV and the DVI jack on the DVD / Blu-ray player / Cable Box / Satellite - Samsung LN32B360 | User Manual - Page 12
system's volume control. N 5.1CH audio is possible when the TV is connected to an external device supporting 5.1CH. N Each Digital Audio System has a different back panel con¿guration. N When the Home Theater receiver is set to On, you can hear sound output from the TV's Optical jack. When the TV is - Samsung LN32B360 | User Manual - Page 13
Theater TV Rear Panel 1 Audio Cable (Not supplied) 1. Connect Audio Cables between the AUDIO OUT [R-AUDIO-L] jacks on the TV and Audio Input jacks on the AUDIO OUT [R-AUDIO-L] jacks: Decrease the volume of the TV and adjust the volume level with the Ampli¿er's volume control. N Each Ampli¿er/DVD - Samsung LN32B360 | User Manual - Page 14
con¿guration. N When connecting a Camcorder, match the color of the connection terminal to the cable. Using an HDMI Cable TV Rear Panel HD Camcorder 1 HDMI Cable (Not supplied) 1. Connect a HDMI Cable between the HDMI (DVI) IN jack on the TV and the HDMI OUT jack on the camcorder. English - 12 - Samsung LN32B360 | User Manual - Page 15
between the DVI AUDIO IN [R-AUDIO-L] jack on the TV and the Audio Out jack of the sound card on your computer. Using an HDMI Cable TV Rear Panel PC 1 HDMI Cable (Not supplied) 1. Connect an HDMI cable between the HDMI (DVI) IN jack on the TV and the PC output jack on your computer. N Each PC has - Samsung LN32B360 | User Manual - Page 16
LN32B360) ¦ Connecting VHF and UHF Antennas If your antenna has a set supplied). Use a screwdriver to tighten the screws. 2. Plug the adaptor into the ANT IN terminal on the back of the TV ANT IN ¦ Connecting Cable TV To connect to a cable TV system, follow the instructions below. Cable without a - Samsung LN32B360 | User Manual - Page 17
player / Cable Box / Satellite receiver (Set-Top Box) TV Rear Panel 1 HDMI Cable (Not supplied) 1. Connect an HDMI Cable between the HDMI IN (1 or 2) jack on the TV and the HDMI jack on the DVD Player or Cable Box / Satellite receiver (Set-Top Box). N What is HDMI? Ɣ HDMI(High-De¿nition Multimedia - Samsung LN32B360 | User Manual - Page 18
Rear Panel DVD / Blu-ray player / Cable Box / Satellite receiver (Set-Top Box) 2 Audio Cable (Not supplied) 1 DVI to HDMI Cable (Not supplied) 1. Connect a DVI to HDMI Cable or DVI-HDMI Adapter between the HDMI IN 1 jack on the TV and the DVI jack on the DVD / Blu-ray player / Cable Box / Satellite - Samsung LN32B360 | User Manual - Page 19
system's volume control. N 5.1CH audio is possible when the TV is connected to an external device supporting 5.1CH. N Each Digital Audio System has a different back panel con¿guration. N When the Home Theater receiver is set to On, you can hear sound output from the TV's Optical jack. When the TV is - Samsung LN32B360 | User Manual - Page 20
Theater TV Rear Panel 1 Audio Cable (Not supplied) 1. Connect Audio Cables between the AUDIO OUT [R-AUDIO-L] jacks on the TV and Audio Input jacks on the AUDIO OUT [R-AUDIO-L] jacks: Decrease the volume of the TV and adjust the volume level with the Ampli¿er's volume control. N Each Ampli¿er/DVD - Samsung LN32B360 | User Manual - Page 21
¿guration. N When connecting a Camcorder, match the color of the connection terminal to the cable. Using an HDMI Cable TV Rear Panel HD Camcorder 1 HDMI Cable (Not supplied) 1. Connect a HDMI Cable between the HDMI IN (1 or 2) jack on the TV and the HDMI OUT jack on the camcorder. English - 19 - Samsung LN32B360 | User Manual - Page 22
sound card on your computer. N When using an HDMI/DVI cable connection, you must use the HDMI IN 1 terminal. Using an HDMI Cable TV Rear Panel PC 1 HDMI Cable (Not supplied) 1. Connect an HDMI cable between the HDMI IN (1 or 2) jack on the TV and the PC output jack on your computer. N Each PC has - Samsung LN32B360 | User Manual - Page 23
remote control buttons Button MENUm RETURN R EXIT e Operations Display the main on-screen menu. Return to the previous menu. Exit the on-screen menu. Button ENTERE Operations Move the cursor and select an item. Select the currently selected item. Con¿rm the setting. Example: Setting the TV - Samsung LN32B360 | User Manual - Page 24
Play Feature When the TV is initially powered on, basic settings proceed automatically and subsequently. Plug & Play 1. Press the POWER P button on the remote control. Menu Language, Store Demo, Channels, and Time will be set. N You can also use the POWER P button on the TV. N The message Menu - Samsung LN32B360 | User Manual - Page 25
List, refer to the 'Managing Channels' instructions. O You can select these options by simply pressing the CH LIST button on the remote control. R Fine Tune (analog channels only) Use ¿ne tuning to manually add / delete or set favorite channels and use the program guide for digital broadcasts. - Samsung LN32B360 | User Manual - Page 26
N Only memorized channels can be reserved. N You can set the channel, month, day, year, hour and minute directly by pressing the number buttons on the remote control. N Reserving a program will be shown in the Programmed menu. N Digital Program Guide and Viewing Reservation When a digital channel is - Samsung LN32B360 | User Manual - Page 27
/ Brightness / Sharpness / Color / Tint (G/R) Your television has several setting options that allow you to control the picture quality. Ɣ Backlight: Adjusts the brightness of LCD back light. Ɣ Contrast: Adjusts the contrast level of the picture. Ɣ Brightness: Adjusts the brightness level of the - Samsung LN32B360 | User Manual - Page 28
receiver may have its own set of screen sizes as well. In general, though, you should view the TV in 16:9 mode as much as possible. O Alternately, you can press the P.SIZE button on the remote control repeatedly to change the picture size. Ɣ 16:9 : Sets the picture to 16:9 wide mode. Ɣ Zoom1 - Samsung LN32B360 | User Manual - Page 29
. N Film Mode is supported in TV, Video, Component (480i / 1080i) and HDMI (480i / 1080i). R Picture Reset ĺ Reset Picture Mode / Cancel Resets all picture settings to the default values. N Reset Picture Mode: Current picture values return to default settings. ¦ Using Your TV as a Computer (PC - Samsung LN32B360 | User Manual - Page 30
500 89.040 Sync Polarity (H / V) N When using an HDMI / DVI cable connection, you must use the HDMI (DVI) IN jack. (LN19B360, LN22B360) N When using an HDMI / DVI cable connection, you must use the HDMI IN 1 jack. (LN26B360, LN32B360) ¦ Setting up the TV with your PC N Preset: Press the SOURCE - Samsung LN32B360 | User Manual - Page 31
bandwidth frequencies. „ Reset Resets the equalizer settings to the default values. Sound Mode : program into foreign languages). O You can listen in a language other than the Preferred Language by pressing the MTS button on the remote control. N Preferred Language is available only in Digital TV - Samsung LN32B360 | User Manual - Page 32
in order to set the time automatically. Ɣ Clock Set You can set the current time manually. N This function is only available when Clock Mode is set to Manual. N You can set the month, day, year, hour and minute directly by pressing the number buttons on the remote control. Ɣ Time Zone Select - Samsung LN32B360 | User Manual - Page 33
function is not available in HDMI, Component or PC mode. N The default PIN number of a new TV set is '0-0-0-0' N If you forget the PIN, press the remote-control buttons in the following sequence, which resets the pin to 0-0-0-0 : POWER (off) ĺ MUTE ĺ 8 ĺ 2 ĺ 4 ĺ POWER (on). N Allow all: Press to - Samsung LN32B360 | User Manual - Page 34
Adult programming. Programming generally considered acceptable for children 8 years and over to watch on their own. Ɣ 13 ans+: Programming set TV ratings remote-control buttons in the following sequence, which resets the pin to 0-0-0-0 : POWER (off) ĺ MUTE ĺ 8 ĺ 2 ĺ 4 ĺ POWER (on) Received Rating: TV - Samsung LN32B360 | User Manual - Page 35
picture is poor when external device is connected to TV, check if Game Mode is On. Set Game Mode to Off and connect external devices. R Energy Saving ĺ Off / Low / Medium / High / Auto This feature adjusts the brightness of the TV in order to reduce power consumption. When watching TV at night, set - Samsung LN32B360 | User Manual - Page 36
. Software Upgrade HD Connection Guide Contact Samsung Ɣ No: If the test pattern is properly displayed, select No. There may be a problem with your external equipment. Please check your connections. If the problem still persists, refer to the external device's user manual. „ Sound Test If you - Samsung LN32B360 | User Manual - Page 37
. Upgrades will be possible by connecting a USB drive to the SERVICE port located on your TV. N Insert a USB drive containing the ¿rmware upgrade into the SERVICE port on the side of the TV. N Please be careful to not disconnect the power or remove the USB drive while upgrades are being applied. The - Samsung LN32B360 | User Manual - Page 38
. light blinks steadily. The TV is using its power management system. Move the computer's mouse or press any key on the keyboard. Image is not stable and may appear to vibrate when you have a computer connected to the PC input. If the setting is not correct, use your computer utility program to - Samsung LN32B360 | User Manual - Page 39
Problem Possible Solution The picture appears distorted in the If Screen Fit is selected with some external devices, the picture may appear distorted in corner of the screen. the corner of the screen. This symptom is caused by the external devices, not TV. The 'Resets all settings to the This - Samsung LN32B360 | User Manual - Page 40
over which may cause damage. 2. Figure 2 shows the adjustment angle (14°~80°) when you convert the LCD from stand-based use to wall-mount. 3. Figure 3 shows the adjustment angle (0°~10°) when you mount the LCD TV to a wall. N You will hear a "Click" sound when changing the angle from 1 to 2 or 3 to - Samsung LN32B360 | User Manual - Page 41
VESA Compliant Mounting Devices (LN19B360) Button Mounting pad (Sold separately) 1 2 1. Place the TV face down on a soft cloth or cushion on a table. 2. Adjust the stand, pressing the button on the back of the stand. 3. Align the mounting interface pad (not supplied) with the holes in the stand - Samsung LN32B360 | User Manual - Page 42
to follow the product installation instructions. N Our 57" and 63" models do not comply with VESA Speci¿cations. Therefore, you should use our dedicated wall mount kit for this model. N Do not exceed 15 degrees tilt when mounting this TV. Product Family LCD-TV PDP-TV LFD inches 19 ~ 22 23 ~ 29 30 - Samsung LN32B360 | User Manual - Page 43
LN32B360 only. „ Components: TV-Holder Screw 1 (M4X 16) „ To prevent the TV from falling: 1. Attach the TV-Holder to the TV by TV. N Make sure to only use the supplied screws. 2. Firmly fasten the screws to the wall or cabinet where the TV is to be installed. Tie the TV-Holder attached to the TV - Samsung LN32B360 | User Manual - Page 44
Humidity Stand Swivel Left / Right LN26B360 26 inches (26.0 inches measured diagonally) 1360 x 768 @ 60Hz 5W x 2 26.4 X 3.0 X 17.9 inches (669.7 x 75.3 x 455.0 mm) 26.4 X 8.5 X 19.5 inches (669.7 x 216.0 x 495.1 mm) 15.4 Ibs (7.0 kg) 18.5 Ibs (8.4 kg) LN32B360 32 inches (31.5 inches measured - Samsung LN32B360 | User Manual - Page 45
¦ Dimensions LN26B360 TOP VIEW JACK PANEL DETAIL 5.2"H X 6.6"W 26.4 3.0 22.7 12.8 17.9 19.5 17.0 8.5 FRONT VIEW / SIDE VIEW the dimensions prior to performing installation of your TV. Not responsible for typographical or printed errors. © 2009 Samsung Electronics America, Inc English - 43 - Samsung LN32B360 | User Manual - Page 46
LN32B360 TOP VIEW JACK PANEL DETAIL 5.2"H X 6.6"W 31.4 3.2 27.5 15.5 20.9 22.7 19.8 9.9 FRONT VIEW / SIDE VIEW 7.9 Refer to the dimensions prior to performing installation of your TV. Not responsible for typographical or printed errors. © 2009 Samsung Electronics America, Inc English - 44 - Samsung LN32B360 | User Manual - Page 47
This page is intentionally left blank. - Samsung LN32B360 | User Manual - Page 48
Customer Care Center CANADA 1-800-SAMSUNG(726-7864) U.S.A 1-800-SAMSUNG(726-7864) Web Site www.samsung.com/ca www.samsung.com/us Address Samsung Electronics Canada Inc., Customer Service 55 Standish Court Mississauga, Ontario L5R 4B2 Canada Samsung Electronique Canada Inc., Service à la Client - Samsung LN32B360 | User Manual - Page 49
the LCD TV Stand 32") o Components When installing the stand, use the provided components and parts. ~ § 1 EA 1 EA Stand Cover Neck o Insert the Cover Neck into the groove of the stand. Assemble the LCD TV stand by aligning the triangle figures indicated by the arrow marks. Guide Stand - Samsung LN32B360 | User Manual - Page 50
pencher vers un cote. Fran~ai5' 2 Ensamble el soporte antes de remover su LCD TV de la caja Instalaci6n del soporte LCD TV (32") o Componentes Cuando instale el soporte, use los componentes y partes incluidas. ~. -"/-0;'" -~ c~ Tern'lias 4 PZ 1 PZ 1 PZ 1 PZ Soporte Tapa del cuello - Samsung LN32B360 | User Manual - Page 51
1111 111111111 11I1 BN68-01402C-02 - Samsung LN32B360 | User Manual - Page 52
- Samsung LN32B360 | User Manual - Page 53
0 = L...:. L...: 0 L...: a -,-. ~~ lHI:lI':A!~. Ail~@ t:!~ ~ EE.~ 012t ~A.~~ Ail~~ ~0I1 g.fi!.71~ OI~o~Oj ~~ 4"-'6~ gA.~~ ~. ~ tggro £. * ~~ 01 ~O~ ~AiIR. ~~~lI/l ~717~ ~o~ ~~Ol ~~ '1!~Ljq. A Make sure to brush off the dirt on the provided cloth before : . . cleaning the cabinet. Make sure - Samsung LN32B360 | User Manual - Page 54
receiver, a signal splitter might be necessary to continue to receive low-power analog broadcasts via an antenna. For more information, please see www.DTV.gov or call 1-888-CALL-FCC. For information on the TV Converter program, and on government coupons that may be used toward the purchase of - Samsung LN32B360 | User Manual - Page 55
power cord to the DC adaptor outlet. make surc the voltage designation of the DC adaptor corrsponds to the local electrical supply. • 1\ever insert anything metallic into the open parts service center. • Be sure 10 pull the po\\er plug oul of the outlet iI' the TV damage to your set. • Use onl - Samsung LN32B360 | User Manual - Page 56
- I() cm .. Appareils dotes d'un ecran 32" ou plus ------> 5 em * Alitres produils . une piseinc. cle. Si I'app areil vient aetre lllouille par accident un centre de services homologue lorsque vous en ]a parte trasera 0 inferior de la toma de corriente si la TV ha dejado de utilizarse, 0 deseJ - Samsung LN32B360 | User Manual - Page 57
use only UL Listed detachable power supply cord with NEMA configuration 6-15P fype (tandem blades) plug cap. This television receiver provides display of television closed captioning in accordance with Section 15.119 of the FCC rules. (TV broadcast receivers with picture screens 13 inches or larger - Samsung LN32B360 | User Manual - Page 58
user may be required to take adequate measures. (If the user manual replacement of the obsolete outlet. 10) Protect the power servicing to qualified service personnel. Servicing is required whcn the apparatus has been damaged in any way, such as powcr-supply 's instructions for mounting and - Samsung LN32B360 | User Manual - Page 59
111II11111111111111111111111111111111111111 AA68-03242L-04 - Samsung LN32B360 | User Manual - Page 60
of products, equipment, systems, utilities, services, parts, supplies, accessories, applications, installations. repairs, external wiring or connectors not supplied or authorized by SAMSUNG which damage this product or result in service problems; incorrect electrical line voltage. fluctuations and - Samsung LN32B360 | User Manual - Page 61
burned-in ghost images in the television picture. To avoid this. vary the programming and images. and primarily display Ii.IiI screen moving images, not stationary patterns or dark bars. On television models that offer picture sizing features. use these controls to view the dit"lerentlonnats as
-
 1
1 -
 2
2 -
 3
3 -
 4
4 -
 5
5 -
 6
6 -
 7
7 -
8
-
9
-
10
-
11
-
12
-
13
-
14
-
15
-
16
-
17
-
18
-
19
-
20
-
21
-
22
-
23
-
24
-
25
-
26
-
27
-
28
-
29
-
30
-
31
-
32
-
33
-
34
-
35
-
36
-
37
-
38
-
39
-
40
-
41
-
42
-
43
-
44
-
45
-
46
-
47
-
48
-
49
-
50
-
51
-
52
-
53
-
54
-
55
-
56
-
57
-
58
-
59
-
60
-
61
 |
 |

LCD TV
user manual
imagine the possibilities
Thank you for purchasing this Samsung product.
To receive more complete service, please
register your product at
www.samsung.com/register
Model
Serial No.