Samsung LNT4665F User Manual (ENGLISH) - Page 86
Wall-Mount Adjustment (Sold separately), Button, Operations
 |
UPC - 036725246621
View all Samsung LNT4665F manuals
Add to My Manuals
Save this manual to your list of manuals |
Page 86 highlights
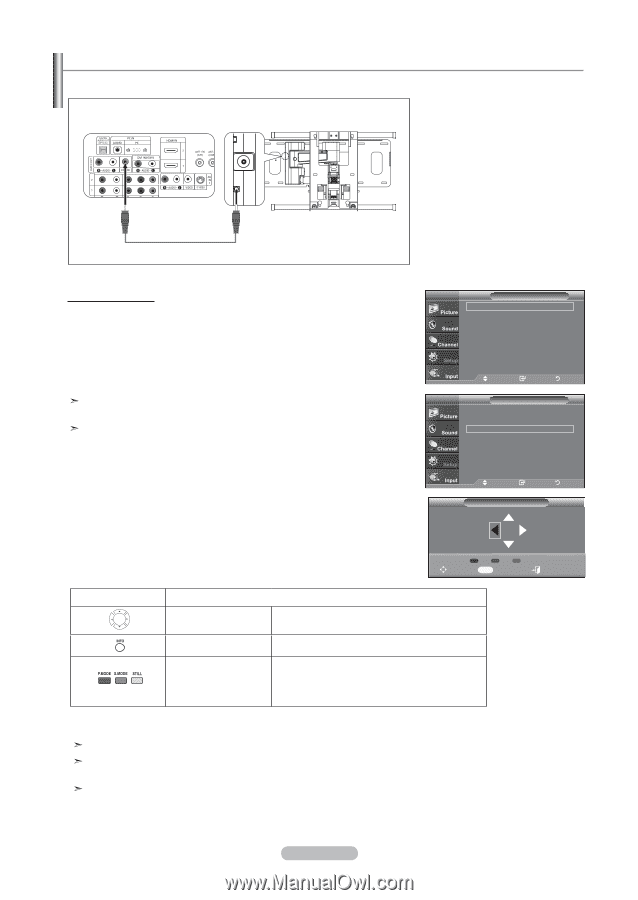
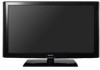
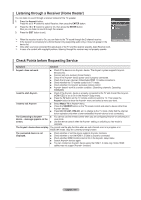
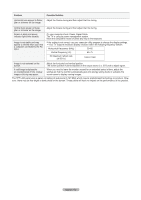
Wall-Mount Adjustment (Sold separately) Tras instalar el montaje en la pared, puede ajustar fácilmente la posición del televisor. TV Rear Panel Auto Wall-Mount EX-LINK Cable (Not supplied) Entering the menu 1. Press the MENU button to display the menu. Press the ▲ or ▼ button to select "Setup", then press the ENTER button. 2. Press the ▲ or ▼ buttons to select "Wall-Mount Adjustment", then press the ENTER button. 3. Adjust to the desired position using the buttons. 4. Press the EXIT button to exit. If you press an arrow button when no OSD is displayed on the TV screen, the Adjustment screen appears. When you turn the power off, your TV moves to the initial installation position. When you turn the power on, your TV moves to the last remembered position you adjusted. TV Setup Plug & Play ► Language : English ► Time ► Game Mode : Off ► V-Chip ► Caption ► Menu TransParency : High ► ▼More Move Enter Return TV Setup ▲ More Film Mode : Off ► Wall-Mount Adjustment ► PIP ► Function Help : Off ► SW Upgrade ► Move Enter Wall Mount Adjusment Position1 Return Using the Remote Control Buttons Button Operations Wall-mount angle adjustment Reset Remembering the position and moving to the remembered position Position 1 2 3 Adjust INFO Center Exit Tilt Up, Tilt Down, Move right, Move left Moves to the initial installation position Remembers 3 positions with the Red, Green and Yellow buttons. Moves to the remembered position using these 3 color buttons. For installation, refer to the Installation Manual provided. For product installation and the installation and moving of the wall mount, make sure to consult a specialized installation company. This installation manual is to be used when attaching the wall mount to a wall. When attaching to other building materials, please contact your nearest dealer English - 84
-
 1
1 -
2
-
3
-
4
-
5
-
6
-
7
-
8
-
9
-
10
-
11
-
12
-
13
-
14
-
15
-
16
-
17
-
18
-
19
-
20
-
21
-
22
-
23
-
24
-
25
-
26
-
27
-
28
-
29
-
30
-
31
-
32
-
33
-
34
-
35
-
36
-
37
-
38
-
39
-
40
-
41
-
42
-
43
-
44
-
45
-
46
-
47
-
48
-
49
-
50
-
51
-
52
-
53
-
54
-
55
-
56
-
57
-
58
-
59
-
60
-
61
-
62
-
63
-
64
-
65
-
66
-
67
-
68
-
69
-
70
-
71
-
72
-
73
-
74
-
75
-
76
-
77
-
78
-
79
-
80
-
 81
81 -
 82
82 -
 83
83 -
 84
84 -
 85
85 -
 86
86 -
 87
87 -
 88
88 -
 89
89 -
 90
90 -
 91
91 -
92
-
93
-
94
-
95
-
96
-
97
-
98
-
99
-
100
-
101
-
102
-
103
-
104
-
105
-
106
-
107
-
108
-
109
-
110
-
111
-
112
-
113
-
114
-
115
-
116
-
117
-
118
-
119
-
120
-
121
-
122
-
123
-
124
-
125
-
126
-
127
-
128
-
129
-
130
-
131
-
132
-
133
-
134
-
135
-
136
-
137
-
138
-
139
-
140
-
141
-
142
-
143
-
144
-
145
-
146
-
147
-
148
-
149
-
150
-
151
-
152
-
153
-
154
-
155
-
156
-
157
-
158
-
159
-
160
-
161
-
162
-
163
-
164
-
165
-
166
-
167
-
168
-
169
-
170
-
171
-
172
-
173
-
174
-
175
-
176
-
177
-
178
 |
 |