Samsung ML 3471ND User Manual (ENGLISH) - Page 15
Selecting a location, Altitude adjustment, Clearance space - linux
 |
UPC - 635753620078
View all Samsung ML 3471ND manuals
Add to My Manuals
Save this manual to your list of manuals |
Page 15 highlights
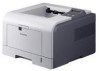
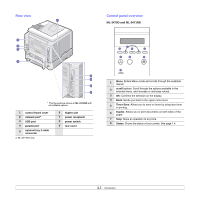
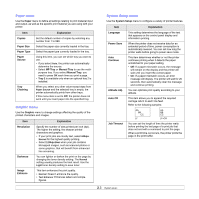
Selecting a location Select a level, stable place with adequate space for air circulation. Allow extra space for opening covers and trays. The area should be well-ventilated and away from direct sunlight or sources of heat, cold, and humidity. Do not set the printer close to the edge of your desk or table. Clearance space Front: 500 mm (enough space so that trays can be opened or removed) Back: 350 mm (enough space to allow opening of the rear cover or the duplex unit) Right: 100 mm (enough space for ventilation) Left: 100 mm (enough space to allow opening of the control board cover) Altitude adjustment The print quality is affected by atmospheric pressure, which is determined by the height of the machine above sea level. The following information will guide you on how to set your machine to the best print quality or best quality of print. Before you set the altitude value, find the altitude where you are using the machine. 1 High 3 2 High 2 3 High 1 4 Normal 0 1 Ensure that you have installed the printer driver with the provided Printer Software CD. 2 Double-click the Smart Panel icon on the Windows task bar (or Notification Area in Linux). You can also click Smart Panel on the status bar in Mac OS X. 3 Click Printer Setting. 4 Click Setting > Altitude Adjustment. Select the appropriate value from the dropdown list, and then click Apply. Note IIf your machine is connected to a network, SyncThru Web Service screen appears automatically. Click Machine Settings > Setup (or Machine Setup) > Altitude Adj. Select the appropriate altitude value, and then click Apply. 1.5
-
 1
1 -
2
-
3
-
4
-
5
-
6
-
7
-
8
-
9
-
 10
10 -
 11
11 -
 12
12 -
 13
13 -
 14
14 -
 15
15 -
 16
16 -
 17
17 -
 18
18 -
 19
19 -
 20
20 -
21
-
22
-
23
-
24
-
25
-
26
-
27
-
28
-
29
-
30
-
31
-
32
-
33
-
34
-
35
-
36
-
37
-
38
-
39
-
40
-
41
-
42
-
43
-
44
-
45
-
46
-
47
-
48
-
49
-
50
-
51
-
52
-
53
-
54
-
55
-
56
-
57
-
58
-
59
-
60
-
61
-
62
-
63
-
64
-
65
-
66
-
67
-
68
-
69
-
70
-
71
-
72
-
73
-
74
-
75
-
76
-
77
-
78
-
79
-
80
-
81
-
82
-
83
-
84
-
85
-
86
-
87
-
88
-
89
-
90
-
91
-
92
-
93
-
94
-
95
-
96
-
97
-
98
-
99
-
100
-
101
-
102
-
103
 |
 |
