Samsung NA30R5310FS/AA User Manual - Page 17
Control knobs, Burner grates and components, English 17
 |
View all Samsung NA30R5310FS/AA manuals
Add to My Manuals
Save this manual to your list of manuals |
Page 17 highlights
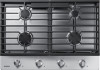
Care and cleaning of the cooktop Control knobs Make sure all surface burner knobs are in the OFF position. 1. Pull the knobs off the control valve 01 stems. 2. Clean the knobs in warm, soapy water. Then rinse and dry them thoroughly. 3. Clean the stainless steel surfaces using stainless steel cleaner. 4. Re-attach the knobs in the OFF position to the control valve stems. CAUTION 02 • Do not clean the control knobs in a dish washer. • Do not spray cleansers directly onto 01 Grasp each knob and pull straight the control panel. Moisture entering the up to remove. electric circuits may cause electric shock 02 Spill protector. Do not remove. or product damage. Burner grates and components Turn off all surface burners and make sure they have all cooled down. 1. Remove the burner grates. 2. Remove the burner caps from the burner heads. 3. Remove the burner heads from the valve manifolds to reveal the starter 2 electrodes. 1 3 4. Clean all removable grates and burner components in warm, soapy water. Do not use steel-wool pads or abrasive cleaners. 5. Rinse and dry grates and burner components thoroughly. 6. Return the burner heads to their positions on top of the manifold valves. Make sure a starter electrode is inserted through the hole in each burner head. 7 8 6 NOTE See pages 18, 19, and 20 for detailed burner component re-assembly instructions. 7. Return the burner caps to their positions on top of the burner heads. To ensure proper and safe operation, make sure the burner caps lie flat on top of the burner heads. 8. Re-install the burner grates in their respective positions. 9. Turn on each burner and check if it operates properly. After verifying that a burner operates normally, turn it off. NA5300R_DG68-01132A-01_EN+MES+CFR.indb 17 English 17 2020-06-04 10:20:04
-
 1
1 -
2
-
3
-
4
-
5
-
6
-
7
-
8
-
9
-
10
-
11
-
 12
12 -
 13
13 -
 14
14 -
 15
15 -
 16
16 -
 17
17 -
 18
18 -
 19
19 -
 20
20 -
 21
21 -
 22
22 -
23
-
24
-
25
-
26
-
27
-
28
-
29
-
30
-
31
-
32
-
33
-
34
-
35
-
36
-
37
-
38
-
39
-
40
-
41
-
42
-
43
-
44
-
45
-
46
-
47
-
48
-
49
-
50
-
51
-
52
-
53
-
54
-
55
-
56
-
57
-
58
-
59
-
60
-
61
-
62
-
63
-
64
-
65
-
66
-
67
-
68
-
69
-
70
-
71
-
72
-
73
-
74
-
75
-
76
-
77
-
78
-
79
-
80
-
81
-
82
-
83
-
84
 |
 |
