Samsung PL120 User Manual (user Manual) (ver.1.0) (English) - Page 53
Adjusting the ISO sensitivity
 |
UPC - 044701015475
View all Samsung PL120 manuals
Add to My Manuals
Save this manual to your list of manuals |
Page 53 highlights
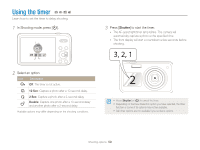
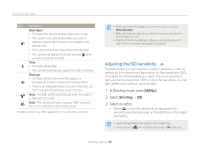
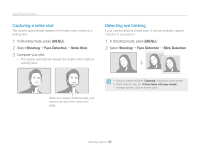
Shooting in the dark Icon Description Slow Sync: • The flash fires and the shutter stays open longer. • This option is recommended when you want to capture ambient light to reveal more details in the background. • Use a tripod to prevent your photos from blurring. • The camera will display the shake warning when you are shooting in low light. Fill in: • The flash always fires. • The camera automatically adjusts the flash's intensity. Red-eye: • The flash will fire twice when the subject or background is dark to reduce the red-eye effect. • There is an interval between 2 bursts of the flash. Do not move until the flash fires a second time. Auto: The flash will fire automatically when the subject or background is dark. Auto: The camera will select a proper flash setting for the scene it detects in Smart Auto mode. Available options may differ depending on the shooting conditions. • Flash options are not available if you set burst options or select Blink Detection. • Make sure that your subjects are within the recommended distance from the flash. (p. 114) • If light from the flash is reflected or there is a substantial amount of dust in the air, tiny spots may appear in your photo. Adjusting the ISO sensitivity p The ISO sensitivity is the measure of a film's sensitivity to light as defined by the International Organization for Standardization (ISO). The higher the ISO sensitivity you select, the more sensitive to light your camera becomes. With a higher ISO sensitivity, you can get a better photo without using the flash. 1 In Shooting mode, press [m]. 2 Select Shooting “ ISO. 3 Select an option. • Select to have the camera set an appropriate ISO sensitivity automatically based on the brightness of the subject and lighting. • Higher ISO sensitivities may result in more image noise. • When you select , the resolution will change to and below. Shooting options 52
-
 1
1 -
2
-
3
-
4
-
5
-
6
-
7
-
8
-
9
-
10
-
11
-
12
-
13
-
14
-
15
-
16
-
17
-
18
-
19
-
20
-
21
-
22
-
23
-
24
-
25
-
26
-
27
-
28
-
29
-
30
-
31
-
32
-
33
-
34
-
35
-
36
-
37
-
38
-
39
-
40
-
41
-
42
-
43
-
44
-
45
-
46
-
47
-
 48
48 -
 49
49 -
 50
50 -
 51
51 -
 52
52 -
 53
53 -
 54
54 -
 55
55 -
 56
56 -
 57
57 -
 58
58 -
59
-
60
-
61
-
62
-
63
-
64
-
65
-
66
-
67
-
68
-
69
-
70
-
71
-
72
-
73
-
74
-
75
-
76
-
77
-
78
-
79
-
80
-
81
-
82
-
83
-
84
-
85
-
86
-
87
-
88
-
89
-
90
-
91
-
92
-
93
-
94
-
95
-
96
-
97
-
98
-
99
-
100
-
101
-
102
-
103
-
104
-
105
-
106
-
107
-
108
-
109
-
110
-
111
-
112
-
113
-
114
-
115
-
116
-
117
-
118
-
119
-
120
-
121
-
122
-
123
-
124
-
125
-
126
-
127
 |
 |