Samsung RF261BIAESR User Manual Installation Guide Included Ver.1.0 (English, - Page 10
Making Minor Adjustments, Between Doors - review
 |
View all Samsung RF261BIAESR manuals
Add to My Manuals
Save this manual to your list of manuals |
Page 10 highlights
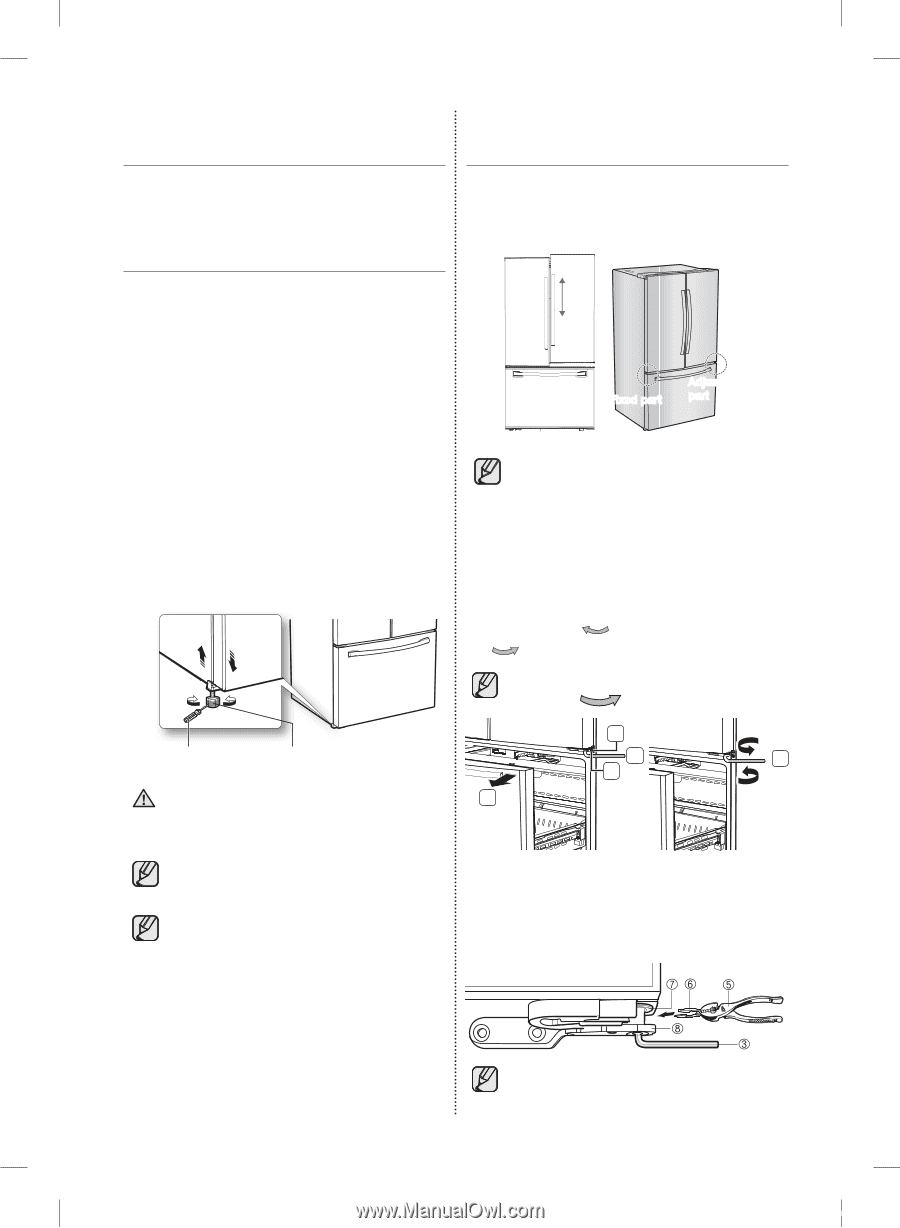
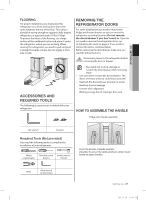
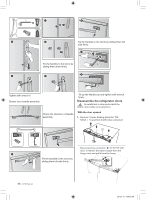
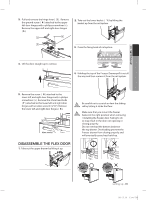
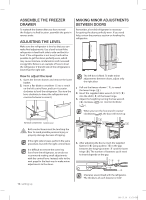
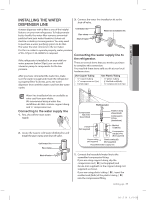
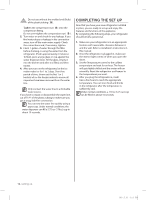
ASSEMBLE THE FREEZER DRAWER To reattach the drawer after you have moved the fridge to its final location, assemble the parts in reverse order. ADJUSTING THE LEVEL Make sure the refrigerator is level so that you can make final adjustments. Use a level to test if the refrigerator is level both side to side and back to front. If the refrigerator is not level, it will not be possible to get the doors perfectly even, which may cause moisture condensation and increased energy bills. Below is an example of how to level the refrigerator if the left side of the refrigerator is lower than the right side. MAKING MINOR ADJUSTMENTS BETWEEN DOORS Remember, a leveled refrigerator is necessary for getting the doors perfectly even. If you need help, review the previous section on leveling the refrigerator. Fixed part Adjustment part How to adjust the level 1. Open the freezer drawer and remove the lower basket. 2. Insert a flat-blade screwdriver (-) into a notch on the left control lever, and turn it counter. clockwise to level the refrigerator. (You turn the lever clockwise to lower the refrigerator and counterclockwise to raise it.) The left door is fixed. To make minor adjustments between doors, adjust only the right door. 1 Pull out the freezer drawer ( 1 ), to reveal the lower hinge ( 2 ). 2. Insert the supplied allen wrench (3/16") ( 3 ) into the shaft ( 4 ) of the lower hinge. 3. Adjust the height by turning the hex wrench ( 3 ) clockwise ( DOWN ) or counterclockwise ( UP ). When you turn the hex wrench counter- clockwise( ), the door will move up. 2 flat-blade screwdriver(-) Control Lever 3 3 4 Both control levers must be touching the 1 CAUTION floor to avoid possible personal injury or property damage because of tipping. If the right side is lower, perform the same procedure, but with the right control lever. It is difficult to remove the cover leg front from the refrigerator, so we do not recommend making small adjustments with the control lever. Instead, refer to the next page for the best way to make minor adjustments to the doors. 4. After adjusting the doors, insert the supplied fastener ( 6 ) using a pliers ( 5 ) in the gap between the hinge-grommet ( 7 ) and the lower hinge ( 8 ). The number of fasteners you'll need to insert depends on the gap. 10_setting up 2 fastener are enclosed with the refrigerator. The thickness of each fastener is 0.04". 1.
-
 1
1 -
2
-
3
-
4
-
 5
5 -
 6
6 -
 7
7 -
 8
8 -
 9
9 -
 10
10 -
 11
11 -
 12
12 -
 13
13 -
 14
14 -
 15
15 -
16
-
17
-
18
-
19
-
20
-
21
-
22
-
23
-
24
-
25
-
26
-
27
-
28
-
29
-
30
-
31
-
32
-
33
-
34
-
35
-
36
-
37
-
38
-
39
-
40
-
41
-
42
-
43
-
44
-
45
-
46
-
47
-
48
-
49
-
50
-
51
-
52
-
53
-
54
-
55
-
56
-
57
-
58
-
59
-
60
-
61
-
62
-
63
-
64
-
65
-
66
-
67
-
68
-
69
-
70
-
71
-
72
-
73
-
74
-
75
-
76
-
77
-
78
-
79
-
80
-
81
-
82
-
83
-
84
 |
 |