Samsung SC-D366 User Manual (ENGLISH) - Page 23
Initial Setting : System Menu Setting, Ajuste inicial: ajuste del menú System Sistema
 |
View all Samsung SC-D366 manuals
Add to My Manuals
Save this manual to your list of manuals |
Page 23 highlights
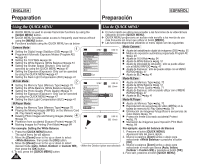
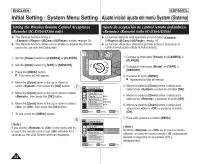
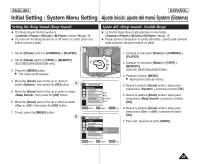
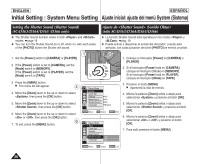
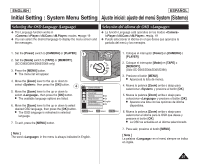
ENGLISH ESPAÑOL Initial Setting : System Menu Setting Ajuste inicial: ajuste del menú System (Sistema) Setting the Clock (Clock Set) Ajuste del reloj (Ajuste Reloj) ✤ Clock setup works in /// modes. ➥page 19 ✤ The Date/Time is automatically recorded onto a tape. Before recording, please set the . ➥page 30 ✤ La configuración del reloj está operativa en los modos ///. ➥pág. 19 ✤ La fecha y la hora se graban de manera automática en la cinta. Antes de grabar, fije la . ➥pág. 30 1. Set the [Power] switch to [CAMERA] or [PLAYER]. 4 2. Set the [Mode] switch to [TAPE] or [MEMORY]. (SC-D363/D364/D365/D366 only) 3. Press the [MENU] button. ■ The menu list will appear. 4. Move the [Zoom] lever up or down to select , then press the [OK] button. Camera Mode √System Clock Set Remote Beep Sound Language Demonstration √On √On √English √On ZOOM Move OK Select MENU Exit 1. Coloque el interruptor [Power] en [CAMERA] o [PLAYER]. 2. Coloque el interruptor [Mode] en [TAPE] o [MEMORY]. (Sólo SC-D363/D364/D365/D366) 3. Presione el botón [MENU]. ■ Aparecerá la lista de menús. 4. Mueva la palanca [Zoom] arriba o abajo para seleccionar y presione el botón [OK]. 5. Mueva la palanca [Zoom] arriba o abajo para 5. Move the [Zoom] lever up or down to select seleccionar y presione el botón [OK]. , then press the [OK] button. ■ The year will be highlighted first. 5 Camera Mode Back ■ Primero aparecerá resaltado el año. 6. Mueva la palanca [Zoom] arriba o abajo para ajustar 6. Move the [Zoom] lever up or down to set current , then press the [OK] button. ■ The month will be highlighted. 7. You can set the month, day, hour and minute Clock Set Remote Beep Sound Language Demonstration ... JAN 1 2006 † 12 : 00 AM el actual y presione el botón [OK]. ■ Se resaltará el mes. 7. Fije el mes, día, hora y minutos siguiendo el mismo procedimiento tras ajustar el año. following the same procedure after setting the year. 8. Presione el botón [OK] tras ajustar los minutos. 8. Press the [OK] button after setting the minutes. ■ A message is displayed. ■ THoouardojursMt tihnebcylopcrke,ssseinlegctthtehe[OYKe]arb,uMttoonnt,ht,hDenay,8 move the [Zoom] lever up or down to set respective values. ZOOM Adjust OK Select MENU Exit Camera Mode Back Clock Set Remote JAN 1 2006 ■ Aparece el mensaje . ■ Para ajustar el reloj, seleccione el año, mes, día, hora o minuto presionando el botón [OK] y mueva la palanca [Zoom] arriba o abajo para ajustar los valores respectivos. 9. Para salir, presione el botón [MENU]. 9. To exit, press the [MENU] button. Beep Sound 12 : 00 AM [ Notas ] [ Notes ] Language Demonstration Complete ! ■ Una vez que la batería de litio pierda su carga (después de 6 meses aproximadamente), la fecha ■ After the Lithium Battery loses its charge (after y hora aparecen en pantalla como about 6 months), the date/time appears on the ZOOM Move screen as . ■ You can set the year up to 2037. ■ If the Lithium Battery is not installed, any inputted data will not be OK Select MENU Exit . ■ Puede definir el año hasta 2037. ■ Si no se instala la batería de litio, no se memorizará ningún dato introducido. backed up. 23
-
 1
1 -
2
-
3
-
4
-
5
-
6
-
7
-
8
-
9
-
10
-
11
-
12
-
13
-
14
-
15
-
16
-
17
-
 18
18 -
 19
19 -
 20
20 -
 21
21 -
 22
22 -
 23
23 -
 24
24 -
 25
25 -
 26
26 -
 27
27 -
 28
28 -
29
-
30
-
31
-
32
-
33
-
34
-
35
-
36
-
37
-
38
-
39
-
40
-
41
-
42
-
43
-
44
-
45
-
46
-
47
-
48
-
49
-
50
-
51
-
52
-
53
-
54
-
55
-
56
-
57
-
58
-
59
-
60
-
61
-
62
-
63
-
64
-
65
-
66
-
67
-
68
-
69
-
70
-
71
-
72
-
73
-
74
-
75
-
76
-
77
-
78
-
79
-
80
-
81
-
82
-
83
-
84
-
85
-
86
-
87
-
88
-
89
-
90
-
91
-
92
-
93
-
94
-
95
-
96
-
97
-
98
-
99
-
100
-
101
-
102
-
103
-
104
-
105
-
106
 |
 |