Samsung SC-HMX10C User Manual (user Manual) (ver.1.0) (English) - Page 83
Component Out, Default Set, Language, Settings, Contents, On-screen, display, SD 480P - progressive hd camcorder
 |
View all Samsung SC-HMX10C manuals
Add to My Manuals
Save this manual to your list of manuals |
Page 83 highlights
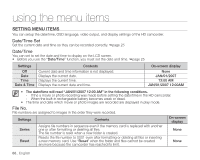
Component Out You can set the component video output to match the TV you have connected. Settings Auto SD 480P SD 480i Contents On-screen display The video signals are output in the same format as the recorded file. Use this setting only when connecting to an HDTV. When "Auto" is selected, an indicator does not None appear on the screen. The recorded file is output in the 480P format. Select it when connecting to an SD quality TV that supports progressive scan. The recorded file is output in the 720x480i format. Select when connecting to an SD quality TV that does not support progressive scan. Default Set You can restore menu settings to default (initial settings at the factory) pages 49-51 Initializing the HD camcorder settings to factory defaults does not affect recorded images. Language You can select a desired language to display the menu and messages. "Language" options may be changed without prior notice. page 24 Demo Demonstration automatically shows you the major functions that are included with your HD camcorder so that you may use them more easily. Settings Off On Contents Disables the function Activates Demonstration mode and shows various features. On-screen display None None • The Demo function will automatically come on after 5 minutes has passed in STBY mode when recording a movie. • You can release the Demo function as follows. - Touching any point on LCD screen / changing mode / pressing the button (Recording start/stop, Q.MENU, Display ( )/iCHECK, EASY Q, or LCD enhancer ( )) • Demo function does not work when the Multi-AV or component cable (only when "Component Out" is set to 480p or 480i) is connected to TV. Also Demo stops and it returns to STBY mode once above cables are connected. English _71
-
 1
1 -
2
-
3
-
4
-
5
-
6
-
7
-
8
-
9
-
10
-
11
-
12
-
13
-
14
-
15
-
16
-
17
-
18
-
19
-
20
-
21
-
22
-
23
-
24
-
25
-
26
-
27
-
28
-
29
-
30
-
31
-
32
-
33
-
34
-
35
-
36
-
37
-
38
-
39
-
40
-
41
-
42
-
43
-
44
-
45
-
46
-
47
-
48
-
49
-
50
-
51
-
52
-
53
-
54
-
55
-
56
-
57
-
58
-
59
-
60
-
61
-
62
-
63
-
64
-
65
-
66
-
67
-
68
-
69
-
70
-
71
-
72
-
73
-
74
-
75
-
76
-
77
-
 78
78 -
 79
79 -
 80
80 -
 81
81 -
 82
82 -
 83
83 -
 84
84 -
 85
85 -
 86
86 -
 87
87 -
 88
88 -
89
-
90
-
91
-
92
-
93
-
94
-
95
-
96
-
97
-
98
-
99
-
100
-
101
-
102
-
103
-
104
-
105
-
106
-
107
-
108
-
109
-
110
-
111
-
112
-
113
-
114
-
115
-
116
-
117
-
118
-
119
-
120
-
121
-
122
-
123
-
124
 |
 |
