Samsung SCD27 User Manual (user Manual) (ver.5.0) (English) - Page 41
CLOCK setup works in CAMERA, PLAYER, M.REC and M.PLAY modes.
 |
View all Samsung SCD27 manuals
Add to My Manuals
Save this manual to your list of manuals |
Page 41 highlights
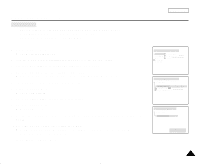
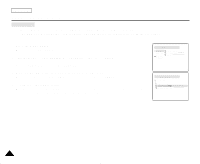
Advanced Recording q CLOCK SET ✤ CLOCK setup works in CAMERA, PLAYER, M.REC and M.PLAY modes. ✤ The DATE/TIME is automatically recorded onto a tape. Before recording, please set the DATE/TIME. 1. Press the MENU button. s The menu list will appear. 2. Turn the MENU DIAL to highlight INITIAL and press the ENTER button. 3. Use the MENU DIAL to select CLOCK SET from the submenu. 4. Press the ENTER button to enter SETTING mode. s A blinking item indicates the item to be changed. The year will blink first. 5. Using the MENU DIAL, change the year setting. 6. Press the ENTER button. s The month will blink. 7. Using the MENU DIAL, change the month setting. 8. Press the ENTER button. s The day will blink. 9. You can set the day, hour and minute following the same procedure for setting the year and month. 10.Press the ENTER button after setting the minutes. s The word COMPLETE! will appear, and a few seconds later, the menu screen will automatically return to the sub menu. 11.To exit, press the MENU button. ENGLISH CAM MODE INITIAL CAMERA A/V MEMORY VIEWER CLOCK SET WL. REMOTE DEMO CAM MODE INITIAL SET CLOCK SET WL.REMOTE DEMONSTRATION SET TIME! CAM MODE INITIAL SET CLOCK SET 1 0 : 0 0 AM J A N. 1 0 , 2 0 0 3 37
-
 1
1 -
2
-
3
-
4
-
5
-
6
-
7
-
8
-
9
-
10
-
11
-
12
-
13
-
14
-
15
-
16
-
17
-
18
-
19
-
20
-
21
-
22
-
23
-
24
-
25
-
26
-
27
-
28
-
29
-
30
-
31
-
32
-
33
-
34
-
35
-
 36
36 -
 37
37 -
 38
38 -
 39
39 -
 40
40 -
 41
41 -
 42
42 -
 43
43 -
 44
44 -
 45
45 -
 46
46 -
47
-
48
-
49
-
50
-
51
-
52
-
53
-
54
-
55
-
56
-
57
-
58
-
59
-
60
-
61
-
62
-
63
-
64
-
65
-
66
-
67
-
68
-
69
-
70
-
71
-
72
-
73
-
74
-
75
-
76
-
77
-
78
-
79
-
80
-
81
-
82
-
83
-
84
-
85
-
86
-
87
-
88
-
89
-
90
-
91
-
92
-
93
-
94
-
95
-
96
-
97
-
98
-
99
-
100
-
101
-
102
-
103
-
104
-
105
-
106
-
107
-
108
-
109
 |
 |
