Samsung SL-M2825DW User Manual Ver.1.01 (English) - Page 20
Installing the driver locally
 |
View all Samsung SL-M2825DW manuals
Add to My Manuals
Save this manual to your list of manuals |
Page 20 highlights
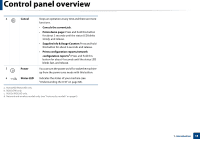
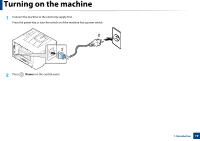
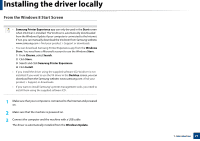
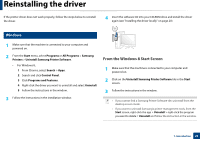
Installing the driver locally A locally connected machine is a machine directly attached to your computer using the cable. If your machine is attached to a network, skip the following steps below and go on to installing a network connected machine's driver (see "Installing driver over the network" on page 107). • If you are a Mac, Linux, or Unix OS user, refer to the "Software installation" on page 95. • The installation window in this User's Guide may differ depending on the machine and interface in use. • Only use a USB cable no longer than 3 meters (118 inches). 12 Windows 1 Make sure that the machine is connected to your computer and powered on. 2 Insert the supplied software CD into your CD-ROM drive. X:\Setup.exe replacing "X" with the letter, which represents your CDROM drive and click OK. • For Windows 8, If the installation window does not appear, from Charms, select Search > Apps and search for Run. Type in X:\Setup.exe, replacing "X" with the letter that represents your CD-ROM drive and click OK. If "Tap to choose what happens with this disc." pop-up window appears, click the window and select Run Setup.exe. 3 Read and check The software End User License Agreement and Using Enhanced Features and Participating in Printer Usage Information Collection Program (optional). Then, click Next. If the installation window does not appear, click Start > All programs > Accessories > Run. 4 Follow the instructions in the installation window. 1. Introduction 20
-
 1
1 -
2
-
3
-
4
-
5
-
6
-
7
-
8
-
9
-
10
-
11
-
12
-
13
-
14
-
 15
15 -
 16
16 -
 17
17 -
 18
18 -
 19
19 -
 20
20 -
 21
21 -
 22
22 -
 23
23 -
 24
24 -
 25
25 -
26
-
27
-
28
-
29
-
30
-
31
-
32
-
33
-
34
-
35
-
36
-
37
-
38
-
39
-
40
-
41
-
42
-
43
-
44
-
45
-
46
-
47
-
48
-
49
-
50
-
51
-
52
-
53
-
54
-
55
-
56
-
57
-
58
-
59
-
60
-
61
-
62
-
63
-
64
-
65
-
66
-
67
-
68
-
69
-
70
-
71
-
72
-
73
-
74
-
75
-
76
-
77
-
78
-
79
-
80
-
81
-
82
-
83
-
84
-
85
-
86
-
87
-
88
-
89
-
90
-
91
-
92
-
93
-
94
-
95
-
96
-
97
-
98
-
99
-
100
-
101
-
102
-
103
-
104
-
105
-
106
-
107
-
108
-
109
-
110
-
111
-
112
-
113
-
114
-
115
-
116
-
117
-
118
-
119
-
120
-
121
-
122
-
123
-
124
-
125
-
126
-
127
-
128
-
129
-
130
-
131
-
132
-
133
-
134
-
135
-
136
-
137
-
138
-
139
-
140
-
141
-
142
-
143
-
144
-
145
-
146
-
147
-
148
-
149
-
150
-
151
-
152
-
153
-
154
-
155
-
156
-
157
-
158
-
159
-
160
-
161
-
162
-
163
-
164
-
165
-
166
-
167
-
168
-
169
-
170
-
171
-
172
-
173
-
174
-
175
-
176
-
177
-
178
-
179
-
180
-
181
-
182
-
183
-
184
-
185
-
186
-
187
-
188
-
189
-
190
-
191
-
192
-
193
-
194
-
195
-
196
-
197
-
198
-
199
-
200
-
201
-
202
-
203
-
204
-
205
-
206
-
207
-
208
-
209
-
210
-
211
-
212
-
213
-
214
-
215
-
216
-
217
-
218
-
219
-
220
-
221
-
222
-
223
-
224
-
225
-
226
-
227
-
228
-
229
-
230
-
231
-
232
 |
 |
