Samsung SL310W User Manual (ENGLISH) - Page 21
Starting the Recording mode - user manual
 |
UPC - 014642880081
View all Samsung SL310W manuals
Add to My Manuals
Save this manual to your list of manuals |
Page 21 highlights
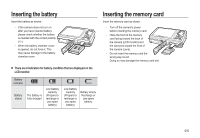
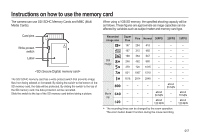
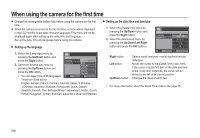
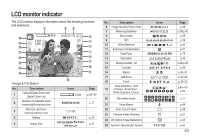
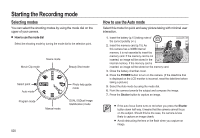
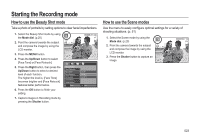
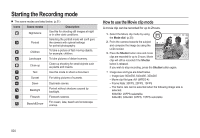
Starting the Recording mode Selecting modes You can select the shooting modes by using the mode dial on the upper of your camera. „ How to use the mode dial Select the shooting mode by turning the mode dial to the selection point. Movie Clip mode Scene mode Beauty Shot mode Select point Auto mode Program mode Photo help guide mode Manual mode DUAL IS(Dual Image Stabilization) mode 020 How to use the Auto mode Select this mode for quick and easy picture taking with minimal user interaction. 1. Insert the battery (p.15) taking note of the correct polarity (+/-). 00005 2. Insert the memory card (p.15). As this camera has a 30MB internal memory, it is not essential to insert the memory card. If the memory card is not inserted, an image will be stored in the internal memory. If the memory card is inserted, an image will be stored on the memory card. 3. Close the battery chamber cover. 4. Press the POWER button to turn on the camera. (If the date/time that is displayed on the LCD monitor is incorrect, reset the date/time before taking a picture.) 5. Select the Auto mode by using the mode dial. 6. Point the camera towards the subject and compose the image. 7. Press the Shutter button to capture an image. z If the auto focus frame turns to red when you press the Shutter button down half way, it means that the camera cannot focus on the subject. Should this be the case, the camera is less likely to capture an image clearly. z Avoid obstructing the lens or the flash when you capture an image.
-
 1
1 -
2
-
3
-
4
-
5
-
6
-
7
-
8
-
9
-
10
-
11
-
12
-
13
-
14
-
15
-
 16
16 -
 17
17 -
 18
18 -
 19
19 -
 20
20 -
 21
21 -
 22
22 -
 23
23 -
 24
24 -
 25
25 -
 26
26 -
27
-
28
-
29
-
30
-
31
-
32
-
33
-
34
-
35
-
36
-
37
-
38
-
39
-
40
-
41
-
42
-
43
-
44
-
45
-
46
-
47
-
48
-
49
-
50
-
51
-
52
-
53
-
54
-
55
-
56
-
57
-
58
-
59
-
60
-
61
-
62
-
63
-
64
-
65
-
66
-
67
-
68
-
69
-
70
-
71
-
72
-
73
-
74
-
75
-
76
-
77
-
78
-
79
-
80
-
81
-
82
-
83
-
84
-
85
-
86
-
87
-
88
-
89
-
90
-
91
-
92
-
93
-
94
-
95
-
96
-
97
-
98
-
99
-
100
-
101
-
102
-
103
-
104
-
105
-
106
-
107
-
108
 |
 |
