Samsung SP-D400 User Manual (user Manual) (ver.1.0) (English) - Page 9
µndicators, Áens, Zoom Knob, Button, ¿elect and Move Button - projector lamp
 |
View all Samsung SP-D400 manuals
Add to My Manuals
Save this manual to your list of manuals |
Page 9 highlights
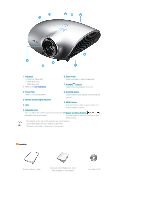
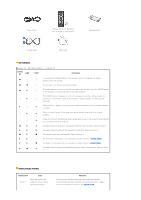
1. Indicators - STAND BY (Blue LED) - LAMP (Blue LED) - TEMP (Red LED) ※ Refer to the LED Indications. 6. Zoom Knob Used to enlarge or reduce image size. 7. POWER( ) Button Used to turn the projector on or off. 2. Focus Ring 8. SOURCE Button Used for Focus Adjustment. Used to select input signals from the external sources. 3. Remote Control Signal Receiver 9. MENU Button 4. Lens Use this button to enter or exit a menu or to move forward in a menu. 5. Adjustable Feet You can adjust the screen position by moving the 10.Select and Move Button( / ) adjustable feet up and down. Use this button to move to or select an item within a menu. The buttons on the top of the projector are touch buttons. Touch them lightly with your fingers to use them. The label is attached to the bottom of the product. Unpacking Quick Installation Guide Warranty Card/ Registration Card (Not available in all locations) User Manual CD
-
 1
1 -
2
-
3
-
 4
4 -
 5
5 -
 6
6 -
 7
7 -
 8
8 -
 9
9 -
 10
10 -
 11
11 -
 12
12 -
 13
13 -
 14
14 -
15
-
16
-
17
-
18
-
19
-
20
-
21
-
22
-
23
-
24
-
25
-
26
-
27
-
28
-
29
-
30
-
31
-
32
-
33
-
34
-
35
-
36
-
37
-
38
 |
 |
