Samsung SPH-M910 User Manual (user Manual) (ver.f9) (English) - Page 76
Updating Your Device Firmware OTA, Confirm Your Current Device Firmware
 |
View all Samsung SPH-M910 manuals
Add to My Manuals
Save this manual to your list of manuals |
Page 76 highlights
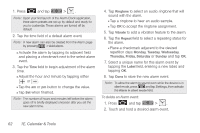
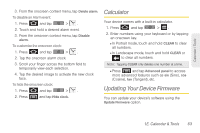
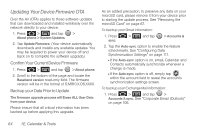
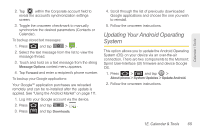
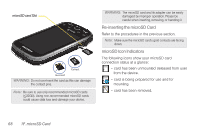
Updating Your Device Firmware OTA Over the Air (OTA) applies to those software updates that can downloaded and installed wirelessly over the network directly to your device. 1. Press > and tap > About phone > System Updates. 2. Tap Update Firmware. (Your device automatically downloads and installs any available updates. You may be required to power your device off and back on to complete the software upgrade.) Confirm Your Current Device Firmware 1. Press > and tap > About phone. 2. Scroll to the bottom of the page and locate the Baseband version read-only field. The firmware version will be in the format of S:M910.X.OS.XXXX. Backup your Data Prior to Update The firmware upgrade process will Erase ALL User Data from your device. Please ensure that all critical information has been backed up before applying this upgrade. As an added precaution, to preserve any data on your microSD card, please remove it from your device prior to starting the update process. See "Removing the microSD Card" on page 67. To backup your Gmail information: 1. Press > and tap > Accounts & sync. 2. Tap the Auto-sync option to enable the feature (checkmark). See "Configuring Data Synchronization Settings" on page 111. Ⅲ If the Auto-sync option is on, email, Calendar and Contacts automatically synchronize whenever a change is made. Ⅲ If the Auto-sync option is off, simply tap within the account field to reveal the account's synchronization settings screen. To backup your Exchange Mail information: 1. Press > and tap > Accounts & sync. See "Corporate Email (Outlook)" on page 106. 64 1E. Calendar & Tools
-
 1
1 -
2
-
3
-
4
-
5
-
6
-
7
-
8
-
9
-
10
-
11
-
12
-
13
-
14
-
15
-
16
-
17
-
18
-
19
-
20
-
21
-
22
-
23
-
24
-
25
-
26
-
27
-
28
-
29
-
30
-
31
-
32
-
33
-
34
-
35
-
36
-
37
-
38
-
39
-
40
-
41
-
42
-
43
-
44
-
45
-
46
-
47
-
48
-
49
-
50
-
51
-
52
-
53
-
54
-
55
-
56
-
57
-
58
-
59
-
60
-
61
-
62
-
63
-
64
-
65
-
66
-
67
-
68
-
69
-
70
-
 71
71 -
 72
72 -
 73
73 -
 74
74 -
 75
75 -
 76
76 -
 77
77 -
 78
78 -
 79
79 -
 80
80 -
 81
81 -
82
-
83
-
84
-
85
-
86
-
87
-
88
-
89
-
90
-
91
-
92
-
93
-
94
-
95
-
96
-
97
-
98
-
99
-
100
-
101
-
102
-
103
-
104
-
105
-
106
-
107
-
108
-
109
-
110
-
111
-
112
-
113
-
114
-
115
-
116
-
117
-
118
-
119
-
120
-
121
-
122
-
123
-
124
-
125
-
126
-
127
-
128
-
129
-
130
-
131
-
132
-
133
-
134
-
135
-
136
-
137
-
138
-
139
-
140
-
141
-
142
-
143
-
144
-
145
-
146
-
147
-
148
-
149
-
150
-
151
-
152
-
153
-
154
-
155
-
156
-
157
 |
 |