Samsung UN19C4000PD Quick Guide (easy Manual) (ver.1.0) (English) - Page 2
Step 5 - manual
 |
View all Samsung UN19C4000PD manuals
Add to My Manuals
Save this manual to your list of manuals |
Page 2 highlights
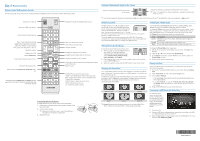
Step 5: Remote Control Remote Control Buttons and Functions ✎✎This is a special remote control for the visually impaired and has Braille points on the Power, Channel and Volume buttons. Turns the TV on and off. Selects the HDMI mode directly. POWER SOURCE HDMI Displays and selects the available video sources. Press to directly access channels. Press to select additional channels (digital) being broadcasted by the same station. For example, to select channel "54-3", press "54", then press "-" and "3". Adjusts the volume. Brings up the OSD. Displays Media Play. Quickly select frequently used functions. Returns to the previous menu. Buttons used in the Channel list, Media Play menu, etc. Use these buttons in Media Play and Anynet+ modes. (�: Controls recording for Samsung recorders that have the Anynet+ feature) PRE-CH MEDIA.P CH LIST MENU FAV.CH TOOLS INFO RETURN EXIT A B CD S.MODE SLEEP MTS P.MODE P.SIZE CC Returns to the previous channel. Cuts off the sound temporarily. Changes channels. Displays the channel list on the screen. Displays Favorite Channel Lists on the screen. Displays information on the TV screen. Selects the on-screen menu items and changes the values seen on the menu. Exits the menu. S.MODE: Press to select the sound mode. SLEEP: Automatically shuts off the TV at a preset time. MTS: Press to choose stereo, mono or Separate Audio Program (SAP broadcast). P.MODE: Press to select the picture mode. P.SIZE: Selects the picture size. CC: Controls the caption decoder. Install the Batteries into the Remote To install batteries into your remote control, follow these steps: 1. Lift the cover on the back of the remote upward as shown in the figure to the right. 2. Install two AAA batteries. ✎✎ Make sure to match the + and - ends of the batteries to the diagram in the battery compartment. 3. Replace the cover. Changing Channels and Adjusting the Volume PRE-CH Adjust the volume by pressing the Volume button on the remote. Change the channels by pressing the Channel button on the remote. ✎✎If your TV is attached to a cable or satellite box, change the channel using CH LIST the box's remote. MENU ✎✎ MEDIA.P FAV.CH You can also change the channels by pressing the z button on the front panel of your TV and adjust the volume by pressing the y button. TOOLS INFO Selecting a Source POWER SOURCE RETURN EXIT To watch a movie on your Blu-ray player or watch your favorite TV show, you must select the correct source. A source is a device, such as a Blu-ray/DVD POWER SOURCE A B HDMIC D player, a cable/satellite box, antenna or a cable TV S.MODE SLEEP MTS input. Sources the HDMI, DVI, can be connected to your TV through Component, Composite, or D-sub connectioPn.MsO,DEor thPrH.oSDIuZMEgI h theCC Antenna or Cable In connections. To view the signal from a source connected to the HDMI, DVI, Component, Composite, or D-sub jack, press the SOURCE button on your remote. Each time you press the SOURCE button, you change to a different source. PRE-CH PRE-CH Viewing the On Screen Menus To view the On Screen Menus, follow these steps: CH LIST MENU 1. With the power on, press the MENU button on your remote. The main menu appears. The menu's left side has the following menu MEDIA.P TOOLS MEDIA.P CH LIST MENU FAV.CH INFO FAV.CH options: Picture, Sound, Channel, Setup, Input, Application, and Support. TOOLS INFO 2. Press the ▲ or ▼ button on your remote to select a menREuTUoRNption, and thEeXnIT press the ENTERE button. REATURN B C EXDIT 3. When done using the menu, press the EXIT button on your remote to exit. S.MAODE BSLEEPC MDTS Changing the Screen Size PS..MMOODDEE SP.LSEIZEEP MCTCS P.MODE P.SIZE CC Your TV has several screen size options, each designed to work best with specific types of video input. If you have a cable box or satellite receiver, it may have its own set of screen sizes as well. To change the screen size, press the P.SIZE button on your remote. The first time you press it, your TV displays the current setting. Thereafter, each time you press the P.SIZE button, you change the size of the picture on the screen. The following sizes are available: Changing the Picture Mode Your TV has three preset Picture Modes with factory adjusted settings, each designed to give you an excellent picture under specific conditions. To change the Picture mode, press the P.MODE button on your remote. The first time you press it, your TV displays the current setting. Thereafter, each time you press the P.MODE button, you change the mode of the picture on the screen. The Picture Modes are listed and described in the table below: Mode Dynamic Standard Movie Description Brightens picture. For a vibrant, enhanced image in brightly lit or sunny room. For a bright, detailed picture in a normally lit room. For a studio quality cinema picture in a dimly lit or dark room. To change the Picture Mode, follow these steps: 1. With the TV on, press the TOOLS button on your remote. The Tools menu appears. 2. Using the ▲ or ▼ on your remote, select Picture Mode. 3. On the Picture mode menu, use the ◄ or ► on your remote to select the Picture Mode you want. 4. Press the EXIT button to exit the menu. Setting the Clock Before you can use your TV's On/Off Timer, you must set the clock. To set the clock, follow these steps: 1. Turn on your TV, press the MENU button on your remote, then select Setup → Time. 2. Select Clock Mode, and then press the ENTERE button. 3. Choose Auto or Manual. xx If you select Auto, the current time will be set automatically using the time from a digital channel. xx If you select Manual, you can set the Month, Day, Year, Hour, Minute and am/pm directly by pressing up, down, left and right arrow button on your remote. 4. Press the RETURN button on your remote when done. 16:9 Wide screen 4:3 Standard screen Wide Fit Zoom 1 Zoom 2 Screen Fit ✎✎Screen Fit displays the full image without any cut-off when HDMI (720p / 1080i / 1080p) or Component (1080i / 1080p) signals are inputted. Connecting a USB Device for Media Play You can enjoy photo, music, and movie files stored on a USB device by connecting it to the TV and using the Media Play feature. For Media Play operating instructions, please see your Owner's Manual. MediaPlay Videos SUM Device Device Mode E Enter R Return 1. Turn on your TV. 2. Connect a USB device containing photo, music and/or movie files to the USB 1 or USB2 (HDD) jack on the side of the TV. 3. When the Input selection screen appears, press the ENTERE button on your remote to select Media Play (USB). BN68-02628A-01
-
 1
1 -
 2
2
 |
 |
