Samsung UN32C4000PD User Manual (user Manual) (ver.1.0) (English) - Page 8
Connecting to an Antenna, Plug & Play Initial Setup - parts
 |
View all Samsung UN32C4000PD manuals
Add to My Manuals
Save this manual to your list of manuals |
Page 8 highlights
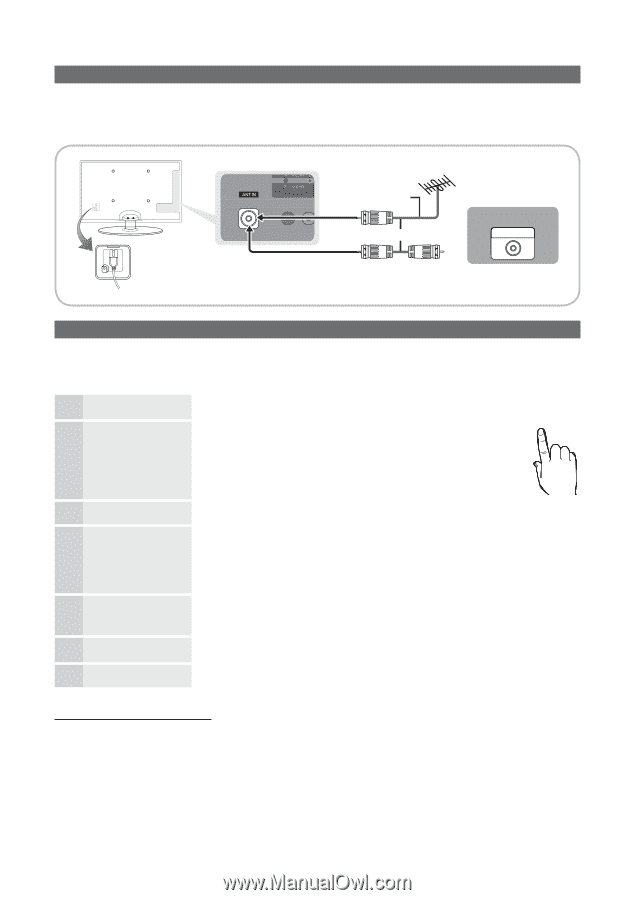
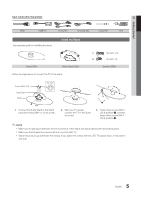
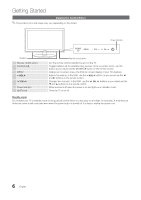
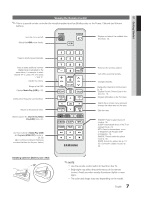
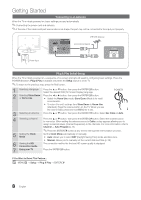
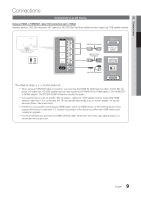
Getting Started Connecting to an Antenna When the TV is initially powered on, basic settings proceed automatically. ✎✎Connecting the power cord and antenna. ✎✎If the size of the cable mold part was an abnormal shape, the part may not be connected to the input port properly. VHF/UHF Antenna Antenna Cable (Not Supplied) or Cable ANT OUT Power Input Plug & Play (Initial Setup) When the TV is initially powered on, a sequence of on-screen prompts will assist in configuring basic settings. Press the POWERP button. Plug & Play is available only when the Setup source is set to TV. ✎✎To return to the previous step, press the Red button. 1 Selecting a language Press the ▲ or ▼ button, then press the ENTERE button. Select the desired OSD (On Screen Display) language. 2 Selecting Store Demo Press the ◄ or ► button, then press the ENTERE button. or Home Use yy Select the Home Use mode. Store Demo Mode is for retail POWER P IN environments. yy To return the unit's settings from Store Demo to Home Use (standard): Press the volume button on the TV. When you see the volume OSD, press and hold MENU for 5 sec. 3 Selecting an antenna Press the ▲ or ▼ button, then press the ENTERE button. Select Air, Cable or Auto. 4 Selecting a channel 5 Setting the Clock Mode Press the ▲ or ▼ button, then press the ENTERE button. Select the channel source to memorize. When setting the antenna source to Cable, a step appears allowing you to assign numerical values (channel frequencies) to the channels. For more information, refer to Channel → Auto Program (p.15). ✎✎Press the ENTERE button at any time to interrupt the memorisation process. Set the Clock Mode automatically or manually. yy Auto: Allows you to select DST (Daylight Saving Time) mode and time zone. yy Manual: Allows you to manually set the current date and time (p. 20). 6 Viewing the HD Connection Guide. The connection method for the best HD screen quality is displayed. 7 Enjoy your TV Press the ENTERE button. If You Want to Reset This Feature... OO MENUm → Setup → Plug & Play → ENTERE 8 English
-
 1
1 -
2
-
 3
3 -
 4
4 -
 5
5 -
 6
6 -
 7
7 -
 8
8 -
 9
9 -
 10
10 -
 11
11 -
 12
12 -
 13
13 -
14
-
15
-
16
-
17
-
18
-
19
-
20
-
21
-
22
-
23
-
24
-
25
-
26
-
27
-
28
-
29
-
30
-
31
-
32
-
33
-
34
-
35
-
36
-
37
-
38
-
39
-
40
-
41
-
42
-
43
-
44
-
45
-
46
 |
 |