Sanyo DP50749 Owners Manual - Page 5
Stand Removal And Wall, Mounting, Getting Started - plasma
 |
View all Sanyo DP50749 manuals
Add to My Manuals
Save this manual to your list of manuals |
Page 5 highlights
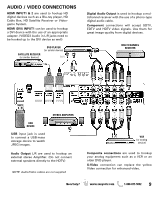
STAND REMOVAL AND WALL MOUNTING (OPTIONAL) Tools Needed: Phillips screwdriver No. 3 IMPORTANT NOTE: Place HDTV face down on a padded or cushioned surface that is larger than the screen size to protect the screen and finish. Handling by more than two people is recommended. Wall mounting of the HDTV must be performed by a skilled person. 1 Remove four (4) screws from the metal bracket. CAUTION: Hold the stand firmly as you remove the last screw. 2 Carefully remove the stand. GETTING STARTED BATTERY INSTALLATION Install batteries in the remote control ( 2 "AAA", not included) PRECAUTIONS To ensure safe operation, please observe the following precautions: • Replace both batteries at the same time. Do not use a new battery with a used battery. • There's a risk of explosion if a battery is replaced by an incorrect type. • Do not expose the Remote Control unit to moisture or heat. • Be sure to match the "+" and "-" signs on the batteries with marks inside the remote control. ANTENNA CONNECTION FOR OFF-AIR SIGNALS OR CABLE 3 Use the screws that are threaded into four (4) of the six (6) inserts on the back of your Plasma HDTV to secure it to a wall mounting kit (not included.) UNIVERSAL standard interface: 480 x 200 and 480 x 360 Mounting screws measurements: M6 Diameter, Length-18mm (max.) ANTENNA CABLE ANALOG / DIGITAL ANTENNA IN The tuner in this HDTV can receive: • Digital and Analog off air signals from an antenna • Analog or ClearQAM cable channels from a direct Cable TV connection. Need help? www.sanyoctv.com 1-800-877-5032 5
-
 1
1 -
 2
2 -
 3
3 -
 4
4 -
 5
5 -
 6
6 -
 7
7 -
 8
8 -
 9
9 -
 10
10 -
 11
11 -
12
-
13
-
14
-
15
-
16
-
17
-
18
-
19
-
20
-
21
-
22
-
23
-
24
-
25
-
26
-
27
-
28
-
29
-
30
-
31
-
32
-
33
-
34
-
35
-
36
-
37
-
38
-
39
-
40
-
41
-
42
-
43
-
44
-
45
-
46
-
47
-
48
-
49
-
50
-
51
-
52
-
53
-
54
-
55
-
56
-
57
-
58
-
59
-
60
-
61
-
62
-
63
-
64
-
65
-
66
-
67
 |
 |
