Sanyo PDG-DWL100 Owner's Manual_Quick Reference Guide - Page 9
Press INPUT to choose RGB, SCART
 |
UPC - 086483074875
View all Sanyo PDG-DWL100 manuals
Add to My Manuals
Save this manual to your list of manuals |
Page 9 highlights
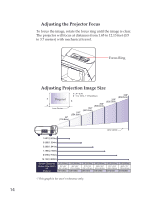
English 7 Note 8 To quick change 9 remote control code, press "MENU" and "IMAGE" buttons about 10 seconds at the 10 same time. 11 12 Note The bottom side of 13 OSD menu might be out of display when 14 user adjusts keystone value, under the status 15 of low resolution sig- nal input and different aspect ratio setting. To solve this problem, 16 please adjust keystone value in "Aspect Ratio" of "4:3" then 17 switch back to your desired aspect ratio. 18 19 20 21 22 23 24 INPUT Press "INPUT" to choose RGB, SCART, Component, S-Video, Composite and HDMI sources. D.ZOOM - Zoom out the projector display. KEYSTONE +/- Adjust the image to compensate for distortion caused by tilting the projec- tor. LAMP CON- Select the lamp mode. (refer "ECO TROL Mode" function) AV-MUTE Momentarily turn off/on the audio and video. COMPUTER 1 Press "COMPUTER 1" to choose Com- puter in 1/Component in 1 connector. COMPUTER 2 Press "COMPUTER 2" to choose Com- puter in 2/Component in 2 connector. FREEZE Pause the screen image. Press again to resume the screen image. Four Use or or or to select items or Directional Se- make adjustments to your selection. lect Keys ASPECT Display the "Aspect Ratio" section of the on-screen display menu to select the desired aspect ratio. D.ZOOM + Zoom in the projector display. INFORMATION Display information menu. VOLUME +/- Increase/decrease speaker volume. Keypad 1~9 AUTO. ADJ HDMI S-VIDEO VIDEO For input a password in the "Security settings". Automatically synchronize the projector to the input source. Press "HDMI" to choose HDMI connector. Press "S-VIDEO" to choose S-Video connector. Press "VIDEO" to choose Video connector. 9
-
 1
1 -
2
-
3
-
 4
4 -
 5
5 -
 6
6 -
 7
7 -
 8
8 -
 9
9 -
 10
10 -
 11
11 -
 12
12 -
 13
13 -
 14
14 -
15
-
16
-
17
-
18
-
19
-
20
 |
 |
