Sanyo PLC-XD2200 Owner's Manual
Sanyo PLC-XD2200 - XGA Able Multimedia Projector Manual
 |
UPC - 086483078644
View all Sanyo PLC-XD2200 manuals
Add to My Manuals
Save this manual to your list of manuals |
Sanyo PLC-XD2200 manual content summary:
- Sanyo PLC-XD2200 | Owner's Manual - Page 1
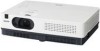
Multimedia Projector MODEL PLC-XD2200 PLC-XD2600 Network Supported ❏ Wired LAN Refer to the Owner's Manuals below for details about network function. ❏ Network Set-up and Operation Owner's Manual - Sanyo PLC-XD2200 | Owner's Manual - Page 2
or remote control (p.54). PIN code lock function prevents unauthorized use of the projector (pp.19, 54-55). The projector has the Multi-scan system to conform to almost all computer output signals quickly (p.28). Up to ♦ Helpful Maintenance Functions WUXGA resolution can be accepted. Lamp and - Sanyo PLC-XD2200 | Owner's Manual - Page 3
Features and Design 2 Table of Contents 3 To the Owner 4 Safety Instructions 5 Air Circulation 6 Installing the Projector in Proper Position 6 Moving the Projector 6 Compliance 7 Part Names and Functions 8 Front 8 Back 8 Bottom 8 Rear Terminal 9 Top Control 10 Remote - Sanyo PLC-XD2200 | Owner's Manual - Page 4
this manual. If the problem still persists, contact the dealer where you purchased the projector or the service center. CAUTION RISK OF ELECTRIC SHOCK DO NOT OPEN CAUTION: TO REDUCE THE RISK OF ELECTRIC SHOCK, DO NOT REMOVE COVER (OR BACK). NO USER-SERVICEABLE PARTS INSIDE EXCEPT LAMP REPLACEMENT - Sanyo PLC-XD2200 | Owner's Manual - Page 5
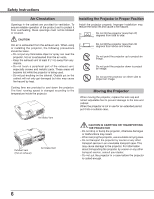
by the manufacturer, or sold with the projector. Wall or shelf mounting should follow the manufacturer's instructions, and should use a mounting kit approved by the manufacturers. An appliance and cart combination should be moved with care. Quick stops, excessive force, and uneven surfaces may - Sanyo PLC-XD2200 | Owner's Manual - Page 6
speed is changed according to the temperature inside the projector. Installing the Projector in Proper Position Install the projector properly. Improper installation may reduce the lamp life and cause a fire hazard. 20° Do not tilt the projector more than 20 degrees from side to side. 20 - Sanyo PLC-XD2200 | Owner's Manual - Page 7
instructions. If such changes or modifications should be made, you could be required to stop operation of the equipment. Model Number : PLC-XD2200, PLC-XD2600 Trade Name : Sanyo Responsible party : SANYO feature to be sure that the plug in your User Instructions. If the - Sanyo PLC-XD2200 | Owner's Manual - Page 8
Front ① ④ Part Names and Functions ②③ ⑤ ⑥ ⑦⑧ ① Top controls and Indicators ② Zoom Ring ③ Focus Ring ④ Speaker ⑤ Infrared Remote Receiver ⑥ Projection Lens ⑦ Lens Cap (See page 61 for attaching.) CAUTION Do not turn on a projector with lens cap attached. High temperature from light beam may - Sanyo PLC-XD2200 | Owner's Manual - Page 9
③ ⑤ ⑥ ⑦ᶉ ⑧④ ① CONTROL PORT When the projector is controlled by a computer, connect to this jack with serial control cable. ② COMPUTER IN 1 /S- ). ⑥ LAN Connection Terminal Connect the LAN cable (refer to the owner's manual of "Network Set-up and Operation"). ⑦ AUDIO IN(Video) Connect the audio - Sanyo PLC-XD2200 | Owner's Manual - Page 10
Part Names and Functions Top Control ⑤ ⑧ ④ ⑦ ③ ② ⑥ ① ① SELECT button -Execute the selected item (p.21). Menu (p.21). ⑦ LAMP REPLACE indicator Lights yellow when the projection lamp reaches its end of life (pp.62, 70). ⑧ WARNING indicator -Lights red when the projector detects an abnormal - Sanyo PLC-XD2200 | Owner's Manual - Page 11
Part Names and Functions Remote Control ① ON/STAND-BY button Turn the projector on or off. (pp.18-20) 26, 32, 39) ⑮ P-TIMER button Operate the P-timer function. (pp.26, 51) ⑯ LAMP button Select a lamp mode. (pp.25, 53) ⑰ INFO. button Operate the information function. (p.58) ⑱ KEYSTONE button - Sanyo PLC-XD2200 | Owner's Manual - Page 12
to the instructions or your local disposal rule or guidelines. Remote Control Operating Range Point the remote control toward the projector (Infrared Remote Receiver) when pressing the buttons. Maximum operating range for the remote control is about 16.4'(5 m) and 60 degrees in front of the - Sanyo PLC-XD2200 | Owner's Manual - Page 13
200" 4064 x 3048 21.5'(6.55m) 25.8(7.87m) 300" 6096 x 4572 32.3'(9.84m) 38.7'(11.80m) Adjustable Foot Projection angle can be adjusted up to 10.0 degrees with the adjustable foot. Lift the front of the projector and push the foot lock latch on the projector. Release the foot lock latch to lock - Sanyo PLC-XD2200 | Owner's Manual - Page 14
the COMPUTER IN 1/ S-VIDEO IN / COMPONENT IN and the COMPUTER IN 2/MONITOR OUT terminals as input. • When the AUDIO OUT is plugged-in, the projector's built-in speaker is not available. • When the cable is of the longer variety, it is advisable to use the COMPUTER IN 1 /S-VIDEO IN /COMPONENT - Sanyo PLC-XD2200 | Owner's Manual - Page 15
Equipment Cables used for connection • Video Cable • S-Video Cable • S-Video-VGA Cable • Audio Cables (Cables are not supplied with the projector. ) Installation S-Video Output and Audio output S-Video cable S-Video-VGA cable Composite Video and Audio Output External Audio Equipment Audio - Sanyo PLC-XD2200 | Owner's Manual - Page 16
Scart) Equipment Cables used for connection • Audio Cables • Scart-VGA Cable • Component Cable • Component-VGA Cable (Cables are not supplied with this projector.) Audio Output RGB Scart 21pin Output Component Video Output (Y, Pb/Cb, Pr/Cr) Audio cable (stereo) Component cable Scart-VGA cable - Sanyo PLC-XD2200 | Owner's Manual - Page 17
of the type of power being supplied, consult your authorized dealer or service center. Connect the projector with all peripheral equipment before turning the projector on. Connect the AC power cord (supplied) to the projector. CAUTION The AC outlet must be near this equipment and must be easily - Sanyo PLC-XD2200 | Owner's Manual - Page 18
appear. Enter the PIN code as instructed on the next page. 16 The preparation display will disappear after 30 seconds. Selected Input Source and Lamp Control Video Lamp control status (See page 53 for Lamp control status.) ✔Note: The Filter warning and Lamp replacement icons may appear on the - Sanyo PLC-XD2200 | Owner's Manual - Page 19
start to operate the projector. If you entered the projector. What is PIN code projector. Setting a PIN code prevents unauthorized use of the projector locking operation of the projector with your PIN box appeared, the projector will be turned your PIN code, the projector can no longer be started. - Sanyo PLC-XD2200 | Owner's Manual - Page 20
changed according to the temperature inside the projector. • Do not put the projector in a case before the projector is cooled enough. • If the WARNING indicator blinks or lights red, see "WARNING indicator" on page 59. • While the POWER indicator is blinking, the lamp is being cooled down and the - Sanyo PLC-XD2200 | Owner's Manual - Page 21
are further divided into other submenus. For each adjustment and setting procedure, refer to respective sections in this manual. Top Control 1 Press the MENU button on the top control or the remote control to display the On-Screen Menu. 2 Use the Point ▲▼ buttons to highlight or select a main menu - Sanyo PLC-XD2200 | Owner's Manual - Page 22
to set the projector's operating configurations (pp.43-57). ⑧ Information Display the input source information: Input , H-sync freq., V-sync freq., Screen, Language, Lamp status, Lamp counter , Power management, Key lock, PIN code lock and Remote control (p.58). ⑨ Network See the owner's manual of - Sanyo PLC-XD2200 | Owner's Manual - Page 23
or the AUTO SET button on the remote control. Refer to page 44 for the setting of the Auto setup function. Top Control ✔Notes: • Auto Keystone corrects vertical distortion only; it does not correct horizontal distortion. • Auto Keystone cannot work when Ceiling feature is set to On in the Setting - Sanyo PLC-XD2200 | Owner's Manual - Page 24
on, press the MUTE button again to select Off or press the VOLUME +/- buttons. The Mute function is also effective for the AUDIO OUT jack. Remote Control Menu Operation 1 Press the MENU button to display the On-Screen Menu. Use the Point ▲▼ buttons to select Sound. Press the Point ► or the SELECT - Sanyo PLC-XD2200 | Owner's Manual - Page 25
for details. LAMP button Press the LAMP button on the remote control to select the lamp mode for changing the brightness on the screen. High Brighter than the Normal mode. Normal....... Normal brightness Eco Lower brightness reduces the lamp power consumption and extends the lamp life. ✔Note: See - Sanyo PLC-XD2200 | Owner's Manual - Page 26
remote control to black out the image. To restore to normal, press the NO SHOW button again or press any other button. When the projected image is captured and is set as User P-TIMER button. IMAGE button Press the IMAGE button on the remote control to select a desired image mode of the screen. See - Sanyo PLC-XD2200 | Owner's Manual - Page 27
Input Source Selection (RGB: Computer 1/Computer 2) Direct Operation Choose either Computer 1(RGB) or Computer 2(RGB) by pressing the COMPUTER 1 or COMPUTER 2 button on the remote control. Before using these buttons, correct input source should be selected through Menu operation as described below - Sanyo PLC-XD2200 | Owner's Manual - Page 28
Check the connection between your computer and the projector. (See "Troubleshooting" on p.64.) The preset system is manually adjusted in the PC adjust Menu. The RGB RGB XGA 1 ► *Mode 1 and SVGA 1 are examples. Selecting Computer System Manually PC system can also be selected manually. 1 Press - Sanyo PLC-XD2200 | Owner's Manual - Page 29
parameters The adjusted parameters from the Auto PC Adjustment can be stored in the projector. Once the parameters are stored, the setting can be done just by selecting function. When the image is not provided properly with this operation, manual adjustments are required (pp.30-31). • The Auto PC - Sanyo PLC-XD2200 | Owner's Manual - Page 30
enables you to precisely adjust several parameters to match those signal formats. The projector has five independent memory areas to store those parameters manually adjusted. It allows you to recall the setting for a specific computer. 1 Press the MENU button to display the On-Screen Menu. Use the - Sanyo PLC-XD2200 | Owner's Manual - Page 31
be selected when 480i, 575i, 480p, 575p, 720p, 1035i or 1080i is selected in the PC System Menu (p.28). • When input computer signal to the projector, PC adjust will become available. 31 - Sanyo PLC-XD2200 | Owner's Manual - Page 32
by pressing the IMAGE button on the remote control. Remote Control IMAGE button Menu Operation 1 Press the Standard Normal picture mode preset on the projector. Real Picture mode with improved halftone four colors. Image 1-4 For viewing with the user preset image mode in the Image Adjust Menu ( - Sanyo PLC-XD2200 | Owner's Manual - Page 33
select Yes. All adjustments will return to their previous figures. ✔Note: • When White balance Red, Green or Blue is adjusted, Color temp. will change to User. • When Blackboard(Green) or Colorboard is selected in Image select, Color temp. will change to Blackboard or Colorboard. 33 - Sanyo PLC-XD2200 | Owner's Manual - Page 34
size. True Provide the image in its original size. When the original image size is larger or smaller than the screen size (1024 x 768), the projector enters to the panning mode automatically. Use the Point buttons to pan the image. When adjusted, the arrows will turn red. When reached to the - Sanyo PLC-XD2200 | Owner's Manual - Page 35
Input Custom adj. Adjust the screen scale and position manually with this function. Press the Point ►button at image can be also expanded by pressing the D.ZOOM ▲ or the SELECT button on the remote control. Digital zoom - Select Digital zoom -. The On-Screen Menu disappears and D. zoom - appears - Sanyo PLC-XD2200 | Owner's Manual - Page 36
Video or S-video by pressing the VIDEO or the SVIDEO button on the remote control. Before using these buttons, correct input source should be selected through menu operation as described below. Remote Control VIDEO button Video S-VIDEO button S-video Menu Operation 1 Press the MENU button to - Sanyo PLC-XD2200 | Owner's Manual - Page 37
Source Selection (Component, RGB Scart 21-pin) Direct Operation Choose Computer 1(Component) or Computer 1(Scart) by pressing the COMPONENT or the COMPUTER 1 button on the remote control. Before using these buttons, correct input source should be selected through Menu operation as described below - Sanyo PLC-XD2200 | Owner's Manual - Page 38
detects an incoming video signal, and adjusts itself to optimize its performance. COMPONENT VIDEO SIGNAL FORMAT If the projector cannot reproduce proper video image, select a specific component video signal format from among 480i, 575i, 480p, 575p, 720p, 1035i, and 1080i. AV System Menu (Component - Sanyo PLC-XD2200 | Owner's Manual - Page 39
by pressing the IMAGE button on the remote control. Remote Control Menu Operation 1 Press the MENU button Standard Normal picture mode preset on the projector. Cinema Picture mode adjusted with fine four colors. Image 1-4 For viewing with the user preset image mode in the Image Adjust Menu (see - Sanyo PLC-XD2200 | Owner's Manual - Page 40
to deepen blue tone (from 0 to 63). ✔Note: • When the White balance Red, Green or Blue is adjusted, the Color temp. level will change to User. • Tint cannot be selected when the video system is PAL, SECAM, PAL-M or PAL-N (p.38). • When Blackboard(Green) or Colorboard is selected in Image select - Sanyo PLC-XD2200 | Owner's Manual - Page 41
options. Off.......... Disabled. L1........... For an active picture. L2........... For a still picture. Film........ For watching a film. With this function, the projector reproduces pictures faithful to the original film quality. Reset To reset the adjusted data, select Reset and press the SELECT - Sanyo PLC-XD2200 | Owner's Manual - Page 42
Video Input Screen Size Adjustment ► ► This projector has the picture screen resize function, which Provide the last stored aspect screen image. Custom adj. Adjust the screen scale and position manually with this function. Press the Point ► button at Custom adj. and the Custom adjustment menu - Sanyo PLC-XD2200 | Owner's Manual - Page 43
Setting Setting This projector has a Setting menu that allows you to set up the other various functions described below. 1 Press the MENU button to display the On-Screen Menu. - Sanyo PLC-XD2200 | Owner's Manual - Page 44
projector's tilt. Manual . . . Works only when pressing the AUTO SETUP button on the top control or the AUTO SET button on the remote control. Off Disables Auto Keystone. ✔Note: • While Input search is set to On1 or On2, the status of Input and Lamp cannot work when the Ceiling feature is set On - Sanyo PLC-XD2200 | Owner's Manual - Page 45
to switch between each option. Blue . . . Project a blue background. User . . Project an image captured in the Logo setting. Black . . Project when turning on the projector. Use this function when you want to project the image as early as possible even when the lamp is not bright enough. - Sanyo PLC-XD2200 | Owner's Manual - Page 46
and Capture functions cannot be selected. Logo select Logo select This function decides on the starting-up display from among following options. User......... Show the image you captured. Default..... Show the factory-set logo. Off Show the countdown display only. Direct on English Store Blue - Sanyo PLC-XD2200 | Owner's Manual - Page 47
select function and set it to User. Then the captured image will be displayed the next time you turn on the projector or when you press the NO image (pp.32, 39). • A signal from a computer can be captured up to XGA (1024 x 768). A signal from video equipment can be captured except for 720p, 1035i, - Sanyo PLC-XD2200 | Owner's Manual - Page 48
-digit number. After entering the four-digit number, move the pointer to Set. Press the SELECT button so that you can start to operate the projector. If you entered an incorrect Logo PIN code, Logo PIN code and the number will turn red for a moment. Enter the correct Logo PIN code - Sanyo PLC-XD2200 | Owner's Manual - Page 49
this function is set to On, the picture will be top/ bottom and left/right reversed. This function is used to project the image from a ceiling-mounted projector. Rear When this function is set to On, the picture will be left/right reversed. This function is used to project the image from rear - Sanyo PLC-XD2200 | Owner's Manual - Page 50
lamp life, the Power management function turns off the projection lamp when the projector is not operated for a certain period. Select one of the following options: Ready When the lamp button on the top control or remote control is pressed. Shut down........ When the lamp has been fully cooled down - Sanyo PLC-XD2200 | Owner's Manual - Page 51
to the network function even after turning off the projector by pressing the ON/STAND-BY button on the remote control. You can turn on/off the projector via network, modify network environment, and receive an e-mail about projector status while the projector is powered off. Eco Select Eco when you - Sanyo PLC-XD2200 | Owner's Manual - Page 52
a printed version of the program sound or other information displayed on the screen. If the input signal contains closed captions, you can turn on the feature and switch the channels. Press the Point ▲▼ buttons to select Off, CC1, CC2, CC3 or CC4. If the closed caption is not clear, you can - Sanyo PLC-XD2200 | Owner's Manual - Page 53
extends the lamp life. ✔Note: • Lamp mode cannot be changed for a while after turning on the projector. Lamp needs some time to stabilize after the power is turned on. Stored lamp mode will be active after the lamp is stabilized. Lamp control Setting Remote control This projector provides - Sanyo PLC-XD2200 | Owner's Manual - Page 54
allows you to use the Key lock and PIN code lock function to set the security for the projector operation. Key lock Key lock This function locks the top control and remote control buttons to prevent operation by unauthorized persons. Select Key lock and then press the SELECT button, and select - Sanyo PLC-XD2200 | Owner's Manual - Page 55
new pin code in column of the pin code no. memo on page 76, and keep it securely. If you forget your PIN code, the projector can no longer be started. Current PIN code 55 - Sanyo PLC-XD2200 | Owner's Manual - Page 56
operation (L1), but it takes more time to cool the projector down. Fan control Choose the running speed of cooling fans from the following options ✔Note: The fan noise becomes louder in On1 and On2. Lamp counter reset Video delay control When you want to make a digital processing of a projected - Sanyo PLC-XD2200 | Owner's Manual - Page 57
to set a frequency for the filter cleaning. When the projector reached a specified time for cleanings, a Filter warning icon appears on the screen, notifying the cleaning is necessary. After cleaning the filter, be sure to select Reset and set the timer. The Filter warning icon will not turn off - Sanyo PLC-XD2200 | Owner's Manual - Page 58
checking the status of the image signal being projected and the operation of the projector. Direct Operation Press the INFO. button on the remote control to display the Information Menu. Remote Control Menu Operation Press the Point ▲▼ buttons to select the Information. The Information Menu is - Sanyo PLC-XD2200 | Owner's Manual - Page 59
projector cannot be turned on and the WARNING indicator still lights red, unplug the AC power cord and contact the service center. CAUTION DO NOT LEAVE THE PROJECTOR WITH THE AC POWER CORD CONNECTED UNDER AN ABNORMAL CONDITION. IT MAY RESULT IN FIRE OR ELECTRIC SHOCK. Top Control WARNING lights - Sanyo PLC-XD2200 | Owner's Manual - Page 60
and adversely affect the life of the projector. If a "Filter warning" icon appears on the screen, clean the filters immediately. Clean the filters by following the steps below. 1 Turn off the projector, and unplug the AC power cord from the AC outlet. 2 Remove the panel front assembly by pulling - Sanyo PLC-XD2200 | Owner's Manual - Page 61
its vicinity. The explosion or fire hazard may occur even after the AC power cord is unplugged because the temperature inside the projector is extremely high due to the lamps. In addition, there is a risk that the internal parts may be damaged not only by the flammable air spray but also by - Sanyo PLC-XD2200 | Owner's Manual - Page 62
of the projector reaches its end of life, the Lamp replacement icon appears on the screen and LAMP REPLACE indicator lights yellow. Replace the lamp with a new one promptly. The timing when the LAMP REPLACE indicator should light is depending on the lamp mode. Top Control Lamp replacement icon - Sanyo PLC-XD2200 | Owner's Manual - Page 63
information to the dealer. ● Model No. of your projector ● Replacement Lamp Type No. : PLC-XD2200, PLC-XD2600 : POA-LMP142 (Service Parts No. 610 349 7518) LAMP HANDLING PRECAUTIONS This projector uses a high-pressure lamp which must be handled carefully and properly. Improper - Sanyo PLC-XD2200 | Owner's Manual - Page 64
the Ceiling function. See page 49. - Check if the Contrast or Brightness is adjusted properly. See pages 33, 40. - Check if Image mode is selected properly. See pages 32, 39. - Check the lamp control function. See pages 25, 53. - Check the LAMP REPLACE indicator. If it lights, the end of lamp life - Sanyo PLC-XD2200 | Owner's Manual - Page 65
setup. See page 44 - Make sure On is not selected at the Ceiling function. See page 49. Auto keystone function does not work even when the projector is tipped. - Make sure the Auto keystone function is not set to Manual. Press the AUTO SETUP button on the top control. See pages 23, 44. 65 - Sanyo PLC-XD2200 | Owner's Manual - Page 66
's code. See page 53. - Unlock the Key lock function for the remote control function. See page 54. Indicator blinks or lights. - Check the status of the projector with referring to "Indicators and projector Condition". See page 70. The exclamation mark appears on the screen. - Your - Sanyo PLC-XD2200 | Owner's Manual - Page 67
WARNING : High voltages are used to operate this projector. Do not attempt to open the cabinet. If problems still persist after following all operating instructions, contact the dealer where you purchased the projector or the service center. Specify the model number and explain about the problem - Sanyo PLC-XD2200 | Owner's Manual - Page 68
Contrast Brightness Color temp. Red Green Blue Sharpness Gamma Reset Store Normal True Wide Full Custom Custom adj. 0-63 0-63 XLow Low Mid High User 0-63 0-63 0-63 0-15 0-15 Yes/No Image 1 Image 2 Image 3 Image 4 Scale H&V Position Common Reset H/V On/Off H/V Yes/No Yes/No Digital zoom + Digital - Sanyo PLC-XD2200 | Owner's Manual - Page 69
/White Lamp control Lamp control High/Normal/ECO Remote control Code 1-Code 2 Security Fan Fan control Key lock Off Projector Remote control PIN code lock Off/On1/On2 PIN code change L1/L2 Off/On1/On2 Video delay control Off/On Lamp counter Lamp counter H Filter counter Warning log Lamp - Sanyo PLC-XD2200 | Owner's Manual - Page 70
or the service center for service and checkup. Do not leave the projector on. It may cause an electric shock or a fire hazard. • • • green. • • • red • • • off • • • blinks green. • • • blinks red. When the projection lamp reaches its end of life, the LAMP REPLACE indicator lights yellow - Sanyo PLC-XD2200 | Owner's Manual - Page 71
Appendix Compatible Computer Specifications Basically this projector can accept the SVGA 6 SVGA 7 SVGA 8 SVGA 9 SVGA 10 SVGA 11 MAC 16 MAC 19 XGA 1 XGA 2 XGA 3 XGA 4 XGA 5 XGA 6 XGA 7 XGA 8 XGA 9 XGA 10 XGA 11 XGA 12 XGA 13 XGA 14 XGA 15 SXGA 1 SXGA 2 SXGA 3 SXGA 4 RESOLUTION 640 x 480 720 x 400 - Sanyo PLC-XD2200 | Owner's Manual - Page 72
Specifications Multi-media Projector 13.13" x 3.35" x 9.72" (333.5mm x 85.2mm x 247.0mm) (Not including protrusions) 5.7 lbs (2.6 kg) 0˚ to 10˚ Panel Resolution LCD Lamp Adjustable from 40" to 300 35 ˚C) 14˚F-140˚F (-10˚C-60 ˚C) Remote Control �Ba�tt�er�y A�AA��or�L�R�03�1�.5�V�A�L�K�A�LI - Sanyo PLC-XD2200 | Owner's Manual - Page 73
Accessories Owner's Manual (CD-ROM) Quick Reference Guide & Safety Manual AC Power Cord Remote Control and Batteries VGA Cable Lens Cap with String PIN Code Label Ferrite core Appendix ● The specifications are subject to change without notice. ● LCD panels are manufactured to the highest possible - Sanyo PLC-XD2200 | Owner's Manual - Page 74
and Information System Industries Association). This projector supports all commands defined by PJLink Class 1 and is verified conformance with PJLink Standard Class 1. For PJ Link password, see the owner's manual of "Network Set-up and Operation." Projector Input Computer 1 Computer 2 Video RGB - Sanyo PLC-XD2200 | Owner's Manual - Page 75
(Red) 7 Ground (Green) 8 Ground (Blue) 9 ----10 Ground (Vert.sync.) 11 ----12 ----13 Horiz. sync. Input/Output 14 Vert. sync. 15 ----- CONTROL PORT CONNECTOR (D-sub 9 pin) LAN TERMINAL Serial 1 ----2 RXD 3 TXD 4 ----5 SG 6 ----7 RTS 8 CTS 9 ----- 1 TX + 5 ----- 2 TX - 6 RX - 3 RX - Sanyo PLC-XD2200 | Owner's Manual - Page 76
Code Number Memo Write down the PIN code number in the column below and keep it with this manual securely. If you forgot or lost the number and unable to operate the projector, contact the service center. PIN Code Lock No. Factory default set No: 1 2 3 4* Logo PIN Code Lock No. Factory default set - Sanyo PLC-XD2200 | Owner's Manual - Page 77
99.5 (3.92) 333.5 (13.13) Dimensions Appendix Unit: mm(inch) Screw Holes for Ceiling Mount Screw: M4 Depth: 10.0(0.39) 217.0 (8.54) 50.0 (1.97) 10.0 (0.39) 90.0 (3.54) 20.0 (0.79) 19.0 (0.75) 90.0 (3.54) 138.0 (5.43) 10 º MAX 51.0 (2.01) - Sanyo PLC-XD2200 | Owner's Manual - Page 78
KR8AC
-
 1
1 -
 2
2 -
 3
3 -
 4
4 -
 5
5 -
 6
6 -
 7
7 -
8
-
9
-
10
-
11
-
12
-
13
-
14
-
15
-
16
-
17
-
18
-
19
-
20
-
21
-
22
-
23
-
24
-
25
-
26
-
27
-
28
-
29
-
30
-
31
-
32
-
33
-
34
-
35
-
36
-
37
-
38
-
39
-
40
-
41
-
42
-
43
-
44
-
45
-
46
-
47
-
48
-
49
-
50
-
51
-
52
-
53
-
54
-
55
-
56
-
57
-
58
-
59
-
60
-
61
-
62
-
63
-
64
-
65
-
66
-
67
-
68
-
69
-
70
-
71
-
72
-
73
-
74
-
75
-
76
-
77
-
78
 |
 |
Owner’s Manual
Multimedia Projector
MODEL
PLC-XD2200
PLC-XD2600
Network Supported
❏
Wired LAN
Refer to the Owner's Manuals below for
details about network function.
❏
Network Set-up and Operation