Sanyo VDC-HD3100 VDC-HD3300 Manual - Page 51
Working with Administrator Configuration Screens 3/50
 |
UPC - 086483075124
View all Sanyo VDC-HD3100 manuals
Add to My Manuals
Save this manual to your list of manuals |
Page 51 highlights
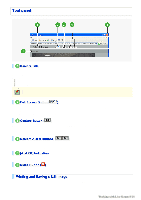
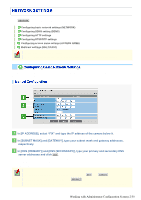
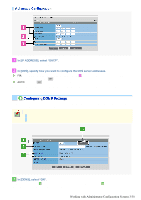
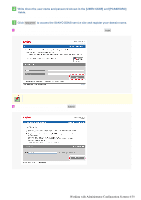
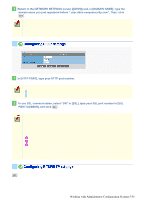
1 In [IP ADDRESS], select "DHCP". The IP address, subnet mask, and gateway fields are automatically filled. 2 In [DNS], specify how you want to configure the DNS server addresses. FIX: In [DNS (PRIMARY)] and [DNS (SECONDARY)] ( 3 ), type your primary and secondary DNS server addresses and click SET . AUTO: Just click SET . Then, the system sets appropriate DNS server addresses automatically. After completing the above steps, click the Close button to once disconnect and then reconnect to the camera to apply the changes. Using SANYO's DDNS service, you can connect to the camera from your Internet Explorer by simply entering the registered domain name, instead of the IP address of the camera. To use the DDNS service, configure the following settings. Specify your DNS server address under [DNS SETTINGS] on this screen. Configure the port forwarding on your router. (For details, refer to your router's instruction manual.) 1 In [DDNS], select "ON". The [REGISTER] button ( 3 ) appears. The [USER NAME] and [PASSWORD] fields ( 2 ) show the automatically assigned user name and password, respectively. Working with Administrator Configuration Screens 3/50
-
 1
1 -
2
-
3
-
4
-
5
-
6
-
7
-
8
-
9
-
10
-
11
-
12
-
13
-
14
-
15
-
16
-
17
-
18
-
19
-
20
-
21
-
22
-
23
-
24
-
25
-
26
-
27
-
28
-
29
-
30
-
31
-
32
-
33
-
34
-
35
-
36
-
37
-
38
-
39
-
40
-
41
-
42
-
43
-
44
-
45
-
 46
46 -
 47
47 -
 48
48 -
 49
49 -
 50
50 -
 51
51 -
 52
52 -
 53
53 -
 54
54 -
 55
55 -
 56
56 -
57
-
58
-
59
-
60
-
61
-
62
-
63
-
64
-
65
-
66
-
67
-
68
-
69
-
70
-
71
-
72
-
73
-
74
-
75
-
76
-
77
-
78
-
79
-
80
-
81
-
82
-
83
-
84
-
85
-
86
-
87
-
88
-
89
-
90
-
91
-
92
-
93
-
94
-
95
-
96
-
97
-
98
-
99
-
100
-
101
-
102
-
103
-
104
-
105
-
106
-
107
-
108
-
109
-
110
-
111
-
112
-
113
-
114
-
115
-
116
 |
 |
