Sanyo VPC CG6 Owners Manual - Page 8
SHOOT, PLAY BACK AND SAVE, Connect your camera to a computer, Copy a video clip to your computer - manual
 |
UPC - 683728123048
View all Sanyo VPC CG6 manuals
Add to My Manuals
Save this manual to your list of manuals |
Page 8 highlights
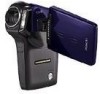
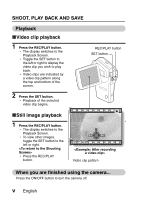
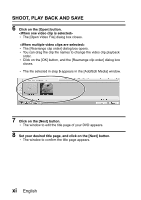
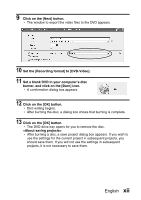
SHOOT, PLAY BACK AND SAVE 3 In the installation window, click on [Finish] and remove the CD-ROM from the computer's CD-ROM drive. h When the installation window closes, a dialog box to connect to the website introducing Kodak's online service appears. Check the [No thanks !] option button, and then click on the [OK] button. Connect your camera to a computer Use the supplied dedicated USB interface cable to connect your camera to a computer (page 8 in the SANYO Software Pack INSTRUCTION MANUAL). To USB terminal on the camera Supplied dedicated USB interface cable USB CONNECTION CARD READER MOBILE VIEWER PictBridge PC CAMERA CANCEL OK To USB connector on the computer Copy a video clip to your computer Run Photo Explorer, set the location of the camera's data as the copy source, and copy the video clip(s) to your computer (page 15 in the SANYO Software Pack INSTRUCTION MANUAL). vii English
-
 1
1 -
2
-
 3
3 -
 4
4 -
 5
5 -
 6
6 -
 7
7 -
 8
8 -
 9
9 -
 10
10 -
 11
11 -
 12
12 -
 13
13 -
14
-
15
-
16
-
17
-
18
-
19
-
20
-
21
-
22
-
23
-
24
-
25
-
26
-
27
-
28
-
29
-
30
-
31
-
32
-
33
-
34
-
35
-
36
-
37
-
38
-
39
-
40
-
41
-
42
-
43
-
44
-
45
-
46
-
47
-
48
-
49
-
50
-
51
-
52
-
53
-
54
-
55
-
56
-
57
-
58
-
59
-
60
-
61
-
62
-
63
-
64
-
65
-
66
-
67
-
68
-
69
-
70
-
71
-
72
-
73
-
74
-
75
-
76
-
77
-
78
-
79
-
80
-
81
-
82
-
83
-
84
-
85
-
86
-
87
-
88
-
89
-
90
-
91
-
92
-
93
-
94
-
95
-
96
-
97
-
98
-
99
-
100
-
101
-
102
-
103
-
104
-
105
-
106
-
107
-
108
-
109
-
110
-
111
-
112
-
113
-
114
-
115
-
116
-
117
-
118
-
119
-
120
-
121
-
122
-
123
-
124
-
125
-
126
-
127
-
128
-
129
-
130
-
131
-
132
-
133
-
134
-
135
-
136
-
137
-
138
-
139
-
140
-
141
-
142
-
143
-
144
-
145
-
146
-
147
-
148
-
149
-
150
-
151
-
152
-
153
-
154
-
155
-
156
-
157
-
158
-
159
-
160
-
161
-
162
-
163
-
164
-
165
-
166
-
167
-
168
-
169
-
170
-
171
-
172
-
173
-
174
-
175
-
176
-
177
-
178
-
179
-
180
-
181
-
182
-
183
-
184
-
185
-
186
-
187
-
188
-
189
-
190
-
191
-
192
-
193
-
194
-
195
-
196
-
197
-
198
-
199
-
200
-
201
-
202
 |
 |
