Sanyo VPC E2 VPC-E2BL Owners Manual English - Page 128
Correcting The Red-eye Effect And Image
 |
UPC - 086483071768
View all Sanyo VPC E2 manuals
Add to My Manuals
Save this manual to your list of manuals |
Page 128 highlights
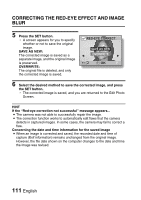
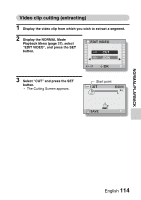
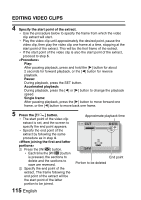
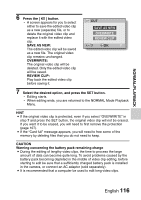
CORRECTING THE RED-EYE EFFECT AND IMAGE BLUR 5 Press the SET button. h A screen appears for you to specify whether or not to save the original image. SAVE AS NEW: The corrected image is saved as a separate image, and the original image is preserved. OVERWRITE: The original file is deleted, and only the corrected image is saved. RED-EYE CORRECT. SAVE AS NEW OVERWRITE OK 6 Select the desired method to save the corrected image, and press the SET button. h The corrected image is saved, and you are returned to the Edit Photo Screen. HINT If the "Red-eye correction not successful" message appears... i The camera was not able to successfully repair the image. i The correction function works to automatically edit flaws that the camera detects in captured images. In some cases, the camera may fail to correct a flaw. Concerning the date and time information for the saved image i When an image is corrected and saved, the recorded date and time of capture (Exif information) remains unchanged from the original image. However, the file date shown on the computer changes to the date and time the image was revised. 111 English
-
 1
1 -
2
-
3
-
4
-
5
-
6
-
7
-
8
-
9
-
10
-
11
-
12
-
13
-
14
-
15
-
16
-
17
-
18
-
19
-
20
-
21
-
22
-
23
-
24
-
25
-
26
-
27
-
28
-
29
-
30
-
31
-
32
-
33
-
34
-
35
-
36
-
37
-
38
-
39
-
40
-
41
-
42
-
43
-
44
-
45
-
46
-
47
-
48
-
49
-
50
-
51
-
52
-
53
-
54
-
55
-
56
-
57
-
58
-
59
-
60
-
61
-
62
-
63
-
64
-
65
-
66
-
67
-
68
-
69
-
70
-
71
-
72
-
73
-
74
-
75
-
76
-
77
-
78
-
79
-
80
-
81
-
82
-
83
-
84
-
85
-
86
-
87
-
88
-
89
-
90
-
91
-
92
-
93
-
94
-
95
-
96
-
97
-
98
-
99
-
100
-
101
-
102
-
103
-
104
-
105
-
106
-
107
-
108
-
109
-
110
-
111
-
112
-
113
-
114
-
115
-
116
-
117
-
118
-
119
-
120
-
121
-
122
-
 123
123 -
 124
124 -
 125
125 -
 126
126 -
 127
127 -
 128
128 -
 129
129 -
 130
130 -
 131
131 -
 132
132 -
 133
133 -
134
-
135
-
136
-
137
-
138
-
139
-
140
-
141
-
142
-
143
-
144
-
145
-
146
-
147
-
148
-
149
-
150
-
151
-
152
-
153
-
154
-
155
-
156
-
157
-
158
-
159
-
160
-
161
-
162
-
163
-
164
-
165
-
166
-
167
-
168
-
169
-
170
-
171
-
172
-
173
-
174
-
175
-
176
-
177
-
178
-
179
-
180
-
181
-
182
-
183
-
184
-
185
-
186
-
187
-
188
-
189
-
190
-
191
-
192
-
193
-
194
-
195
-
196
-
197
-
198
-
199
-
200
-
201
-
202
-
203
-
204
-
205
-
206
-
207
-
208
-
209
-
210
-
211
-
212
-
213
-
214
-
215
 |
 |
