Sanyo VPC-S880P Owners Manual - Page 17
Initial Settings
 |
View all Sanyo VPC-S880P manuals
Add to My Manuals
Save this manual to your list of manuals |
Page 17 highlights
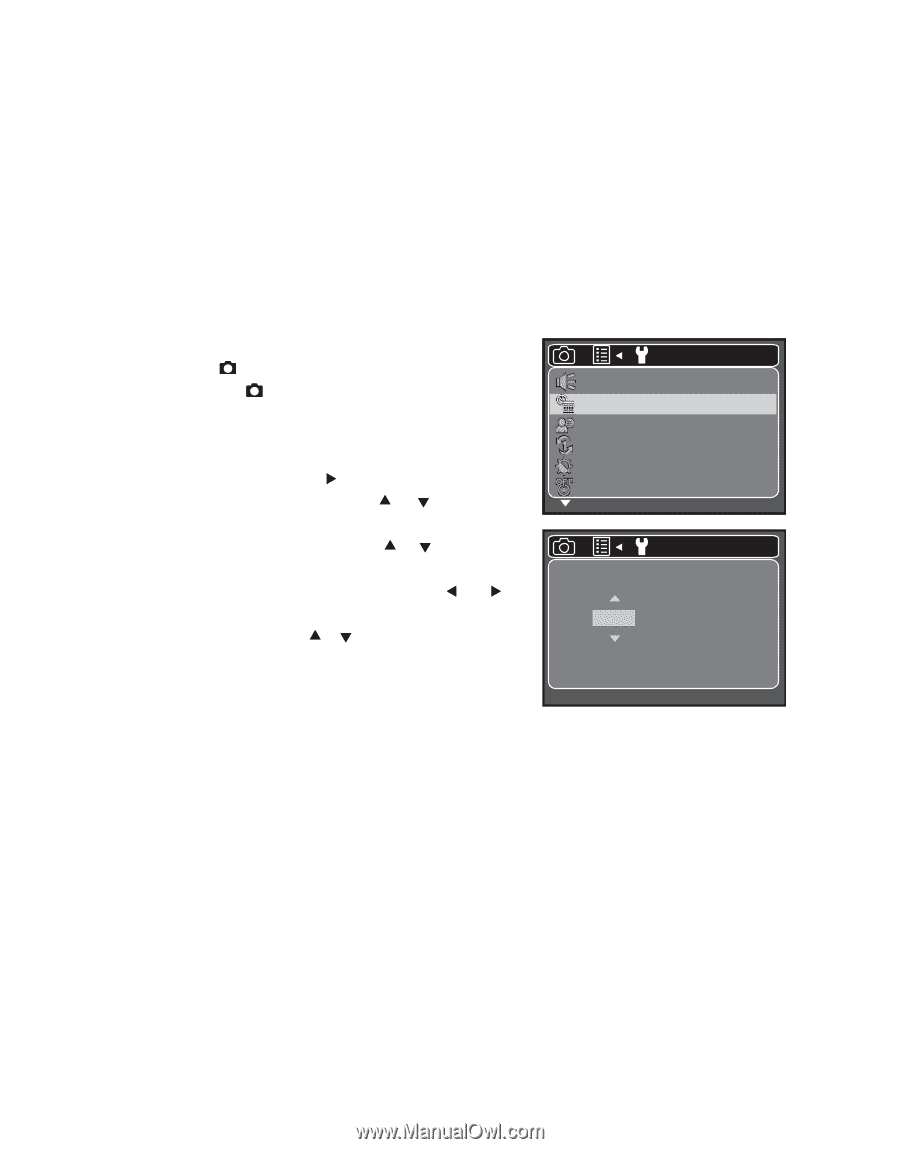
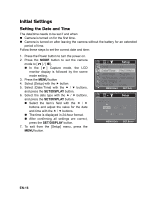
Initial Settings Setting the Date and Time The date/time needs to be set if and when: Camera is turned on for the first time. Camera is turned on after leaving the camera without the battery for an extended period of time. Follow these steps to set the correct date and time: 1. Press the Power button to turn the power on. 2. Press the MODE button to set the camera mode to [ ] / [S]. In the [ ] Capture mode, the LCD monitor display is followed by the scene mode setting. 3. Press the MENU button 4. Select [Setup] with the f button. 5. Select [Date/Time] with the c / d buttons, and press the SET/DISPLAY button. 6. Select the date type with the c / d buttons, and press the SET/DISPLAY button. Select the item's field with the e / f buttons and adjust the value for the date and time with the c / d buttons. The time is displayed in 24-hour format. After confirming all settings are correct, press the SET/DISPLAY button. 7. To exit from the [Setup] menu, press the MENU button. Setup Beep On Date/Time Next Menu Language English Fr.No.Reset Next Menu LCD Bright. 0 Auto Off 3 Min. MENU:Exit SET:Adj. Date/Time Setup 2008 / 01 / 01 00 : 00 MENU:Exit SET:Enter EN-16
-
 1
1 -
2
-
3
-
4
-
5
-
6
-
7
-
8
-
9
-
10
-
11
-
 12
12 -
 13
13 -
 14
14 -
 15
15 -
 16
16 -
 17
17 -
 18
18 -
 19
19 -
 20
20 -
 21
21 -
 22
22 -
23
-
24
-
25
-
26
-
27
-
28
-
29
-
30
-
31
-
32
-
33
-
34
-
35
-
36
-
37
-
38
-
39
-
40
-
41
-
42
 |
 |