Schwinn IC3 Indoor Cycling Bike Quick Start Manual - Page 10
Changing Unit Measures English Imperial/Metric
 |
View all Schwinn IC3 Indoor Cycling Bike manuals
Add to My Manuals
Save this manual to your list of manuals |
Page 10 highlights
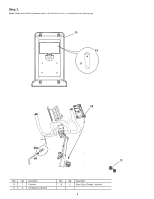
If the body weight of a user is very low, the user may have difficulty with operation of the engagement/release mechanism in the Pedals. It may be necessary to decrease the retention force of the mechanism. To adjust the retention: 1. Locate the opening in the rear of the Pedal for access to the adjustment bolt. It is between the 2 screws that attach the Foot Restraint to the Pedal. 2. Use a 3mm hex key to turn the adjustment bolt. To decrease the retention, turn it left (counterclockwise). To increase the retention, turn it right (clockwise). - + Handlebar Adjustment To adjust the handlebar position: 1. Loosen and pull the Handlebar Post Adjustment Knob on the Handlebar Post. Adjust the Handlebar to the desired height. Do not lift the Handlebar Post above the "STOP" mark on the Handlebar Post. 2. Tighten the Handlebar Post Adjustment Knob to engage the locking pin. Be sure that the pin is fully engaged and fully tighten the adjustment knob. NOTICE: Do not crimp the cables. 3. To move the Handlebar closer to, or away from the console, loosen the Handlebar Adjustment Knob. Slide the Handlebar to the desired position and fully tighten the knob. Note: If the handle cannot turn due to contact with another part, pull the handle, turn and push it back in to reposition it. Continue turning as needed. Locking the Flywheel/Storage When the machine is not in use, be sure to lock the Flywheel with the Brake/Resistance Adjustment Knob. The flywheel should be locked for storage of the machine. For safe storage of the machine, remove the batteries and fully tighten the Brake/Resistance Adjustment Knob to secure the Flywheel. Place the machine in a secure location away from children and pets. To lock the Flywheel, fully tighten the Brake/Resistance Adjustment Knob to prevent movement of the Flywheel and Pedals. Power-Up Mode The Console will enter Power-Up Mode if any button is pushed, or if it receives a signal from the RPM sensor as a result of pedaling. Note: The Console display will dim if the battery level is 25% or less. Auto Shut-Off (Sleep Mode) If the Console does not receive any input in approximately 4 minutes, it will automatically shut off. The LCD display is off while in Sleep Mode. Note: The Console does not have an On/Off switch. Changing Unit Measures (English Imperial/Metric) The default distance unit is kilometers (K). You can switch units between kilometers and miles before you start a workout, or after you reset the Console. To change the units, push UP and DOWN together and hold 3 seconds. When the display begins to blink, use the arrow button to change the units (K or M). Press any key to save. 10
-
 1
1 -
2
-
3
-
4
-
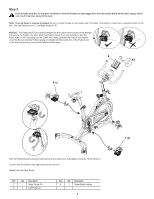 5
5 -
 6
6 -
 7
7 -
 8
8 -
 9
9 -
 10
10 -
 11
11 -
 12
12
 |
 |
