Sealey E/START1100 Instruction Manual - Page 3
fig.11, fig.10
 |
View all Sealey E/START1100 manuals
Add to My Manuals
Save this manual to your list of manuals |
Page 3 highlights
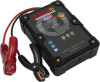
5.5. BYPASS MODE 5.5.1. In some situations the E/START may fail to start the car because the vehicle's battery is too weak. Press ON/OFF for a few seconds to activate Bypass MODE. 5.5.2. After the ignition sign, fig.3 appears, turn on the engine as soon as possible. 5.6. PRE-CHARGE MODE 5.6.1. If the battery is too weak to charge the E/START, fig.7 will appear. 5.6.2. Connect the E/START to a good battery until the unit is fully charged, then remove. 5.6.3. Connect the E/START to the weak battery, the display shows the voltage in that battery. 5.6.4.. Press the ON/OFF switch to activate. Fig.3 is now displayed. 5.6.5. Turn the engine on. 5.6.6. Remove the unit as soon as the engine fires. 5.7. ALTERNATIVE CHARGING METHODS In addition to using a 12V battery, as in 5.6.2., three additional charging methods may be used: 1) The E/START2A Digital ElectroStart Smart Charger Adaptor 15V 2A, (not supplied, available as an accessory). 2) A 5V USB lead (not supplied). 3) A 12V pin jack lead from a vehicle accessory socket (supplied). The USB and pin jack sockets are located under a rubber flap in the base of the E/START unit. 5.8. OVERRIDE MODE 5.8.1. If the pre-charge mode fails, use the override mode. 5.8.2. Charge the E/START as in 5.6.2./5.7. 5.8.3. Connect E/START to the vehicle with the battery lead disconnected from the battery, POSITIVE E/START lead connected to VEHICLE BATTERY POSITIVE lead, see fig.10. fig.10 5.8.4. 5.8.5. 5.8.6. Press the ON/OFF for a few seconds to activate OVERRIDE MODE. Turn on the engine. Put the POSITIVE E/START LEAD and VEHICLE BATTERY POSITIVE onto the BATTERY POSITIVE TERMINAL. Remove the E/START's POSITIVE lead after it is fastened to the battery terminal, see fig.11. fig.11 5.9. 5.9.1. 5.9.2. 5.9.3. WARNING: DO NOT leave the engine running without the E/START or battery being connected securely. WARNING: Make sure that the terminals are not cross connected: there is no cross connection protection in the Override Mode. GLOW MODE (Only use if the glow plug symbol appears on the vehicle instrument panel). In cold weather the glow plugs in most diesel vehicles will be first energised to heat up the engine before it is started, as indicated by a symbol on the instrument panel. If this is the case, after the E/START is fully recharged and connected to the vehicle, press GLOW button and turn on the ignition. When the glow light on dashboard goes out, start the vehicle. NOTE: GLOW is deactivated in OVERRIDE mode (5.8 above). © Jack Sealey Limited Original Language Version E/START1100.V2 Issue: 2 - 01/02/19
-
 1
1 -
 2
2 -
 3
3 -
 4
4
 |
 |
